Layout Diary & Description of Events
Until my layout is completed, this section will be constantly "under construction". This page is set up so that the newest information is at the top.
Layout Diary Archive: 1998 - 2005
Layout Diary Archive: 2006 - 2014
Layout Diary Archive: 2016 - 2019
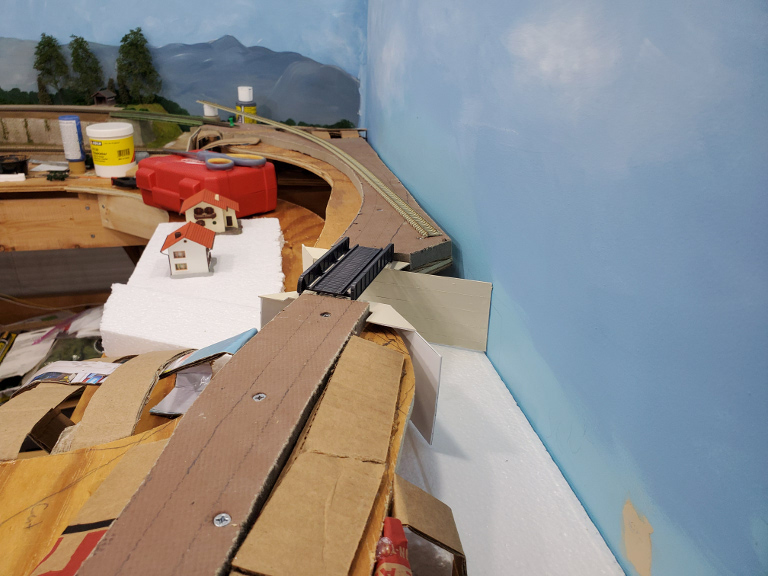
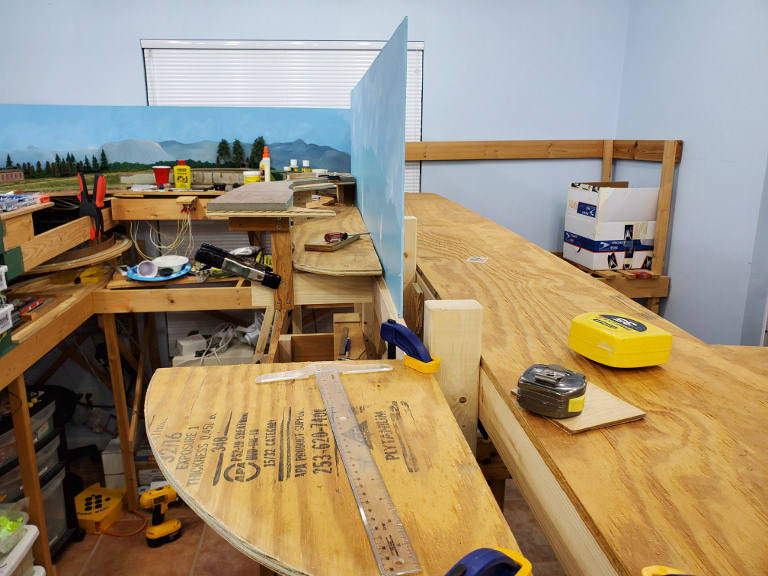
July 5, 2023 – Two Years Of Stop/Start
Progress - In One Entry!
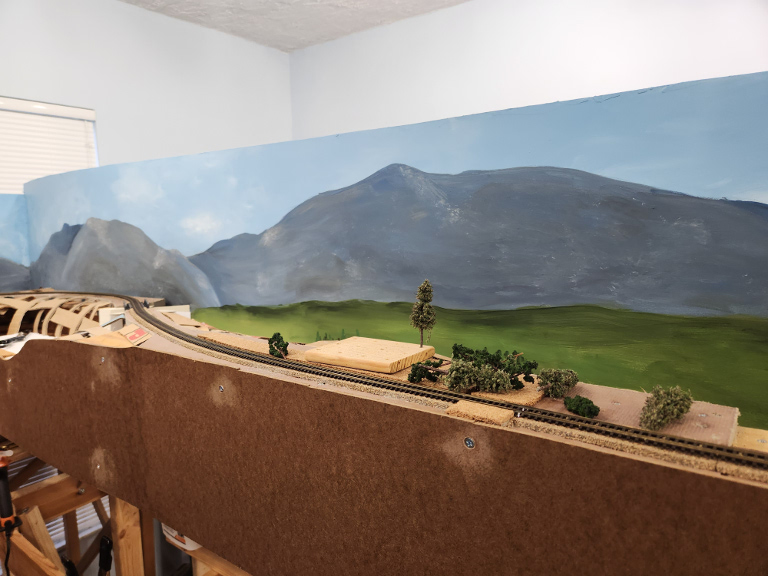
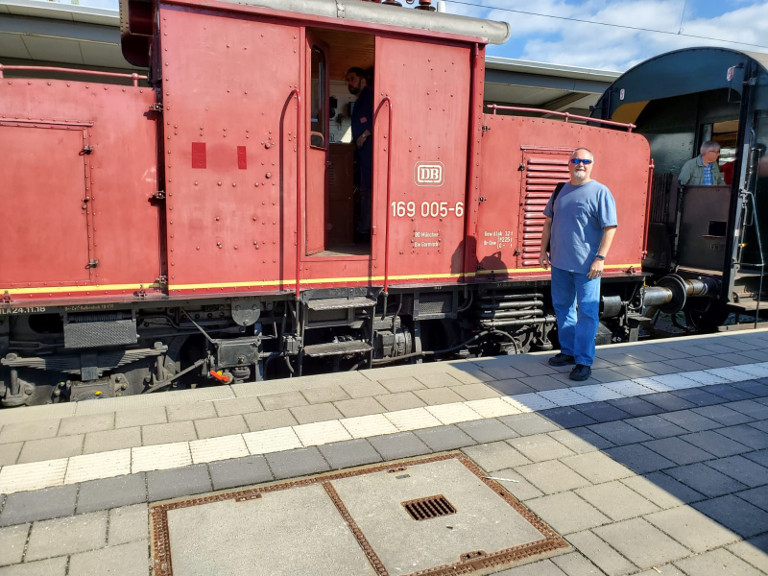
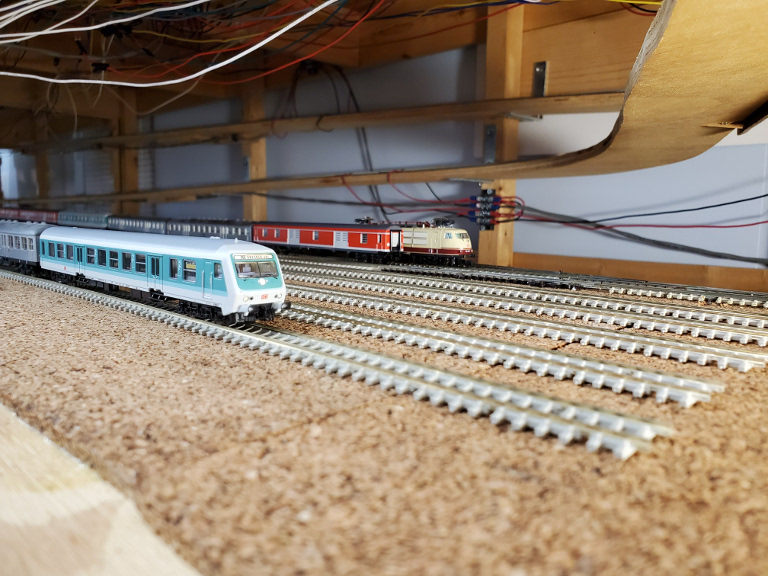
![]() (5 July 2023)
(5 July 2023)
I can't even begin to figure out when progress was made. However, based on the last photos, I'd say I've made at least SOME headway on the layout in the last couple of years!
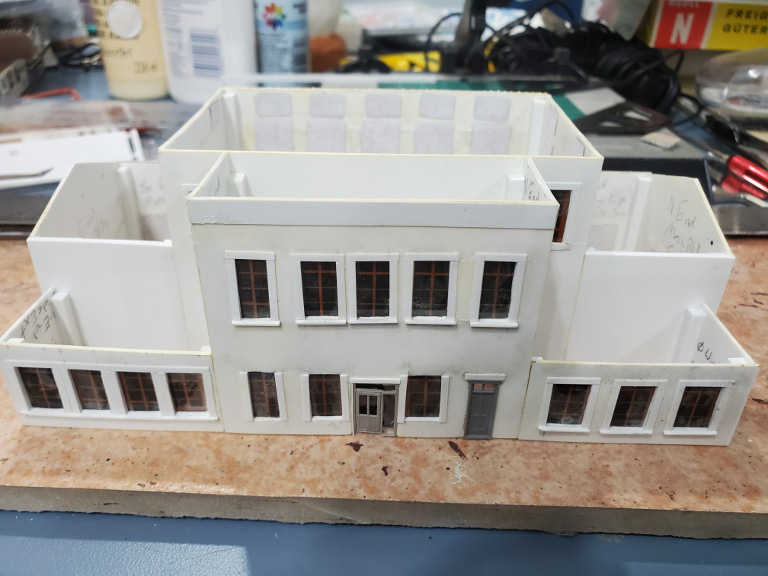
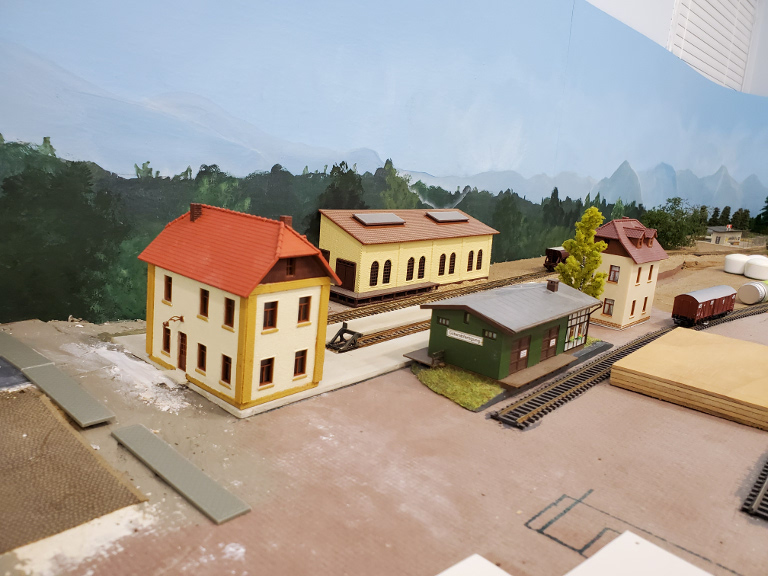
Quick update on the Murnau Bf building - it has roofs for the 2 wings, but not the main building. No photo below, unfortunately. Another quick update on the Lokalbahnhof. Buildings are all planted, and, for the most part, that area is complete. I need to do the sidewalk in front of the building, but that all goes with the work around the main station as well.
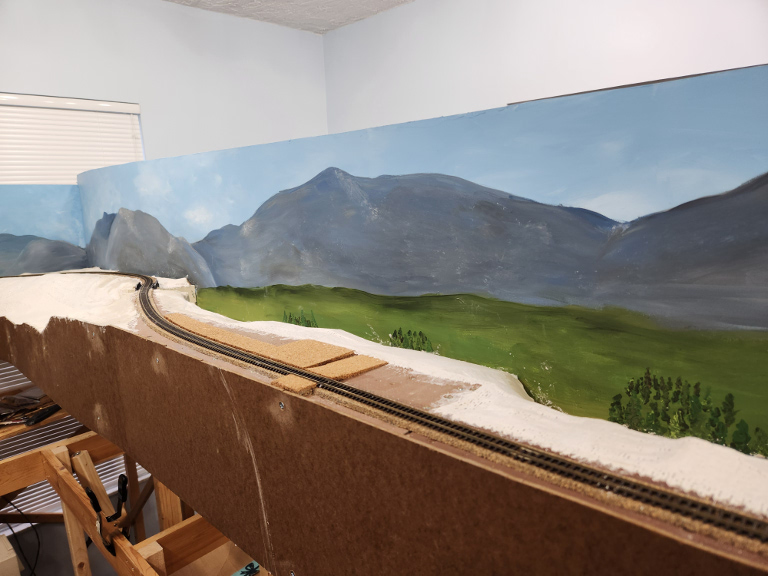
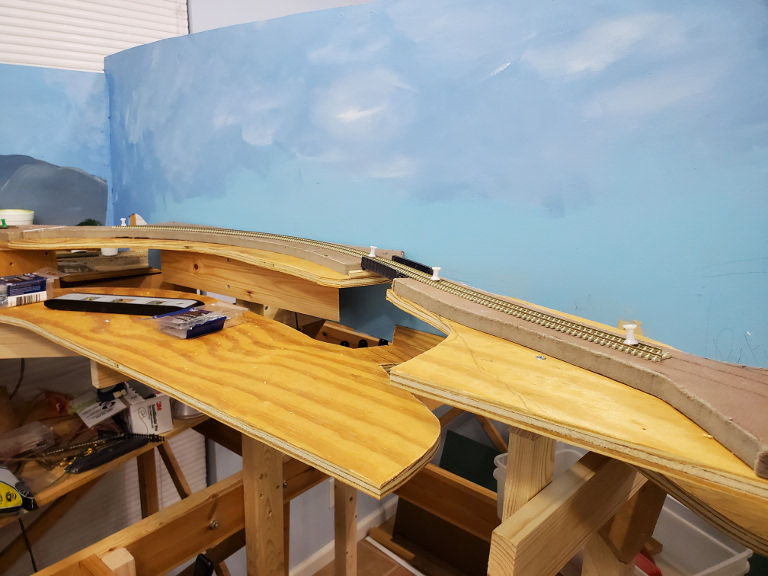
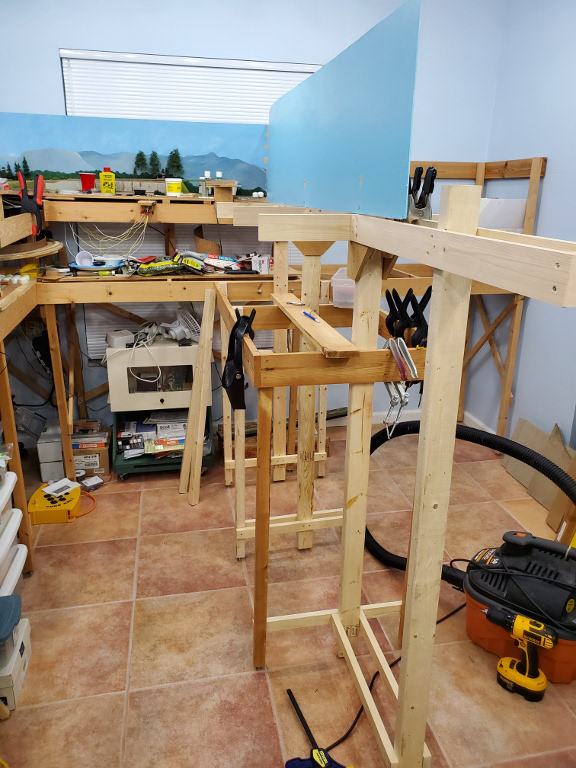
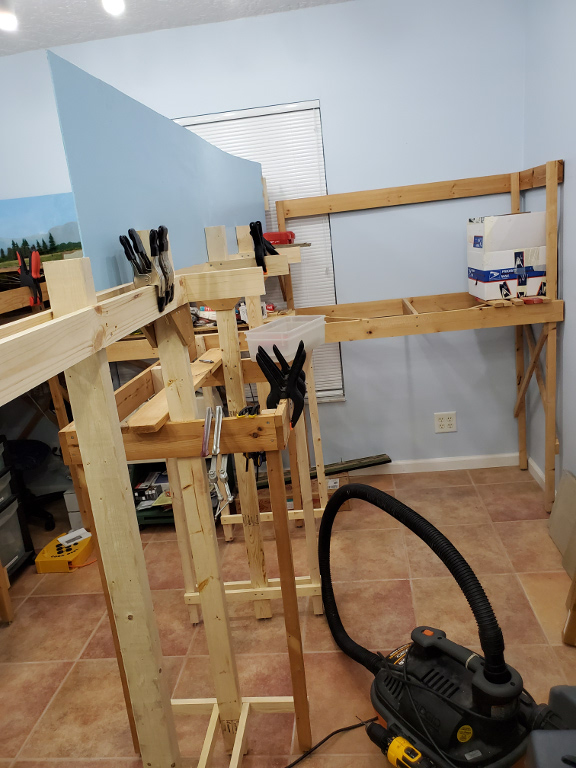
The branchline has been my primary focus. I've added the trackwork for Bad Kohlgrub, added a fascia and land forms along the side with Jägerhaus, and wired up the tracks and the Tortoise switch machines for the entire peninsula. (Tortoises still need power to operate them, however.) The photos below show this progress.
Next up, I'll probably continue working on the land forms - painting, grass, trees, ballasting, etc. I'll also add the fascia between Murnau Bf and Murnau Ort Hp, as well as continuing the fascia around the peninsula to Bad Kohlgrub. Before this, I need to fix the special switch I attached to the Tortoise to provide power to the dwarf signal for Track #5. I'm currently using Velcro to attach it to the Tortoise, but that is clearly not the long-term solution. So, I'll likely screw it to the Tortoise - while attempting to NOT destroy the parts inside the switch machine. Wish me luck!!
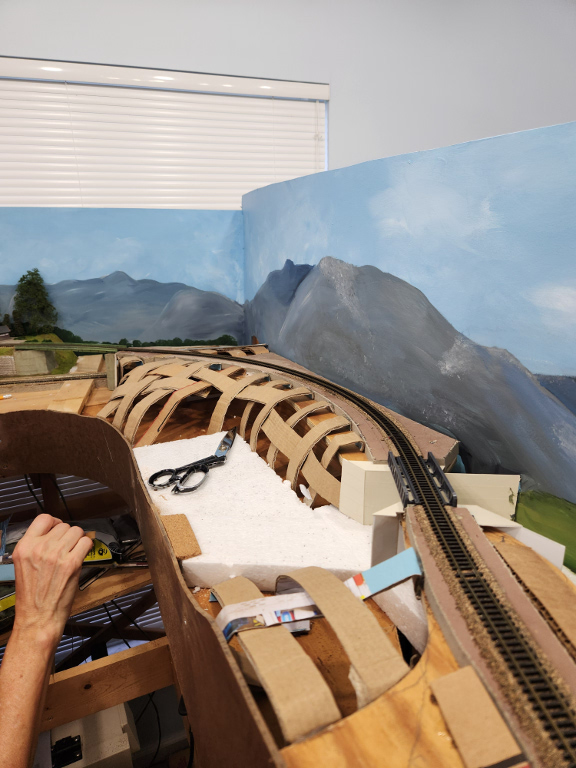 |
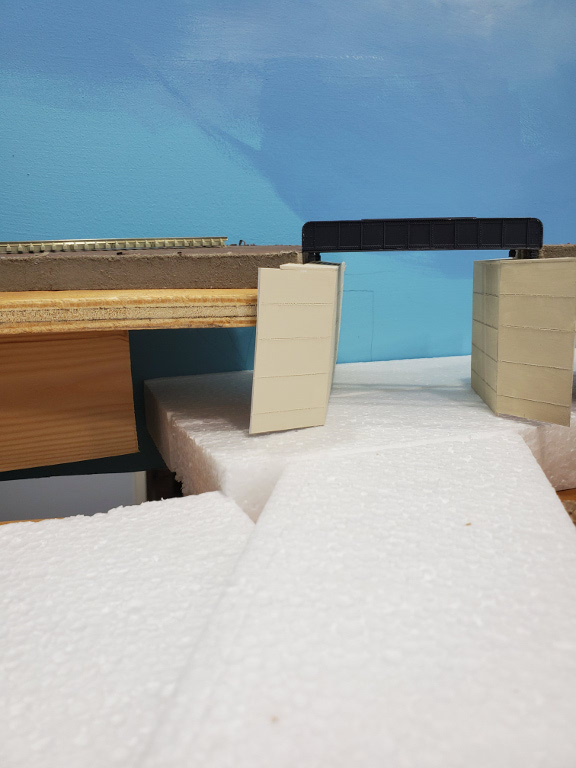
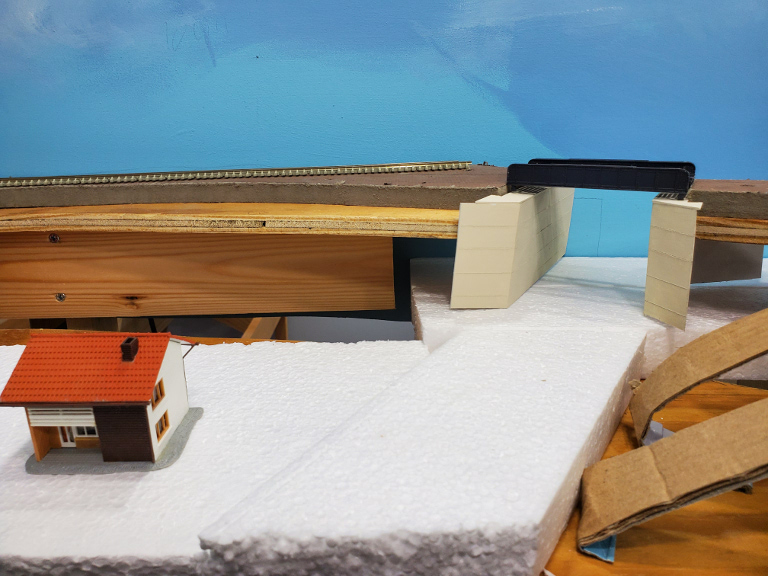
| With the bridge, abutment, and track in place, it was time to add the fascia so that we could attach some of the cardboard webbing to it. This is near the Jägerhaus Haltepunkt. |
 |
| The Bad Kohlgrub side of the peninsular. Trackwork, including wiring, for this station is complete. |
 |
| The webbing in complete. Time for some plaster cloth. Oh! Note the initial draft of the backdrop painting done by my wife! |
 |
| Land forms (mostly) done. The cork shown here is a small road next to the Jägerhaus Hp, including the platform. |
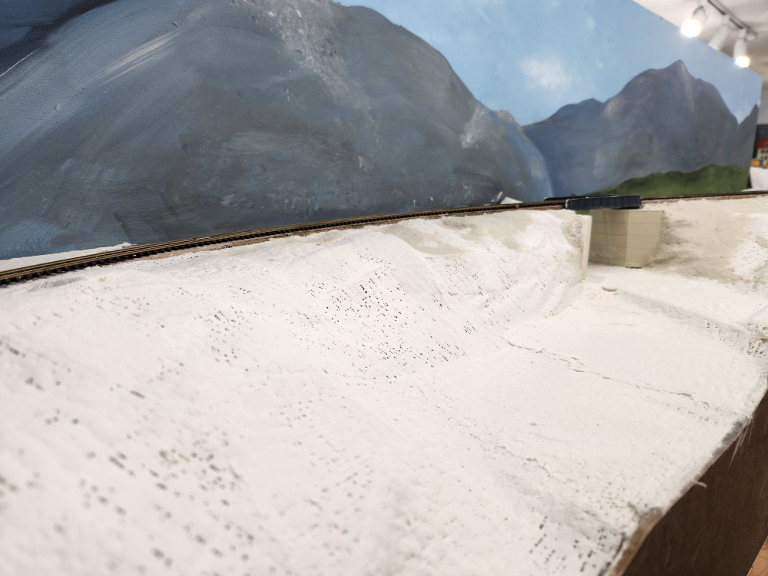 |
| A different angle of the land forms. It still needs some additional Hydracol - and maybe some plaster cloth (I ran out just as I was finishing up.). |
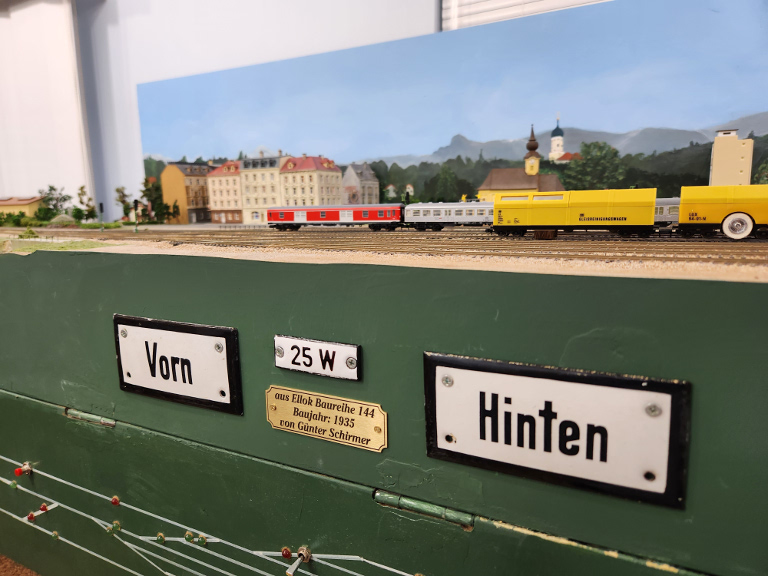 |
| This has nothing to do with my layout progress. However, I wanted to show some new additions to the layout. My dear friend, Günter Schirmer, passed away a few months ago (Decemer, 2022). His wife brought these to me, knowing that I was an Eisenbahn fan. These signs were taken off of a Class 144 electric locomotive from 1935! |
 |
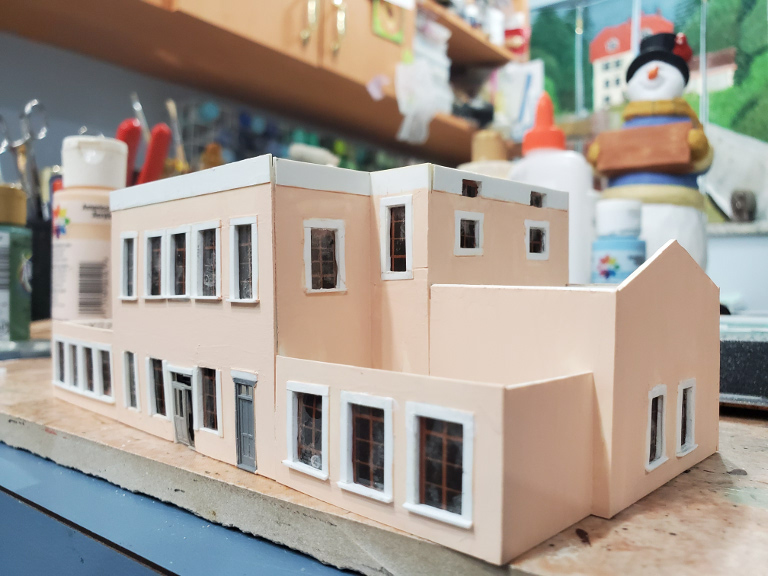
| More signs from Günter Schirmer. These are from a passenger car from 1930! Günter's father worked for the railway. He passed these along to Günter. I will forever cherish these gifts!! NOTE: You can see my scratch-built Murnau Bf building in the background (with the white roof seams). |
May 26, 2022 – A 100-Year Jubilee and
(FINALLY!) A Ride Behind An E69!
![]() (5 July 2023)
(5 July 2023)
We took a trip to Oberbayern specifically to celebrate the 100-Year Jubilee of the E69 04, which is a static monument just outside of the Murnau Bf. In order to get down to Murnau, we took a historic train from the München Ostbahnhof - complete with historic cars AND the E69 05!! It was a bucket list trip that allowed me to finally ride behind one of the E69s. I finally got to "meet" the E69 05 as well. The only E69 I haven't seen in person is the E69 03 - so, 4 out of 5. Oh, and we may have done a bunch of Alpine hiking and went to the Passion Play, too, while we were there. A bit if a railroading tie-in to the Passion Play. Through 1990s play, special trains would run on KBS 963 thoughout the "play season". It was stopped when all passing sidings, except for the one in Bad Kohlgrub, were pulled up. Well, I'm happy to report that I managed to ride a special train for the Passion Play! Yes, the last train of the night is advertised as, "Oberammergau nach München Hbf". I asked a conductor, and he confirmed that these are special trains for the Passion Play to make for a more seamless journey for those returning to München by train at the end of the night. Very cool!
Photos of my E69 adventure on Vatertag:
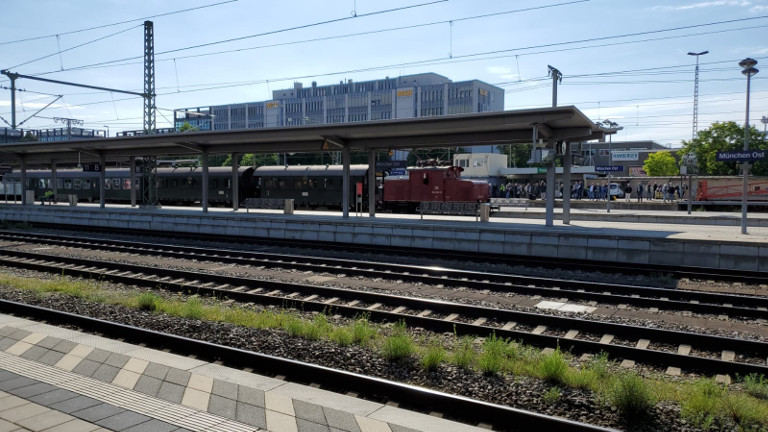 |
| This photo shows the historic train being pulled by the E69 05 pulling into the München Ostbahnhof. |
 |
| Me in front of the E69 05 at the München Ostbahnhof. |
 |
| The Personenwagen we'll be riding in down to Murnau Bf. I believe these cars were called "Donnerbuchse", or "Thunder Box" in English, because they were so loud to ride in. |
 |
| A close-up of the E69 05 in Murnau Bahnhof. The engineer is featured in several YouTube videos with the E69 05. So, it was pretty cool to see him! I'm not saying that I was "star-struck", but I did add him to the photo on purpose! |
 |
| A photo of the historic train in Murnau Bahnhof. |
 |
| The Bierwagen! Yes, it was used. And, yes, I had a Tegernseer Helles on the way down to Murnau. It's already a great beer, but the setting seemed to make it even tastier!! |
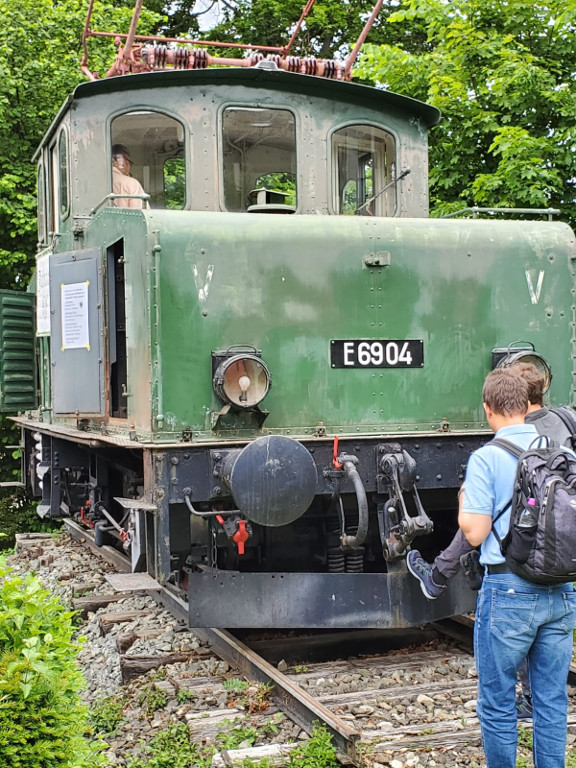 |
| And, finally, the E69 04 on its 100th birthday (or close enough). It was great to see all of the interest in this special trip and day. Its sounds like there are plans for a new location for the E69 04 - next to the old Lokalbahnhof building! It should look great there! |
September 25, 27, and October 1, 2, 9, 11, 2020 – Three Weeks Of Sputtering - A Wide Range Of Projects! (11 October 2020)
I wasn't really planning on it, but I took some time away from the layout in chunks of several days. I took a week off, did some work on the branchline, took another week off, and then restarted some scratch building. Who knows if I'll keep working or take another week off.
On September 25th and 27th (I think those were the dates - tough call), I spent time with a hot glue gun, some cardboard, and some beaded styrofoam. Using strips of cardboard and the hot glue gun, I created supports for the land forms that I'll be adding to the branchline between Murnau Ort and Jágerhaus. You create a web by weaving the cardboard strips together to create a fairly stable base to which I'll add plaster cloth. I used beaded styrofoam for the road base and for the base of a "neighborhood", consisting of two houses. I used beaded because we had several sheets left over from the kids' projects when they were in middle school. It was - either use it, or my wife was going to throw it out. I didn't need it to bear any weight, so why not use it?
Once I had a place for the two houses, it was time to pick the two that I wanted there. Instead of building new houses, I picked two that I had purchased at a local train show about 15 years ago. As I always have to do, I repainted and weathered these houses, so that they'd look presentable. Many of the older houses from Faller, Kibri, and Pola looked very toy-like. They were decent representations, but the colors were too bright, and they just exude, "Hey, look at me - I'm a plastic model house!". Change to muted house colors (mostly white, antique white, and dark brown) with a terracotta colored roof really seems to make even these models work! I also spent some time creating bridge abutments for the bridge that I just built. Scratch building these has really made it easy to create whatever arrangement I need - without worrying if an off-the-shelf abutment will fit the situation.
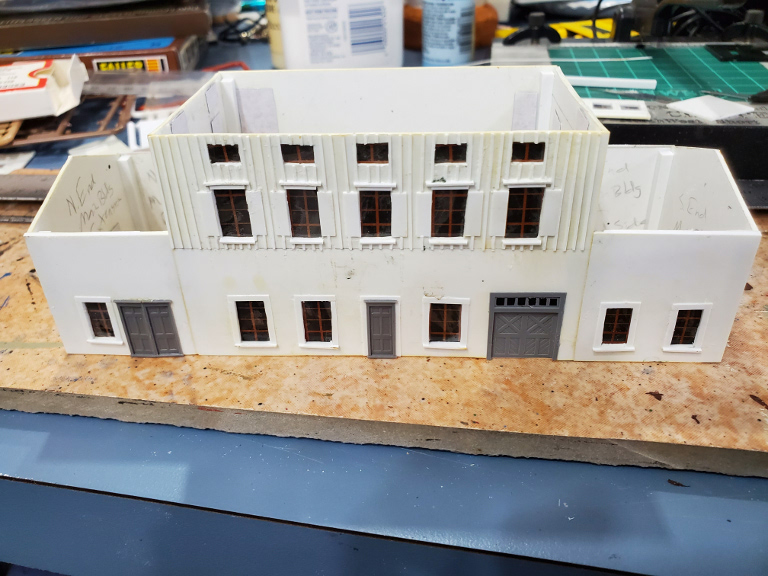
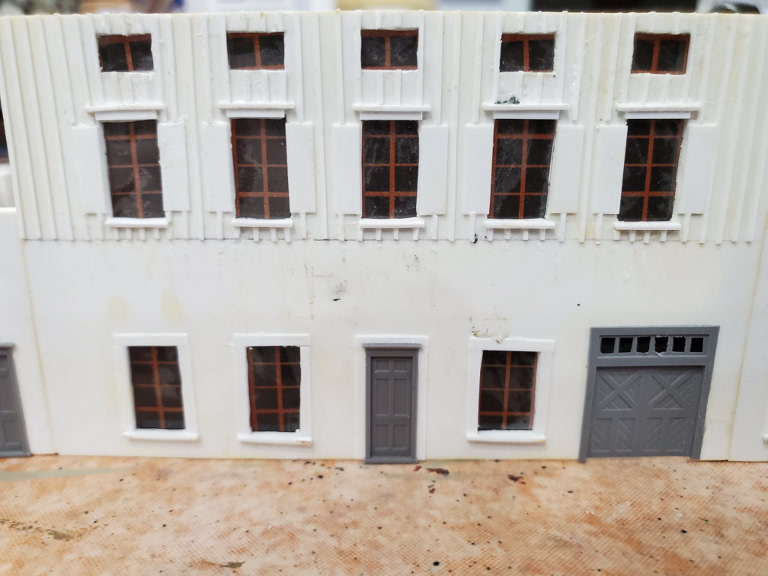
This weekend, I went back to work on my scratch building project for the Murnau Bahnhof main building. I hadn't touched this in about a decade! I felt it was time to finish it. The great news was that I had already done all of the truly hard work - cutting to exact measurements, adding window and door holes in the plastic, and adding details to the facades on the wall sections. Really, all that needed to be done was to assemble the pieces, paint it, and add the roof! I also needed to add the glazing and window details, but all of this was easy compared to what I had already done. I managed to assemble and paint the walls, and add the windows this weekend. So, in spite of not expecting to do much this weekend, I feel rather accomplished!
I took some photos of my progress. See? I'm getting better at progress photos, rather than waiting until I'm done!
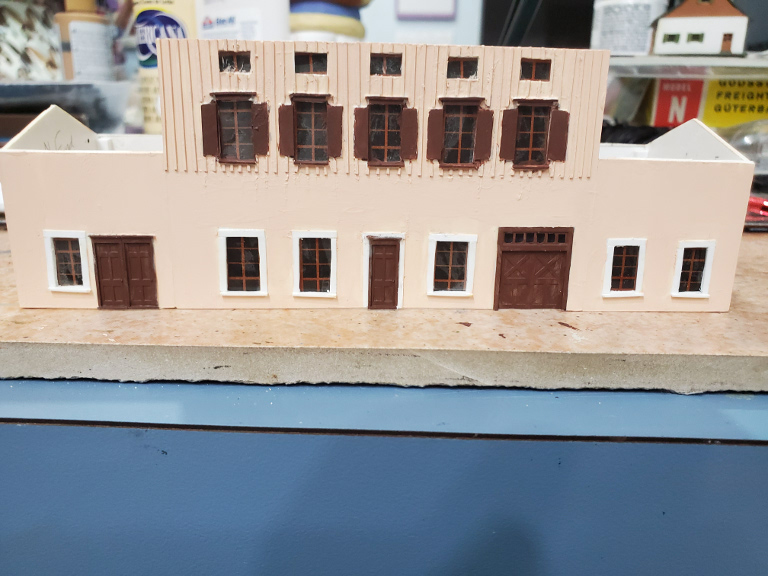
This photo shows the beaded styrofoam that I used for the road, which is thicker, plus the thinner piece to the left, where the houses will go. Also, you'll note my scratch build bridge abutments. I still need to weather them - and the bridge - but that's the general look of this scene. A wider view of the scene. Here is one of the houses that I spruced up. You can also see some of the cardboard strips that will be the base for the plaster cloth that will be the base of the scenery in this area. A view along the stretch of the line between Murnau Ort (with the 3 big trees in the distance) and Jägerhaus. This photo was take above, and just a tad ahead, of Jägerhaus. Murnau Bahnhof (sans roof and paint) as seen from the street side. I had just assembled all 17 wall sections, and thought it was time for a "progress photo". Murnau Bahnhof - trackside view. The second floor took significant time to create. Lots of windows, many with shutters, plus the different siding (not sure what you call it) - all built from plain styrene. The only pre-made parts are the 3 doors you see, plus the 2 doors on the other side. A close-up view from trackside. So, I created the window lattice work on the computer and printed them out. I didn't get some of these as straight as I would've liked, but I think they work. Initial paint job for Murnau Bahnhof - street side. I'll probably need to do some touch ups, but this is a good indication of how the final building will look. And, here's the tackside view of the building with paint. The platform cover will extend out over the platform from about where the siding ends on the second floor. That cover will be a whole project by itself!! It will also need a sister cover for the island platform - between Tracks 2 and 3.
September 13, 14, 15, 17, 18, 2020 – Laying (And Cutting) Some Wood To Jägerhaus, Plus A Lokalbahnhof Is Born! (19 September 2020)
I spent Sunday putting together a couple of buildings that will be used for the Lokalbahnhof. These include the main station building and also a bunkhouse. I also modified the base of a warehouse that I'll also be using in that area. I finally bought a restroom (WC) on eBay that looks like a great stand-in for the one next to the main building in the Murnau Bahnhof. I've been adding any of these models that I find on eBay to my Watch List. Unfortunately, after 3 years, I still hadn't seen what I would call a bargain. So, I broke down and bought one, anyway. It was nice to be able to sit at my workbench, again!
Monday was spent mostly outside cutting wood. I cut the sections from Murnau Ort to Jägerhaus, and on to Bad Kohlgrub. This represents the entire upper level for the peninsula. The next day, I cut the section that includes Jägerhaus, "cookie-cutter" style, as there are some elevation changes, including a valley. I also cut the homasote for the track bed and built a bridge where the highway goes under the tracks. I screwed down these pieces, and I think it looks pretty good. I'm going to have to raise the "valley" piece a bit, as it's a little too deep.
It was back to model building on Thursday and Friday. I significantly modified the bigger of the two buildings that I had built on Sunday. It now looks like a reasonable facsimile of the Lokalbahnhof - complete with yellow bricks as accents around the edges. Originally, I was going to just use it as a stand-in. Now, I can't see a scratchbuilding project at any time in the future - maybe a decade from now, when everything else is complete! The WC for the main station showed up, so I built that as well. It looks like it'll fit perfectly.
I decided it was time for some progress pics. I don't do enough of these, and I really enjoy seeing the progress in photos - both on my layout and other people's layout. So, I need to get better at doing this.
 |
| View of the Murnau Lokalbahnhof from what will eventually be the main Murnau Bahnhof. |
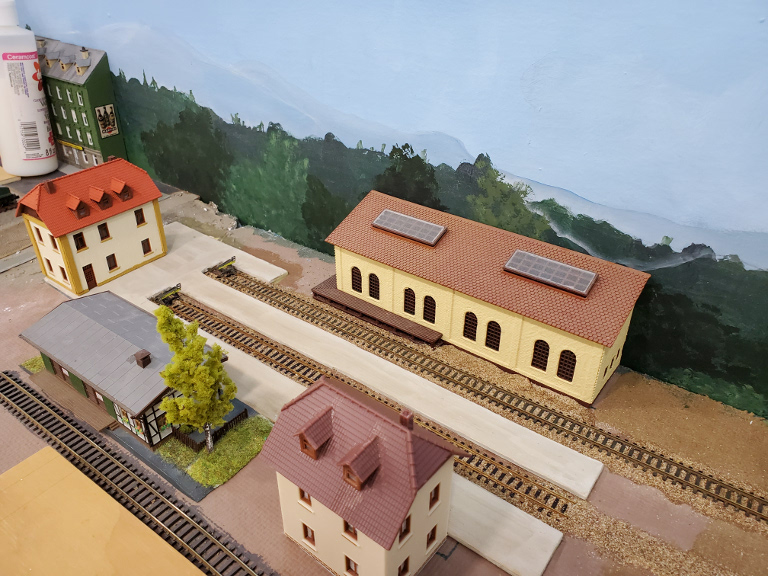 |
| A bit of a mock-up of the Lokalbahnhof in Murnau. These are the buildings that will be used, and their locations. Note the modified building at the head of the platform. This building used to look exactly like the building at the bottom of the photo, except that it is slightly larger. I re-painted it and added the yellow brick accents. Later, I added shutters to the top windows. All of these buildings will be getting some weathering, and other details will be added to complete this scene. Note the track that has been abandoned/disconnected. I added the ballast to represent the roadbed where the track used to be. |
 |
| A view of the peninsula with the cut wood. The left side is where Jägerhouse will be located. The right side will have Bad Kohlgrub. It will also be higher, and pushed in by 3" (over the 2"x3" pillars). The left side has been cut, "cookie-cutter" style. |
 |
| A better view of the left side of the peninsula to better show the "cookie-cutter" cuts that I made. The lower section needs to be raised more steeply, and the road that goes under the bridge will need to be raised, so that it won't look so strange going under the tracks at such a height difference. |
September 10, 11, 2020 – A Final LED Wired, Some Scenery, And Some Spring Cleaning In September (12 September 2020)
The last couple of days were spent messing around on several projects. On Thursday, I managed to wire the final LED in the control panel for Staging. With the exception of the block signal for Murnau Ort that I'm still waiting on, I can call all wiring complete on this entire side of the layout. I also did some ballasting on the track that lead to the old Lokalbahn Bahnhof, near the back of the layout in Murnau. After doing that, I realized that I really needed to create the platforms for that section. Back in the days of the Lokalbahn AG, this was the station in Murnau for the Murnau-Oberammergau line. Trains on this line rarely ventured onto the Deutsche Bundesbahn tracks. Freight exchanges, possibly power transfers for major repairs, and special trains (Passion Play, skiing, etc.) were the only need for the connecting tracks. So, I made the measurements and drew them onto a piece of 1/8" plywood.
Friday was a busy day in the hobby room. After cutting out the Lokalbahn platform, I covered it in Durham's Water Putty, to give it a look of concrete. While that dried, I installed the buffers at the end of the two tracks that made up the Lokalbahn Bahnhof, and added some more ballast. One set of tracks isn't active, and isn't connected to the rest of the tracks. So, I also added a roadbed of ballast to indicate where the track had gone, prior to being torn up. After I was done with this, it was time to head back to the platform. I sanded down the putty and added some weathering to the platform before using wood glue to install it. I added weights and let it dry. Later, I had to come back and re-glue a small section at the back of the layout that didn't take hold. More glue and even more weights were added and left to dry/cure overnight.
With that done, I started thinking about all of the little projects that I need to take on to truly complete the town of Murnau, and move onto work on the branchline. So, I made a lengthy list of projects. I put each project into one of 4 categories - Scenery, Wiring, Construction, and Side Projects. (I also had a "DCC Installs" category, but a good chunk of those will be farmed out to professionals.) It became obvious to me that the main thing that I needed to get done in Murnau was constructing buildings - including the scratch-built main station building, so that I could get the scenery completed from the back up to the station tracks. I took one look at my work area and realized that would be impossible without a major cleaning project! So, I spent the rest of the night doing just that! I'm happy to report that I found my work area under the massive pile of paper, parts, tools, scenic materials, and dust! And, now, the dust is (mostly) gone, papers and tools are organized, and I have a proper space to construct some buildings. I really should've taken before/after photos to show just how bad it was.
Now I'm all set. I can head outside to cut some plywood for the sub-roadbed for the branchline, I can lay down some scenery in Murnau, or I can head to my workbench and work on some buildings! Maybe tomorrow I'll do a little bit of all three - hey, stuff has to dry, right?!?!
September 1, 3, 4, 6, 7, 9, 2020 – Extra! Extra! As In Extra Progress And Extra Frustration! (9 September 2020)
With my wire order taking days longer than expected, I decided to turn my sights fully on building up the second tier of the peninsula. This second tier will hold the Haltepunkt, Jägerhaus, and the midpoint Bahnhof, Bad Kohlgrub. On Tuesday (Sep. 1), I remembered that I'd need to had to Lowe's or Home Depot for some lumber and a few other items. So, instead of venturing out, I did some ballasting around a few catenary masts that I had noticed were bare. I did that and ran all of my cars from Murnau Bf down into Staging in the form of several long trains. It was fun to be able to do this without the "five-fingered crane". It actually took a while, but Murnau Bf is now (mostly) clear of cars and locomotives. So, when I don't have the wood or electronics supplies that I need to work on the peninsula, I can work on finishing up the scenery in Murnau. I still need to construct my scratchbuilt station building - I have cut out most of the parts.
I finally made it to the local DIYs to grab some lumber (and a new pair of hardwire nippers!) on Thursday. Once I got home, I started cutting wood and building new benchwork. The first thing that was needed was a central pillar - made from 2"x3" boards. I added 1"x2" braces at the bottom (which will double as ledges for shelves) and 1"x3" cross brackets. I created bracing pieces made from 1/2" plywood pieces. I got a lot of this done on Thursday and Friday (Sep. 3 & 4). On Friday, even my mother-in-law, who was visiting for the weekend, helped out! Wood these days is not as straight and true as it was in the early 21st century - and it showed. I was checking everything with a level, measuring and re-measuring distances....and, still, there were places that were skewed. I finally realized that it was the wood. It was very frustrating, but I took solace in the fact that it was the wood and not my methods. And, yes, on my second trip out for lumber, I could fine no perfectly straight pieces - and I spent 20 minutes looking for only two pieces! So, it wasn't like I didn't give it the ol' college try.
As mentioned above, I had to make another trip to Lowe's on Tuesday (Sep. 8) for a couple of more pieces of wood - and screws! I ran out of screws! Like the title of the entry below says - it's always something!!! Today, I added the backdrop for the top section on this part of the layout of the layout. This was a huge pain, because it was an 8ft. secition, and it wasn't bending like I wanted it to. After lots of cussing and a couple of extra cuts, I think I have something that will be acceptable. Now, I need to provide my wife with some guidance s to what needs to be on them.
The wire came today for that final LED in the Staging control panel. I may take care of that tomorrow, plus do a little scenery work behind Murnau Bf. What I really need to do is cut some plywood for the upper level of the peninsula. I may do some of that as well. It all depends on how the job search goes. If there aren't a lot of new opportunities, I may knock off early and head to the hobby room. Here are a couple of photos of my progress.
|
|
|
The left side of the peninsula. The top level will have the Haltepunkt, Jägerhaus, which is on the branchline, and the bottom level will have Eschenlohe Bf, which is on the mainline. |
|
|
|
|
|
The right side of the peninsula. The top level will have Bad Kohlgrub Bf, which is on the branchline, and the bottom level will have the tracks to Hartsteinwerk Werdenfels, which is a long, industrial spur coming out of Eschenlohe Bf. |
|
|
August 28, 30, 2020 – It's Always Something - First Spade Connectors, Now Wire! (30 August 2020)
I had a bit of good luck - my order of spade connectors came in on Friday instead of Saturday. This was huge, because I knew that I wouldn't be working on the railroad on Saturday. So, I was able to take full advantage of Friday afternoon and evening, wiring up all of the track and turnouts on the far end of Staging. I wired up all of the power and about 2/3 of the logic for the control panel LEDs. I ran the first train all the way through Staging and onto the track that will eventually lead to Eschenlohe! (Actually, my wife ran the train, as I checked for issues.) I have two troublesome turnouts that I'll need to tune up. I also had 4-5 piano wire levers for the turnouts that were sticking too far above the holes in the switch rods. These are very hard wires and require the use of a special nipper to cut them. Well, somewhere along the line, the tip of my special nipper met its match! I need to use the tip to cut these wires once they are installed, so that I can get close. On one of the wire levers, I couldn't seem to get a hold of it with the tip of the wire cutters. Upon closer inspection, I realized that part of the tip of the wire cutters was missing - broken off! So, now, I need to go out and buy another one. Ugh...
On Sunday, I thought I was going to finish up the wiring of the LEDs for the control panel. I ended up being just 8 feet short of the wire color that I needed! Again - so close, but now have to wait for yet another order to arrive. I'm hoping this one shows up early as well! I decided to program the DS64 with all of the routes for Staging. This went incredibly smooth! Before long, I was pressing buttons and switching tracks all over the place! I brought down a cleaning train to clean the tracks for Garmisch-Partenkirchen. All was well - except for the 2 trouble-makers (turnouts). It was great to finally see locomotive traversing the tracks of Garmisch-Partenkirchen - and simply with the push of a button!!
I finished up the evening coming up with estimates on the amound and dimensions of the wood that I would need for the peninsula, which is next on my work list. I'm guessing that I'll be making a run to my local DIY at some point this week. It's taken years (decades!) to get to this point, but I can honestly say that the work done so far represents about 60-70% of the trackwork for the entire layout.
August 25, 26, 2020 – It Is What It Is - Wiring What I Can (26 August 2020)
I managed to get power, via the DS64s, to all 7 Tortoises. I also wired up any logic between the Tortoises - just not the wiring to the LEDs. Why? Because I need spade connectors!! Unfortunately, it looks like that order won't come until Saturday (August 29). So, I think the next thing I'll do will be to install the PR3 programmer and wire it up. I also need to solder together the straight sections where I connected the two parts of Staging. I determined that it would be too difficult to drop feeders for 12 sections of track with limited clearance! After that, I'll need to straighten out the tracks and then glue them down.
I did run a few trains down through the full length of Staging. I was able to switch the turnouts using my throttle, which was awesome! I even took two trains (one passenger, one freight) down to Staging, unhooked the locomotive, and ran it around to the other end of the train, and pulled the trains back to Murnau!! This is the first time I haven't had to back up in at least one direction. So cool! (Well, it was cool for me, anyway - I've only been waiting 20 years to do that!)
August 19, 20, 21, 2020 – I'm Wired! I'm Wired! I'm Not Wired! (21 August 2020)
Well, I was once again making great progress - right up until I ran out of spade connectors! But, let's start with Wednesday and Thursday evenings. I modified the seven Tortoise switch machines that I'd need under the seven new turnouts in Staging. I make modifications to the contacts so that there is less of a chance of a short when switching the polarity of the frogs on the turnouts. I use a set of contacts (usually pins 5, 6, 7) on the Tortoises to do this, and the area between pins 6 and 7 on the board is small. So, I just increase the "dead space" to ensure a momentary break.
Tonight, I started installing the Tortoises. I got the levers (made from piano wire) cut and formed, and then I headed under the layout. Hands down, the easier installations I've ever done for Tortoises! I was done in no time. So, I figured I'd start wiring them up. I had 3 of them wired for the frogs when I realized that I had run out of spade connectors! Noooooo!!!!! I need those to connect wire to the barriers strips, which is where the power comes from for the frogs. I made an order tonight, but I'll have to move onto something else. I can provide power via the DS64s, since neither connection requires the spade connectors. I can also wire up most of the logic for the turnouts - I just can't wire up the LEDs on the control panel.
During my wiring, I realized that the first turnout should probably be in the power district that runs from the south end of Murnau, through Hechendorf, Ohlstadt, and Eschenlohe, right up to Staging. This turnout, like most on my layout, is double gapped on both routes, providing the perfect power district separation point. I'll probably leave it for now, since I won't be going any further on that side of Staging for quite some time.
August 16, 17, 2020 – Getting Laid - All Tracks Are Down In Staging! (17 August 2020)
I'm as shocked as anyone - I got all tracks in Staging laid in the last 2 days!! I spent about 5 hours on Sunday and about 3 hours on Monday evening to accomplish this feat. Anyone who had dealt with plastic rail joiners, or even the metal ones, in N scale will know my pain. My fingers are sore, but the frustration level was an absolute minimum. This was a surprise, given the tight quarters and having to lean way in, in order to hook up the far tracks for Garmisch-Partenkirchen!
I sent 3 trains down to the finished tracks at the very end of Monday's session. I couldn't go through the turnouts because I don't have Tortoises mounted just yet - that's next on my agenda. Regardless, it was very cool to see the trains traverse the entire length of Staging - even without feeder wires for those tracks. I was relying totally on the metal rail joiners for power.
Backing up a bit, I started Sunday afternoon's session by taking the remaining piece of Staging and shaving off some excess plywood. I'm going to need all of the space I can get at the end of Staging, where my SD-1s and BD-1s are located in order to keep access to that panel. After that, I determined that I was going to have to install this piece and attach it to the rest of Staging before I installed the Tortoise switch machines. The clearances were just too tight to add another 3-4 inches to the height of this section. So, I went ahead and installed it and added a couple of barrier strips to hook track feeders to. Next, I cut the main bus wires from Staging to the the main controller so that I could incorporate the new barrier strips. After a quick test to ensure everything was working, it was time to lay some track - and that's all I did for the next 2 days.
Over the next several days (weeks?), I'll be installing Tortoises, wiring up the track feeders to the bus, wiring up the Tortoises (frog polarity, route logic, and power from the DS64s), adding the last of the LEDs to the control panel, and, finally, programming the final routes into the DS64s.
Here are a few photos of the finalized tracks in Staging. I may have to straighten a few of these....or, I may just leave it - as long as trains aren't scraping each other on adjacent tracks!
 |
| A Regionalbahn train at the far end of Track #5 in the München Hbf. Also shown is the tail end of another Regionalbahn (with a mail/baggage car) on the Hauptlinie (Mainline) and a BR 103 heading up a CityNightLine night train on Track #1 of Garmisch-Partenkirchen Bf. |
 |
| Photo taken from near the throat of the München Hbf, but from the spur tracks of Garmisch-Partenkirchen (Track #5 - Track #2, left to right). |
 |
| Photo taken at about the mid-point of Staging. You can barely see the tail end of the CNL train on the track to the left of the Regionalbahn train. |
 |
| A closer look at the 6-car Regionalbahn train, headed up by a BR 112. |
August 10, 11, 2020 – Cleanup On Track 1.....and Track2.....and Track 3......and..... (11 August 2020)
Mission accomplished! All pushbuttons are now wired - I did this on Monday afternoon. I spent a couple of hours on Tuesday cleaning the tracks that are wired up - GaPa Track #1, the Hauptlinie (Mainline), and MUC Track #1 through MUC Track #6, plus the Lok Track and the Programming Track. Why did it take a couple of hours? Well, I didn't do it by hand - I used 2 cleaning cars and my BR 112 locomotive. Yeah, I was playing around with the train and also basking in the fact that I could simply press a button to get the turnouts to align to the proper track, rather than going under the layout and manipulating the Tortoises by hand. After the first 4 tracks were cleaned, I also started running different trains down to those tracks as a way of testing. I had noted, previously (years ago!) that not all locomotive reacted the same way to these tracks. Back then, I had a clearance issue with one locomotive (BR 103?) with one of the rods that throws the switch - but only in the closed position. I had to nip the top of that rod off for smooth running. So, this time, I ran a BR 103, a BR 218, and the BR 112 that was used for cleaning. I ran them through all of the various track configurations - no issues found! Some of my trackage was uneven, but there were no derailments. Any of these issues could be fixed with a little filing. However, at this point I'm not worried. Besides, these minor issues are all located very close to the front - easy enough to get to.
I think I'm going to have to sink another wire for the frog on one of my spurs up in Murnau Bf. I seem to have a dead spot that no amount of cleaning was helping the situation. I pushed up on the green wire from below, and, suddenly, the locomotive started to move. Hmmmm.... I've seen this before, and this should be a fairly quick fix. Again, this is close to the front of the layout.
Next up will be to work on the other half (third?) of Staging. First, I'll need to trim some of the plywood for a better fit. After that, I'm going to install the Tortoise switch machines and wire up the frogs. I'd really like to get the block signal for Murnau Ort before I permanently install this section. I may try a test fit to see if I'll still be able to easily install the block signal with this section in place. If it doesn't cause issues, I'll continue on with permanently adding this section to Staging and finish up all of the wiring. That's probably a week or two away, so there is at least some time for that block signal to show up.
August 9, 2020 – Pushbuttons And Routes For München Hbf! (9 August 2020)
I took Saturday off to watch FC Bayern pound Chelsea and advance to the next round of the abbreviated Champions League. From here on out, it's single elimination, with Barcelona up next.
Sunday was a lazy day until about 2:30PM, when I finally headed out to the layout. Once there, things really started moving. I was able to wire all routes that have associated turnouts. This includes all tracks for München Hbf, plus the mainline and the through track (Track #1) for Garmisch-Partenkirchen. Oh, it also includes a programming track and what I'm calling a Lok Track, as I may store locomotive on it, with the ability to turn power on and off. I'm still not sure about my full intentions for that track, but that's where my head is, currently.
After getting the pushbuttons wired, I had a decision to make - push through and install the rest of the pushbuttons, or program some routes. I was getting pretty stiff from hours of sitting under the layout, so the route programming won out. I had a few glitches, and I apparently mis-wired (mis-numbered, actually) one of the pushbuttons. But, all-in-all, a fully successful round of programming.
I finally had a chance to try cascading routes. The Digitrax DS64s have 8 slots for each route. The first slot is usually the virtual "top address", so that one is wasted, leaving just 7 slots. If you reference the photo below, you'll note that there are 8 switches that need to be aligned in order to get to München Hbf Track #6 (MUC Track 6) or the Programming Track. Well, that's one more turnout than the 7 slots that I had. So, I created another route with the final 2 turnouts - the one to the Lok Track and the one that goes to either Track 6 or the Programming Track. My first attempt failed. I re-entered the values a few times before I finally went to the documentation It appeared that by setting the virtual top address to "thrown", rather than the usual "closed", the cascading routes would work. Well, I'm not sure if that was the actual resolution, but the 2 routes worked once I did this!!
I'm extremely happy with this progress. More importantly, I can't wait to send a cleaning train down all of those track without having to reach way under the layout and manually manipulate the Tortoises. I will definitely be running trains tomorrow!! I'll also likely finish wiring the remaining five pushbuttons. After that, I can't do anything more with this control panel until I get the other part of Staging installed. So, I'll be installing Tortoises on throat to the Garmisch-Partenkirchen portion of Staging for my next big project.
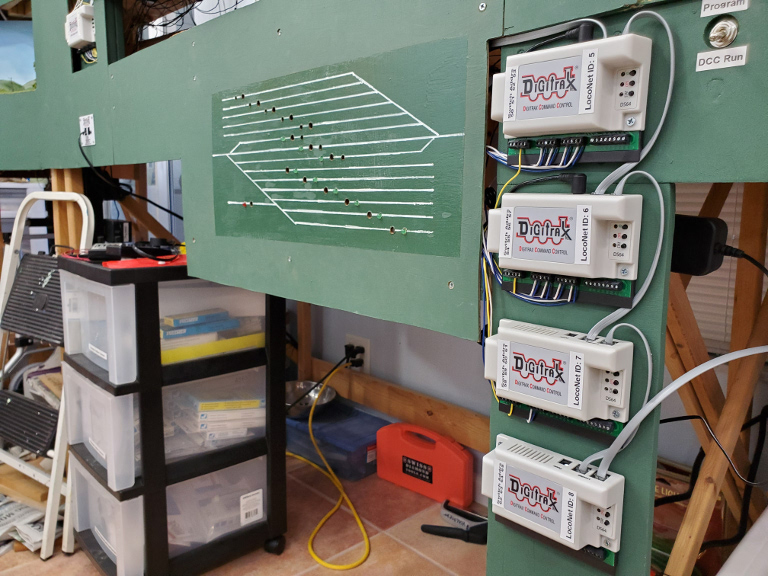
August 6, 7, 2020 – Tortoises Wired For München Hbf! (7 August 2020)
I spent the last couple of afternoons wiring up the 9 Tortoise switch machines to the DS64s for the München Hbf portion of Staging. I finished this up just before supper, today! Now I need to add the pushbuttons for the routes for this section of Staging, and then program the routes into the DS64s. After that, it'll be time to add Tortoises to the switches for the Garmisch-Partienkirchen portion of Staging, and then hook that piece of plywood and trackwork to the rest of Staging. I'm still waiting on the Block Signal for Murnau Ort. Once I have that, and install it, I should be able to "button up" the south end of Murnau Bf. Well, I'll still need to test the Staging tracks, to ensure there are no issues. After all, once I start adding the fascia, it will be difficult to get to some of the tracks in Staging to make adjustments! By the way, I also need to install the PR3. I may do that sooner than later. We'll see...
Here's a quick photo of the DS64s and the control panel:
 |
|
View of the control panel and the DS64s wired for 9 Tortoise switch machines. 7 more Tortoises to go! |
August 5, 2020 – DS64s Configured! (5 August 2020)
Just a quick update. I slipped into the hobby room for a little over an hour to configure the 4 DS64s that I had just mounted for Staging. I set up their IDs, the IDs of the turnouts that they will control, and also configured the DS64s for local input control (allowing the pushbuttons to control routes) and for slow motion switch machines (Tortoises). So, I'm all set to wire up the DS64s - to the pushbuttons and also to the Tortoises, themselves. Then, it'll be time to program the routes - at least for the München Hbf side. That means I'll get to try my hand at cascading routes for the first time! I'm sure I'll report on how that goes, once I've tried it.
August 3, 4, 2020 – I'm Wired! And So Is Half Of My Control Panel For Staging! (4 August 2020)
OK, so, maybe only half of the LEDs are wired for Staging - but I'll take it! I still need to add the pushbuttons, however. On Monday evening, I headed under the layout to add LEDs to the München Hbf portion of the control panel. Three hours later, all LEDs were wired and tested to ensure they were properly wired, based on the alignment of the Tortoise switch machines. This was the first big step that I've had in over 2 weeks!
Encouraged by my progress on Monday, I headed back out to the hobby room on Tuesday evening to see if I could make further progress. I started by making labels for the four DS64s that would control the 16 turnouts in Staging. Once that was done, I added the labels to the DS64s and mounted them to the layout. I then made some cables that connected the DS64s. Now it was time to put them on the LocoNet. That meant that I had to cut the cable between the DS64s that controlled the north and south ends of Murnau Bf. This proved to be slightly challenging. I had to completely replace the cable that ran from the north end to the Staging DS64s. Again, not a complex issue, but a bit time consuming. Once this was all done, I ran some trains to make sure the new cables were working properly back to the Command Station. I finished up around 10PM, so this was another solid 4 hours.
Next up, I'll need to add power supplies to the DS64s (easy enough), and then fully configure each of them (much more involved). Eventually, I'll need to add my PR3 (Digitrax's decoder programmer) just below the DS64s, but I don't want to mess with that just now. There is no room at that spot under that layout to set up the computer to do programming. And, while I'm not currently programming decoders, I've considered messing around a bit on a couple of locomotives. So, I want to keep my options open, for now.
August 2, 2020 – A New Power Supply, A Successful Test, And A Mounted Control Panel! (2 August 2020)
My shipment of wire, larger resistors, and a smaller power supply all came in on Friday. So, I headed out to the layout today to do some testing and drill some holes in my latest control panel. I had all of these new resistors that I had planned on testing. However, this weekend I realized that I would need all 4 DS64s for Staging - and that was just enough for all turnouts down there - including the locomotive and programming tracks. So, I wouldn't have any manually controlled turnouts, and, therefore, no need for the larger power supply. So, I replaced the burned up resistors with resistors of the same values and added the 6v DC power supply. It all worked! Cool!
With the testing shortened and out of the way, I turned my attention to the control panel, itself. I drilled holes for the LEDs and the pushbuttons. Once this was done, I mounted the panel onto the layout and started wiring up the LEDs. You can see in the second photo below that I have 3 LEDs wired up. I was able to test them by manually moving the Tortoise fulcrums. I also wired the power up the entire length of the München Hbf side of Staging, which includes the tracks closest to the front of the layout - and the bottom of the control panel.
This week, I hope to finish the wiring (and testing) of the LEDs on the München side of Staging. I need to order power supplies for the DS64s, before I can really do anything with them. I was lucky with the south side of Murnau Bf - I had already programmed those two DS64s, including their identity and the configuration settings. I need to start from scratch for the DS64s for Staging.
 |
| Here is an overall view of the new control panel for Staging. The spurs at the top represent Garmisch-Partenkirchen Bf. in the south. The spurs at the bottom represent the München Hbf in the north. The through tracks in the middle are (top to bottom) Garmisch-Partenkirchen Bf. Track #1, the mainline (Hauptlinie), and München Hbf. Track #1. |
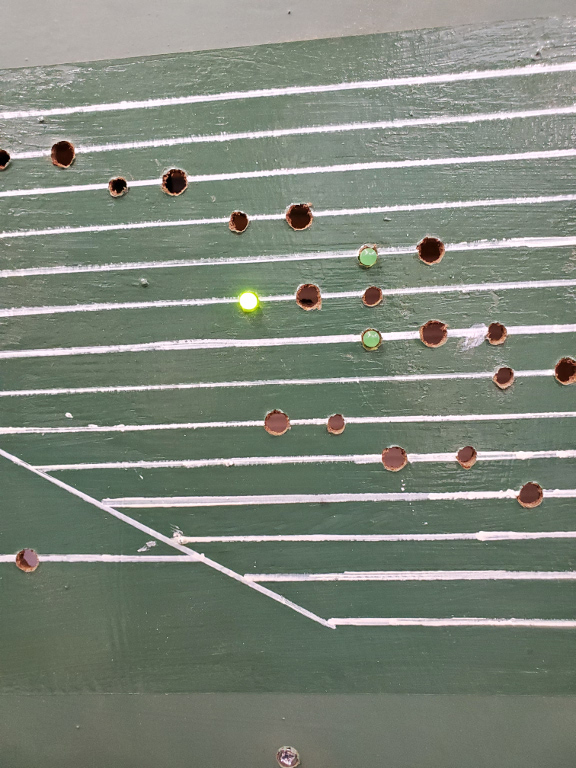 |
| Here is a close-up
image of the 3 LEDs that I've already installed. This indicates that
the turnouts on the left side are aligned for Garmisch-Partenkirchen
Bf. Track #1. The three through tracks will actually have 2 LEDs and
a pushbutton. The LEDs will both be lit, indicating that turnouts on
both sides are aligned for one of the through tracks. So, for the through tracks, there will be LED-Pushbutton-LED configurations. While the spurs will be LED-Pushbutton (Garmisch-Partenkirchen) or Pushbutton-LED (München). |
July 25, 29, 2020 – The Good, The Bad, And The Ugly - Why Testing Is So Important (29 July 2020)
I spent a few hours on the layout on Sunday, but most of it was just running trains. "Why was that?", you may ask. Well, I finished my testing with the LEDs very quickly, as everything became quite apparently with one test. I hooked up about 3 turnouts with the logic I'll be using for the LEDs to light up. The "good" news was, my logic works - the LEDs lit up when they were supposed to. The "bad" news was, I clearly have resistors with values that are way too small. The "ugly" news was that I found this out because the resistors started to smoke - and, possibly, started a brief fire!! I used what I had read on the Internet, which was the typical resistor for LEDs - 330 Ohms and 1/4 Watt. Well, I went back to do further research after my (partially) failed test. It turns out that any mention of power was always with a 9v battery. Well, my power supply is 30v DC!!! So, yeah, I either needed to get a smaller power supply (6v DC, in this case) or resistors with much larger values. I decided to order both. After thinking it over, I don't think I'll need the 30v power supply. I used these to power several Tortoise switch matches with manual DPDT switches. However, I think all Tortoises in Staging will be powered via 4 DS64s - which have their own power supply. More on this once my parts come in.
The rest of the evening was running trains. I even got out one of my DCC-equipped cab-cars, which are used in push-pull operation. Ever since the BR 141s took over for the BR 169s on the Oberammergau line, this line has nothing had push-pull operations for passenger service. I spent the rest of the night "stretching the legs" of some of my locomotives.
On Wednesday night, I placed white dots on the control panel, indicating where I will need to drill holes for the LEDs and push-buttons. I'll probably get to that this weekend. This was just a quick update, so still no photos.
July 19-21, 23, 24, 2020 – Working In One-Hour Chunks All Week - Control Panel Progress (25 July 2020)
I worked no more than 1 or 2 hours on several days this week, trying to get the control panel set up for Staging. I started by painting all pieces of tempered hardboard that I had cut out. I used my standard green that I've used on all fascias. After two coats, I taped off the area where the control panel will be for Staging. At the same time, I taped off a section between the north and south control panels for Murnau Bahnhof. I then lightly painted inside the perimeter of the tape in order to seal it. Once this had dried, I used a white paint pen to connect the tracks between these control panels. They were ready to be sealed with gloss coat. However, that would have to wait for another day.
I spent an evening drawing out the track plan for Staging on graph paper, so that I would have the measurements right for the real thing. This was probably the only 2-hour work session the entire week - and it was done in front of the TV!
On another day, I spent about an hour and a half with the white paint pen, adding the track plan for the Staging control panel. After letting this dry for a good amount of time, I sealed this, and the area between the control panels for Murnau Bahnhof with gloss coat. I let these dry over night before I peeled the tape away.
On Friday, I started working on wiring up the turnouts for the LEDs that will show which track is active. I am taking a different approach to this than I used for the other control panels. I'm using a set of contacts on the Tortoises, rather than hooking into the power lines to the switch machines. I'm running the positive (+) power lines through these contacts, which will connect to a resistor before being soldered to the anode side of an LED. The cathode side will be wired directly to the negative (-) power lines. The idea is that the positive power will only reach an LED for the track that is aligned. I'll be doing this for the north end and the south end of staging, independently. So, there will be 2 LEDs lit at all times - one for each side. If one of the 3 lines that go fully through Staging is selected, it will have 2 LEDs lit. Otherwise, there will be a stub-ended spur lit for each side. I'll have photos of this, once I'm done - in case this sounds confusing.
So, for wiring, I've started on the north end (since the south end isn't installed yet!), and I'll do some tests with just the LEDs before I start drilling holes into the control panel. I want' to make sure this works before doing that, because if is doesn't work, I can always go back to my tried and true method.
Speaking of photos - none for this installment, as I had hoped. Depending on how things go in the coming days, I'll try to take some pics of how things are progressing.
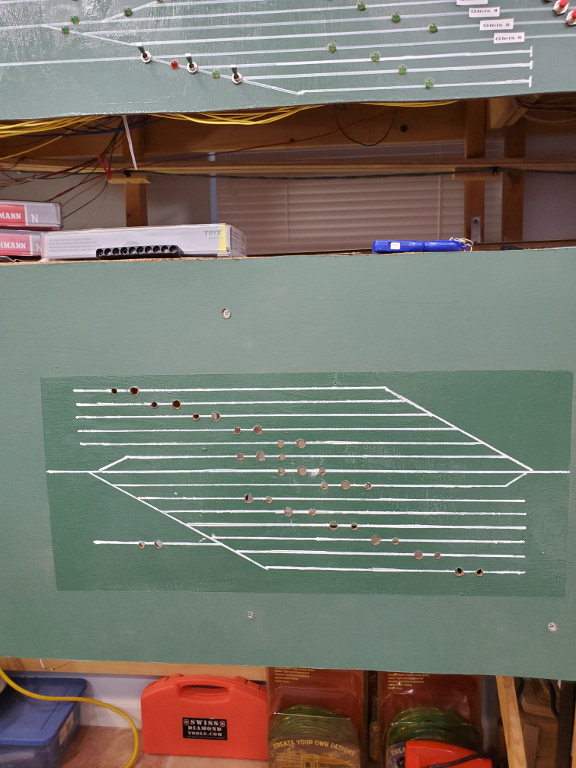
July 16, 17, 2020 – Control Panels And Fascias And Guard Rails - Fun With Tempered Hardboard (17 July 2020)
I spent a couple of hours on Thursday messing around the layout. I cleaned up, and then added a wooden frame for the next control panel - staging. This will be the last really big control panel. I'm guessing that Oberammergau and Eschenlohe will be decent sized. However, the rest (Bad Kohlgrub, Altenau, Unterammergau, Hechendorf, and Ohlstadt) should be a couple of turnouts controlled by a DS64, with 1 (mostly) to 5 manually controlled turnouts. Of these stations, only Hechendorf will have more than 1 manually controlled turnouts.
Friday turned out to be a very productive few hours! I spent most of the time cutting fascias from tempered hardboard. This included the piece that will have the control panel for staging, and the piece that covers the south end of Murnau - along with first part of the branchline to Oberammergau and the last part of the mainline, as it leaves Eschenlohe and heads into staging. I also cut (and installed) "safety railing" for the helix under the south end of Murnau. If a coupler fails, just as a train enters the visible area on the top level (coming out of the helix), the uncoupled cars race down the helix. It has been my (bad!) experience that cars can derail on the turnback just below the south end of Murnau. Without some sort of protection, cars hit the tile floor!! So, I installed 1 3/4" sides made of hardboard at the turnback in an attempt to keep cars from the "big drop". Once installed I did a test. Of course! Not a single car derailed!!! I'll try some additional test later on with cars that are lighter and have a high center of gravity than the cars I used, initially.
I also finally got to test run all of the DCC-equipped locomotives that I could find. The great news was that the little BR 322 switcher worked and my BR 169 also ran!! The bad news - I had a Fleischmann Orient red BR 141 with what appears to be a short under the shell, plus an Fleischmann (Austrian) BR 1144 and an Arnold BR 627 were dead. Their lights could be turned on/off and also could change based on the direction of travel - but no movement! I also had an Arnold BR 141 (orange/white) that has clearly lost its mind - it would just take off, and I couldn't controle it! I clearly don't have the right address listed on the box. I'm also positive that I have a DCC-equipped blue/beige Fleischmann BR 141, but I couldn't find it.
I looked through my inventory of locomotives and cars while looking for the blue/beige BR 141. While doing this, it became clear to me that I need to "thin my herd" of locomotive and cars. I have far too many locomotives - most of them analog. I also have way too many locomotive classes that don't even run on the line through Murnau - or are infrequent. For instance, I ran three BR 218s today (DCC) to shake off the cobwebs. I found at least 2 others in my stash. The BR 218s only ran once or twice per day during a couple of years that I model, as they came from Schongau to Weilheim and down through Murnau to Garmisch-Partenkirchen. Do I really need five BR 218s?!?!? Probably not! So, I should probably get rid of the other 2 (or 3). To be fair, one of the DCC-equipped locomotives is s special "King Ludwig" paint scheme - and I'm not giving that one up. It was originally analog, and I added a DCC decoder to it. So, it's all mine!!
I'll try to get photos of my progress in the next installment. However, I'm guessing I won't get much done this weekend, as both days have activities planned.
July 13, 2020 – Light Work Day (13 July 2020)
I didn't get out to the layout until about 4PM, so there were only a couple of hours to get anything serious done. I drilled the holes and wired up the 2 photocells for the north end of the northbound mainline block from Hechendorf to Murnau. I only needed to take care of the north end as this block can't be used/tested until I get down to Hechendorf, itself. So, I didn't jury rig it like I had for the southbound mainline or the block from Murnau to Bad Kohlgrub on the branchline. After that, I thought I'd take a look at the other issue I was having, which was the Einfahrtsignal at the north end of Murnau showing only Green when it should show Green/Yellow. I had a suspicion that it had to do with the routing of power and the fact that I was only checking occupancy for Track #3 for that signal instead of Tracks #3 through #5 (#6?). Anyway, I fired up the layout and ran some trains to reset all of the signal. Sure enough - a train starting in Track #3 and proceeding south saw a Green/Yellow on the north end Einfahrtsignal the minute it went into the southbound block just south of Murnau. After playing with different routes, the Einfahrtsignal seemed to lose it's mind once I started aligning turnouts for the branchline. I saw Green/Yellow a couple of more times, but at the end, all I saw was Green when trains transitioned to the southbound block just south of Murnau - regardless of the turnout alignment. At this point, I'm willing to live with this, as I'm guessing the remedy would be fairly complex. After all, it appears that the logic for the signals is correct - and it does work a good amount of the time. Besides, as long as the Green doesn't show when a Red should be indicated (next block filled), then it's not completely wrong, either.
Next on my list of things to do - try the resistors that I bought to be used with some LEDs for staging. I think I have a scheme that won't take up some many LEDs, and may be a better indication of which track(s) is(are) aligned. This scheme has the Tortoises merely routing power, rather than having the LEDs in series with the Tortoise motor (which acts like a resistor). So, with no motor, I need to add the resistors.
Oh! You'll also note that the diary/blog has been shortened. If you look above, you'll see a link to another archive - "Layout Diary Archive: 2016 - 2019". This file had gotten really big, so it was time to add yet another archive. At this rate, I'm guessing that, like 2015, 2020 may have its own archive in the near future! Let's see if I can keep up the momentum. I guessing that I can - as long as a) the COVID-19 pandemic is still around and b) I'm unemployed. Let's hope (b) gets resolved sooner than later! After all, I need funds to keep these projects going! Luckily, I had a lot of extra equipment and supplies that I had purchased in advance.
July 10, 12, 2020 – Big Addendum To Friday And A Frustrating Day Of Troubleshooting On The Day Of Rest (12 July 2020)
Wow! I may have been a bit premature with my entry for July 10. After typing it up and uploading it to the website, I went back and finished all of the wiring for the Ausfahrtsignale! It took until about 10:30PM, but I got it done. Signals changed as I pressed buttons to change routes. However, the signal for the route selected always showed green. Ugh.... I think it's that BD-1 board again. I replaced the one "repaired" BD-1 board with another "repaired" BD-1. That one was showing the red LEDs lighting up as I moved a car over the sensors embedded between the rails. However, it appears that the logic isn't working. So, I'm going to mess with that, today.
Also, for some strange reason, one of my routes is now missing a turnout in the sequence. Pushing the button for Track #5 to head southbound is not actuating Switch #9. So, I'm going to try to add it back into the route. If I can take care of these 2 items quickly, I can add the sensor for the northbound mainline. If this all goes smoothly, then I may actually start on wiring up staging! But, enough strategizing - it's time to get out there and work!
Well, talk about a frustrating - but, ultimately, satisfying - 5+ hours! For some reason one of my DS64s lost it's mind, with a couple of routes screwed up. I tried to fix them, but figured out that I was on the wrong DS64! So, I spent a lot of time reprogramming both of the DS64s. As luck would have it, I uncovered one mistake that had been there prior to this - so, that was a bonus!
I was having a heck of a time figuring out why my block detection for the southbound block just outside of Murnau wasn't working. I finally swapped out the board for a brand, new BD-1. Still no-go! So, I decided to turn my attention to the dwarf signal on Track #6. I figured that this signal would "just work" when I added the wires for the logic on the Ausfahrtsignale to the same contacts on the Tortoise as the dwarf signal. Well, the basis for my logic is that power for the signals is routed through those contacts. So, there were times when no power was sent through Switch #10. Well, that dwarf signal need power all of the time! I had already considered using an external SPDT switch for the dwarf signal anyway. So, I went ahead in added it (see the photos below). Now it works like a champ!
OK, after dinner, I headed back under that layout. I double and triple checked the wiring diagram and the actual wiring, itself. I disconnected a couple of wires as well in a further attempt to troubleshoot the issue. What it seemed to come back to was the freakin' BD-1 board - but how could that be?! I tried both "repaired" boards with no luck. Now, I had a brand, new BD-1! That one couldn't be bad, too, could it?!?! Well, rather continuing to pull out what little hair I have, I decided to try a fourth BD-1. I snapped it in and wired it up. BINGO!!! I was now getting red lights for all track not properly aligned, and the signal for Track #3 (which is the track that was aligned) had the appropriate aspect (Red or Green), based on the block occupancy! I had one issue - I had the wires mixed for Pins 6 & 7 on turnout Switch #10. Once I switched these, Track #4 and Track #5 had signals that also had the appropriate aspect!
I can't believe that I have three bad BD-1s! I'm gonna have to contact Circuitron to see if I can get replacements. I love all of their stuff - Tortoises, SD-1s, BD-1, etc. But, wow, I must've gotten a bad batch of BD-1s.
In spite of the hours of frustration, I'm calling today a success! I have one tiny issue - the Einfahrtsignal (entry signal) at the north end of Murnau Bf should show Green/Yellow once a train is in the southbound block, just south of the station. Currently, it's showing just Green. I'll leave that for another day!
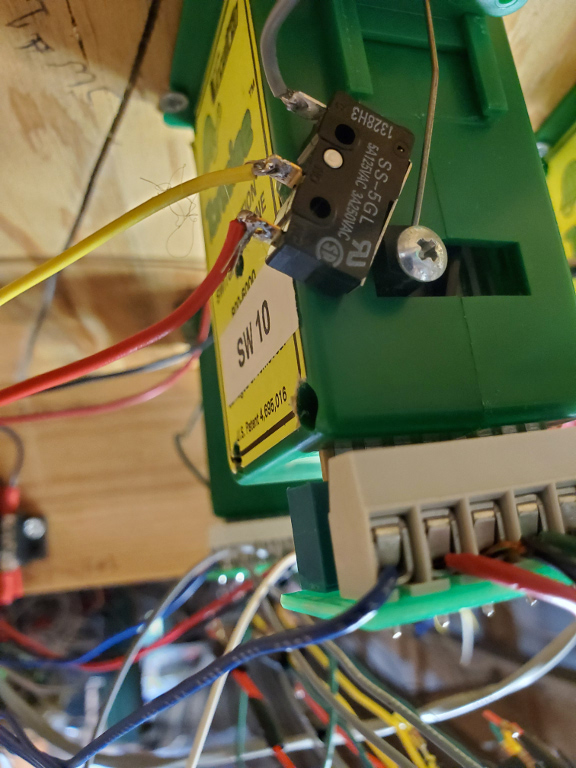 |
| This was my solution to the need for an external switch. I needed constant power to the dwarf signal. Depending on the position of the Tortoise the signal is either Red or Yellow. In this position, the turnout is aligned to Track #6. Therefore, the two Yellow lights are on. |
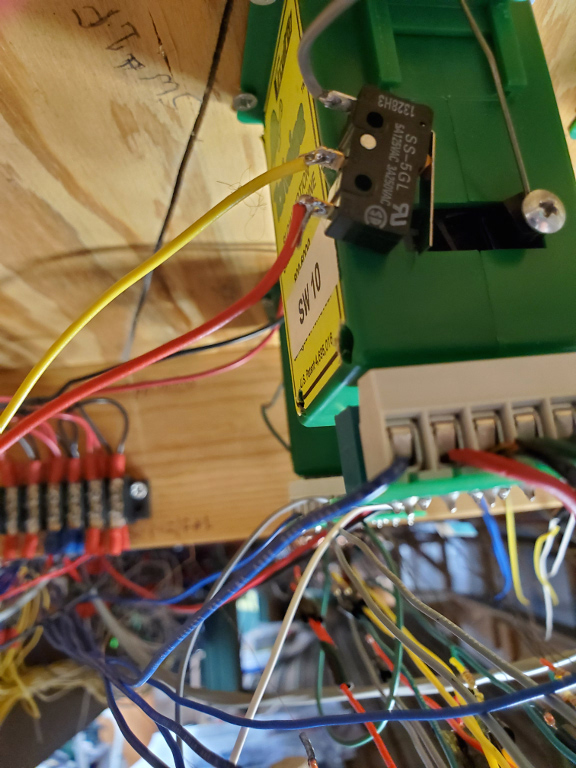 |
| Here, the Tortoise is aligned for Track #5. Therefore, the two Red lights on the dwarf signal are lit. On the real DB, this would inform the engineer to not run through the switch, as it wasn't aligned for their track. In these photos, I had used hot glue to attach the SPDT switch to the Tortoise. This failed after about 20 minutes, so I resorted to velcro. So far, so good! |
July 10, 2020 – More Troubleshooting And Lessons Learned (10 July 2020)
I learned an important lesson today: If you have something jury-rigged so that you can test fully installed components, always suspect the jury-rigged pieces when issues arise. The issue I mentioned below about the block for the southbound mainline to Hechendorf turned out to be such a situation. I replaced a board and fiddled a bit with the wiring to the photocells. Nothing helped remedy the problem. Finally, I messed around with the wires on the jury-rigged end of this block - which is held together by alligator clips. Well, well, well - imagine my surprise when things started to work once I enhanced the connections between the wires and the photocell in question. Everything worked!
After that, it was time to work on the final three Ausfahrtsignale for Tracks #3, #4, and #5. Hmmmm... My diagram shows an SD-1 for Track #6. Looking at the physical layout, there is no Ausfahrtsignal for Track #6 - just a dwarf signal, indicating the turnout position! Well, that certainly simplifies things. Here is the updated wiring diagram for the south end of Murnau Bf.
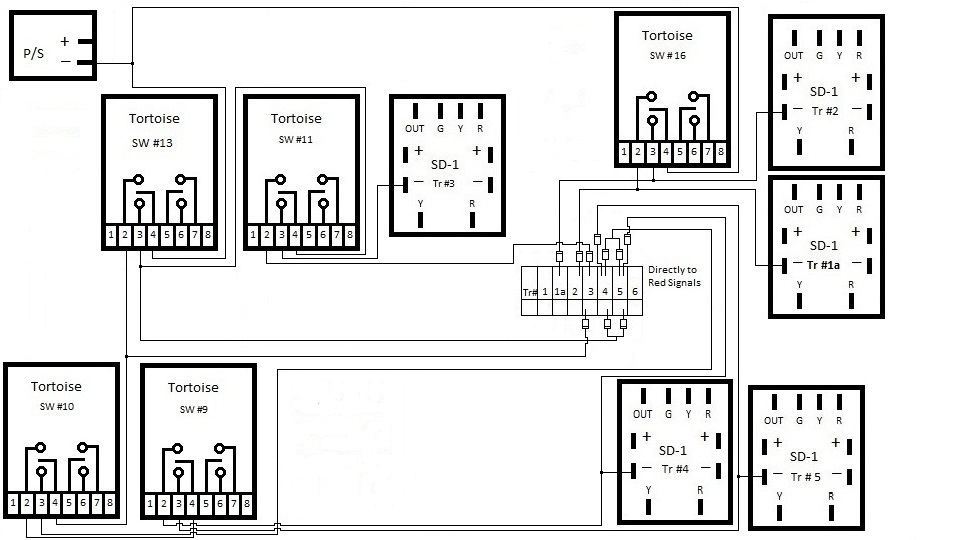 |
| Version 2 of the wiring diagram for the south end of Murnau Bahnhof. I took out the SD-1 for Track #6, which isn't needed. While I was at it, I took out the Tortoise for Switch #12. |
July 7-9, 2020 – Troubleshooting, Success, And A Bit Of A Set Back (9 July 2020)
OK, so I lied. I couldn't stand having issues with my wiring, so I took a couple hours each day (Tuesday, Wednesday, and Thursday) to troubleshoot. I figured out that the Block Signal for Track 1a was bad, very quickly. I took another signal (Ausfahrtsignal?) under the layout and pressed wires against the pins on the SD-1 board. Yep - they all worked. So, I replaced the Block Signal with the Ausfahrtsignal. This particular signal was purchased on eBay, used. I was missing a resistor for the white LEDs. However, I wouldn't be using them - or the yellow LED. So, this wasn't an issue. After replacing the signal, a quick test showed that the new signal was working - it just wasn't showing the right aspect. This was expected. So, on with the troubleshooting.
After doing a couple of experiments and doing a diagram of how I thought the wiring should work, I went to work rewiring the signals that were giving my headaches, previously. After the re-work, I tested everything out. It was actually worse that before! So, it was (literally!) back to the drawing board, with me reviewing the diagrams that I had drawn. Everything seemed to make logical sense - what could be wrong?! Then I reviewed the wiring for the north end of Murnau Bahnhof. Well, this seems strange - everything seems to be in reverse! Specifically, the diodes were wired in the opposite orientation than I would've expected. Then, as the cobwebs cleared, I seemed to remember an engineer from Circuitron telling me that their boards used "pull-down" resistors to drive the signals. I know that in order to get "Green/Yellow" for the "slow" indication, I had to add a diode between the green pin and the yellow pin. The orientation was the opposite of what I would've expected. I had an electrical engineer at work explain it to me, as I'm neither an EE nor an electrician. This got me to thinking - if my wiring (which was the opposite of what I would expect) worked on the north end of Murnau, and if my recollection was correct, I should be able to just reverse all of the diodes that I had added.
So, with the assumptions above, I got to work on this, today. Once I had a drawing, I started to rewire. Upon testing, everything worked as expected!!!! I was so relieved! I think the simplicity of these two signals actually complicated things for me. I'm hoping the final three signals will be easier - or no less complicated, at the very least. That's the problem with taking a 4-year hiatus in doing signal wiring - the (re)learning curve has been steep!
While testing, I ran into one last issue - my block for the southbound mainline out of Murnau now had an issue with one of the sensors, where one hadn't existed, previously. I'm guessing that it is the board, since I used a BD-1 board that I had repaired. Maybe the repair wasn't a total success. I may look at that tomorrow. Once this issue is resolved, I only have 2 things left on the south end of Murnau: 1) wire up the remaining 3 Ausfahrtsignale, and 2) add the block signal at Murnau Ort (to ensure that a train can safely enter Murnau Bf). Of course, the latter will have to wait until the block signal comes in. It is currently on order.
July 2, 6, 2020 – Drawing Diagrams, Injured Reserved, Then Some Progress (6 July 2020)
I spent a brief moment on Thursday, July 2, on the layout. I thought I could get some stuff done that didn't involve spade connectors, which were on order. I connected the negative (-) power wires to Switches #13 and #16, in preparation for the "switch logic" for the signals. The Tortoises have a board that attaches to the pins via an edge connector. The edge connector has really nice screw terminals, which makes it a snap to wire up - and change, if necessary. So, I wired those two up and ran the wire down to the plywood board that had all of the SD-1s and BD-1s attached to it. Oops! I needed spade connectors to connect to the barrier strip for the power! Well, all was not lost. I still wasn't sure how the physical wiring would look. The diagrams below are great for the logic and where wires go on the boards. However, there are missing pieces that need to be figured out. So, I spent the rest of the evening diagramming my next moves for the Oberammergau line and the signals for Track #1a and Track #2. I felt a bit of a twinge in my back, but thought nothing of it. Well...
I spent the next 2 days (Friday and Saturday) mostly on my back, thanks to intense back spasms. I was only slightly better on Sunday, but not good enough to want to crawl under the layout. So, the Independence Day holiday weekend was completely wasted. After doing my typical Monday job search duties, I headed to the chiropractor for an adjustment. I was already feeling better on Monday morning, but chiropractor really straightened me out - enough that I headed out to the layout in the evening.
Monday evening, I wired up the Block Signal for Track #1a and the Ausfahrtsignal for Track 2. Both of these get their aspect from a (to be installed) block detection section from just outside the station to Bad Kohlgrub on the Oberammergau branchline. The switch logic involved only one switch - Switch #16. Depending on its alignment, the signals either get their aspect from the SD-1 board or get direct power for the red signals to show a red aspect - which is the case if the switch is not aligned to the track in question. A quick test showed that the Ausfahrtsignal for Track #2 worked as expected - always red. Since I don't have the block installed yet, the signal should show red as default. However, I could see the lights flicker whenever I changed the turnout - so, I was sure that it was transitioning properly. The Block Signal for Track #1a was a different matter - it was completely dark, regardless of the turnout's position. After doing a couple of tests, and logically eliminating a few possibilities, I think it boils down to 1 of 2 things - either the Block Signal is bad/blown, or I have not wired from the signal to the SD-1 board correctly (loose connection? improper solder joint?). I think I'm gonna pull another signal out of the drawer and test it with the connections. This will either prove or disprove a bad Block Signal...I hope.
I won't be working on the layout for the next couple of days. My next chance is Thursday. Hopefully, I'll have the Block Signal issue resolved by then.
June 29, 2020 – Blocks To Nowhere - Setting Up Blocks Of The Future In Order To Test The Signals Of Today (1 July 2020)
I spent a little time on Monday afternoon setting up a block that only has about 3 feet of the needed (approximately) 10 feet of track. The block is the southbound track from Murnau to Eschenlohe, and it's needed now in order to test my four Ausfahrtsignale that change, based on the occupancy of the next block. I got it up and running. Now I can go ahead with wiring up the logic for those exit signals. I'll also need to install the block between Murnau and Bad Kohlgrub on the branchline. That block only has about 3 feet, as well. However, it's missing around 15 feet of track! While I'm at it - for convenience - I'll also add the northbound block on the mainline from Murnau to Eschenlohe. Once I finish the staging tracks, it would be nearly impossible to wire these up easily. Plus, the block on the branchline will help me test the block signal on Track 1a and the Ausfahrtsignal on Track 2. I also did a little vacuuming before I ran some trains to end my session.
Today, I might head out to the layout to try to figure out how I wired the logic for the signals on the north end. We'll see.... I don't have a lot of time, but this wouldn't involve much more that sitting under the layout, trying to see where wires were going.
June 25, 26, 28, 2020 – I'm Just Gonna Say It - Wiring Manual Switches Sucks!! (28 June 2020)
The title of this entry says it all! I spent 3 grueling days trying to wire four freakin' manual switches! Just about everything that could go wrong, did. I had to troubleshoot every step of the way. For one switch, I had the DPDT wired the opposite of what I wanted. So, one set of wires leading to the barrier strip for power were now switched (and incorrectly colored for my coloring scheme). Another switch, I had done the same thing as mentioned above, but I also got the LEDs wrong, too! So, now half of the wires going to the power were incorrectly colored! Yet another switch had the LEDs wrong. I managed to get only one switch exactly right. Oh, and for the first 2 switches, I thought I had trashed the DPDTs, because there appeared to be no power at all. Well, I had wired them up in positions #3 and #4, instead of #1 and #2! Ugh... Each of these "issues" cause 30-60 minutes of troubleshooting and resolving. Honestly, I have no idea what I was doing - I had pre-tested, done some reading of schematics, and had figured out exactly what I needed to do. All I could do is shake my head (and swear - a lot!).
Next up was to run a cleaning train through all of the spurs that had just been "liberated" due to the switches now being active. The very first piece of track I trundled onto, the locomotive stopped dead its tracks (pun intended). At first, I thought that the track was just really dirty. After all, I hadn't run a locomotive on it since it was first laid - 4 years ago? 7 years ago?! Not sure. So, I cleaned it vigorously with a Bright Boy. Sill nothing. I got under the layout after dinner to try to figure out what was wrong. I had an improperly crimped spade connector for a track feeder on the very section of track that was giving me fits. So, I replaced it. Still nothing, however. I then started jiggling the feeder wires to that piece of track. Oh! The loco sputtered to life! So, in an attempt to get a better connection (without tearing up scenery), I heated up the top of the rail with my soldering iron, while pushing up on the feeder wiring from below. I don't know if it was the pressure alone, or if I was actually able to reflow the solder so that the connection was corrected - but somehow I had power back to that section of track. I'm calling it "good" for now. However, I'm fully prepared to have to drop another feeder in that location.
To finish off Sunday evening, I ran trains for about an hour and a half. In addition to being fun, this has turned out to be an important exercise for many reasons. Most importantly, the locomotives need to be run on occasion - just like I'm finding out with our cars during the COVID-19 pandemic. Running trains also keeps the track clean. I've also been running 2 cleaning cars - going over as many tracks as I can during each session. I really need to pull all of my DCC-equipped locomotives out and run them. I've found that my tiny BR323 shunting engine isn't working and neither is my prized E69. I may have to put them back on the programming track.
It was great running several trains as far as I could run them. I would start either on the mainline, just south of Murnau Bf, or on the branchline at Murnau Ort Hp. I would then travel through Murnau and down the helix - finally arriving in staging on one of the main tracks. I even ran a pseudo-prototypical scenario where 3 trains meet in Murnau every hour. The local train from Oberammergau arrives on the branchline and pulls into Track 1a. Shortly after that the northbound and southbound trains on the mainline arrive, taking Track 1 and Track 3, respectively. After these 2 trains leave, the branchline train heads over to Track 2 to pick up passengers. After that, it makes its way back onto the branchline for another trip to Oberammergau.
I'm going to start the final steps in getting the Ausfahrtsignale (Exit Signals) fully wired. This involves logic based on the BD-1s and the position of the the Tortoise switch machines. I can do everything that doesn't involve barrier strips, as I ran out of spade connectors. They should be here in a couple of days. I'm sure it'll take me that long to get back up to speed on how I actually have done this in the past.
June 24, 2020 – I Just Couldn't Stand It! Troubleshooting And Fixing Issues On The Layout (24 June 2020)
Once again, the job listings were scarce of new opportunities. So, I was, again, able to call it a day on my job search at about 1:30PM. The two issues that I had encountered on the layout were bugging me, and I decided to venture out to the layout once again - in spite of telling myself that it would have to wait until later in the week. The two issues were:
1) The pushbutton for the route from Track 3 to the branchline leading to Oberammergau didn't work. I had to pull four pushbuttons just to get to the one in question - the buttons are so tightly packed, that there was no other choice. I did several tests at several locations with a good pushbutton. I finally decided that I'd have to pull the wires from the pushbutton back to the DS64 and the barrier strip for the "+ COM" port. Right then, the wire that went to the "+ COM" barrier strip came loose from its spade connector! Well, that ended the troubleshooting. I got a new spade connector and made sure that I got a good crimp. I then had the arduous task of reinstalling all 5 of the pushbuttons. It was easier when I first installed them - before all of the extra wiring was blocking them!!
2) The Einfahrtsignal (the signal to the entrance of Murnau Bahnhof on the south end) wasn't showing a red signal when Track 1 in the station was occupied. I ran several tests (basically, I played with trains - passing them through the various blocks on the layout), but none of what I was seeing was making sense. I was even disconnecting (and reconnecting) several wires! I finally decided to replace the BD-1 block detection board. As I was pulling off the connector for the wire that goes to the "Occupied" peg, the peg actually came out with the wire! Hmmmm... That might have been the problem. Regardless, I replaced it with a new BD-1. BAM!! The signal started showing all of the aspects I was expecting to see!!! Green to Red to Green/Yellow back to Green were displayed as the train went from south to north.
3) I found another issue while attempting to see if there was anything else wrong with the BD-1 I had just replaced, besides the obvious issue with the peg coming out. I grabbed another new BD-1 and compared the front and then the back of each, in order to see if there were any anomalies. Well, oddly enough, there was a difference on the backside - but it wasn't the "bad" BD-1 that seemed to have the problem! One of the traces had a gap in the supposedly "good" BD-1. So, I had to pull out a third BD-1 for comparison. Sure enough - that gap in the trace was not supposed to be there! So, a little solder, plus a little piece off of a lead from one of the LEDs, and the BD-1 should be back in business. I marked both BD-1 boards with a blue highlight marker, roughly showing what I had done to each of them. That way, I'll be wary of them (if I use them) the next time there appears to be an issue.
OK, now all I have left is installing the DPDT switches for the manual turnouts. I'm also waiting for the block signal that goes between Murnau Ort and Murnau Bf, which indicates whether Track 2 in the station is occupied. As I mentioned, that's on backorder. So, if it doesn't get here soon, I'll just start working on staging.
June 23, 2020 – Riding The Wave Of Productivity! (23 June 2020)
With very few new job opportunities to check out, I was able to call it a day on my job search at about 1:30PM. I headed out the the layout after grabbing a bite to eat. I created enough Loconet cables to wire everything up. Now it was time to program some routes! I screwed around with the DS64s a bit to make sure that I had properly configured them, previously. They already had labels on them with the DS64 ID and the turnout numbers, so I figured I had already set them up years ago. After a quick check of one DS64, it appears that I was correct. One less thing to relearn - for now.
I was able to successfully create all 17 routes across 3 DS64s! I had to add one to DS64 #1. The other 16 went on DS64 #3 and DS64 #4. Yeah, I had a few times where I had to re-type the route. However, I eventually got them all programmed. I only had one issue, and I think it's either faulty wiring or a faulty pushbutton. When I press the button, nothing happens. Every other issue I encountered was simply a wrong combination of turnout settings, giving me a wonky route. I'll check out the pushbutton once I get back under the layout to wire up the 4 manual turnouts. That won't happen tomorrow, but possibly Thursday or Friday.
But hey - progress!!! Other than the 4 manual turnouts, and a little troubleshooting, the only other thing I have left in the Murnau area is a block signal between Murnau Ort and Murnau Bahnhof - and that's on backorder. After that, I'm heading to Oberammergau!! Single track all the way, baby - and no fancy stations like Murnau. I guess I shouldn't get ahead of myself. I still need to install the other half (third?) of the staging track and wiring that all up as well.
June 22, 2020 – With This Luck, I'm Glad I Didn't Play The Lottery! (22 June 2020)
Well, I wandered out to the layout in the late afternoon to turn on the power to the DS64s to see how successful I was in getting the LEDs correct. Well, as the title says, with the luck I had, I'd say it was the equivalent of winning $5 on a scratch-off ticket. I got half of the regular turnouts correct - 2 out of 4. Of the 2 that didn't work, one had no LEDs lit at all, and the other had them backwards. I was also 50% on the 2 double-slip switches, getting half of both correct. The other halves also showed no LEDs being lit as well. It turns out that all of the ones that weren't lit at all were wired the same way for both LEDs. In other words, if any of those turnouts would've been in the opposite position, both LEDs would have been lit up!! Ugh.... That's just lazy - and I thought I was really paying attention! The good news, all of this was fixable, with only a slight amount pain (and embarrassment!).
After fixing all of the weirdness, I cleaned up again - there were wiring coverings and pieces of LEDs leads all over the place. Next, I printed out a bunch of Digitrax documentation about creating routes with pushbuttons on DS64s, so that I could relearn how I had done it on the north end of Murnau Bf while I ate my dinner. I quickly realized that the DS64s needed to be hooked up to the Loconet and the command station. Well, I'd have to create some new Loconet cables! I hadn't done that in a while, so it should be fun.
I see the spool of cable, now where were the RJ connectors and the special crimping tool? Hmmmmmm.... They weren't in the obvious places - either in the general electronics drawer or one of 2 Digitrax equipment locations. So, I tore up (and reorganized) the entire layout room - three times!! In this case, the fourth time was the charm. I checked the pile of Digitrax equipment stored on the shelf on the cart that has my enclosure for the command station and PM42 one more time - bingo!
I made my first cable - an 8-inch length that would go between the DS64s. Now, it was time to use my cable tester to make sure I had made a good connection with the RJ connectors. I know where that is! So, I turn it on - dead. No worries, I have a stash of 9-volt batteries on the cart - right next to where I found the connectors and crimping tool! I swap out the battery and turn on. the cable tester The power light is dim. No reading of the wires when I plug in the cable. So, I guess 9-volt batteries have a shelf life of less than 4 years - which is how long they've been sitting there! Luckily, my wife had made a run for hurricane supplies a couple of weeks ago. I grabbed a fresh 9-volt battery from her hurricane stash and, BAM! - everything worked! Woo hoo! One cable down, two more to go! Oh, look at the time..... I guess any other progress will have to wait for another time.
June 15, 16, 18, 19, 21, 2020 – A Flurry Of Activity All Week! (21 June 2020)
Who knew this would be such a productive week?! I cleaned up a bit (and then messed it back up throughout the week!) on Monday evening. I also printed some labels for the tracks on both control panels - Murnau Bf North and Murnau Bf South. I've been meaning to do this for months (years?!) on the north end. So, I took some time to do both.
On Tuesday I started the arduous task of soldering wires to the leads on the LEDs for the tack indicators on the control panel. This is a tedious and time-consuming exercise. The process was slowed down further after realizing the holes on the panel for the LEDs were too small. Then, I enlarged them too much!! So, I added white glue to most of the holes and let it dry. I would carve the glue away, as needed, as I came to each hole. For a few of them, I just glued the LED into the hole because I didn't want to wait for them to dry. A few others had no issues at all - and, yet, I used the same sized drill bit for all of them!!! Go figure.
On Thursday afternoon, I continued with the LEDs. Then, it dawned on me that the easy part - wiring from the tortoises to the barrier strips - would go much faster. Plus, I could put off all of that soldering to the LEDs for another day! So, on Friday, I hooked up all of the wires to the Tortoises. And, as luck would have it, my shipment arrived that had the spool of yellow wire! So, I took care of that final pushbutton as well!
Sunday was the day of reckoning - I could either finish soldering/wiring the LEDs for the switches hooked to the DS64s, or I could would on the manual turnouts, which use DPDT switches. The latter job is even more tedious than the former! So, I chose to take care of the rest of the LEDs. Things are really coming along! I'll probably tackle the manually controlled turnouts this coming week - there are 4 of them, so it shouldn't be a Herculean task. Once that's done, I'll need to program the DS64s. I'm sure that, at that point, I'll need to swap some (all?) of the LEDs. I think I did them right, but the double-slip switches have me concerned. We'll see...
In the meantime, here are a couple of photos of my progress.
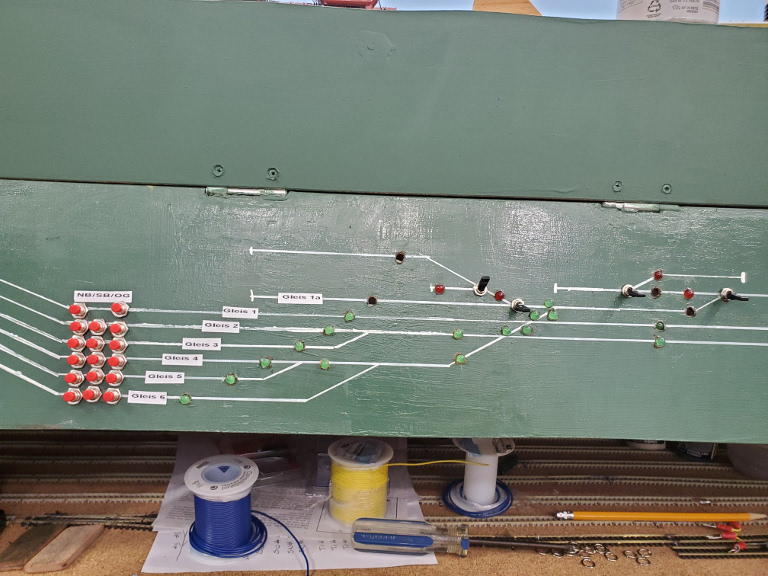 |
| Here is the (mostly) populated control panel for the south end of Murnau Bahnhof. The red LEDs are not wire - nor are the manual DPDT switches. The red LEDs and the open holes (where green LEDs will go) are all for the manual switches. These will be worked on next week. Also, note the labels for the tracks. |
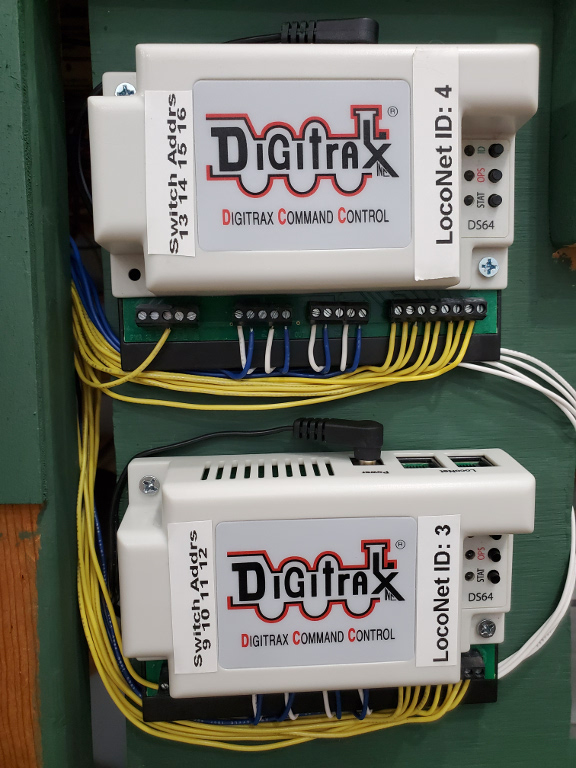 |
| Here are the fully wired DS64s for the south end of Murnau Bahnhof. These, along with the other 2 DS64s on the north end of Murnau Bahnhof are the cleanest wiring jobs on the layout. I really suck at tidy wiring - that takes planning and bundling and more planning. |
June 12, 14, 2020 – Pushbuttons For DS64s All Wired....Almost (14 June 2020)
I saw a lot of progress on Friday and Sunday. I installed all 17 pushbuttons on the control panel, and wired them up to the DS64s - until I ran out of yellow wire. So, I still have one left to wire up. The DS64s can handle up to 8 routes via pushbuttons each. That means the two new DS64s could handle 16 in total. Wait - what about route #17?! Well, I had to run wires from one of the DS64s on the north side of Murnau Bahnhof to handle this additional route. They only have 4 and 5 routes used, respectively, so I added this route to the one that had only 4 programmed, currently. So, in addition to programming the new DS64s, I'll having program this additional route into one of the existing DS64s. By the way, the reason for so many more routes on the south end of the station is due to the 2 double slip switches at the entrance to the station. They allow flexibility to enter/exit the station on the mainline on either the northbound or southbound tracks, and also to enter/exit the station on the branchline.
So, while I wait for the yellow wire, I'll turn my attention to wiring up the Tortoise switch machines to the DS64s and to DPDT manual switches, where appropriate. I use blue and white wire for these connections, as can be seen in the diagram from last Monday, below. This will take me longer to do than the shipping process for the new wire. So, I'll only have myself to blame for any lack of progress.
Here are some photos of the work I've been doing.
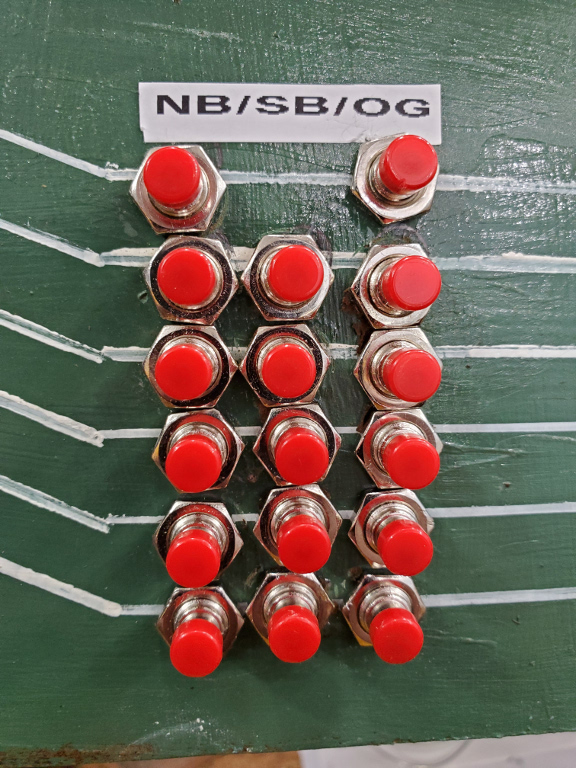 |
| Pushbuttons for the various routes that can be taken. NB is the "Northbound Mainline". SB is the "Southbound Mainline". OG is the "Branchline to Oberammergau".This represents Tracks 1-6. You'll note that Track 1 can't actually use the southbound mainline, due to track configuration. During typical operations, the following is true: Track 1 would utilize the NB button, as trains come into the station from the south, heading northbound to München Hbf. Track 2 would utilize the OG button, as trains come into and out of the station from the branchline. Track 3 would utilize the SB button, as trains come into the station from the north, heading southbound to Garmisch-Partenkirchen and Innsbruck, Austria. Tracks 4-6 are freight tracks and can see trains traveling north or south - or even heading onto the branchline. These are the rules, but you know that there always exceptions to these rules. Therefore, I need buttons for every possible route - and that's why you see what you see in the above photo. |
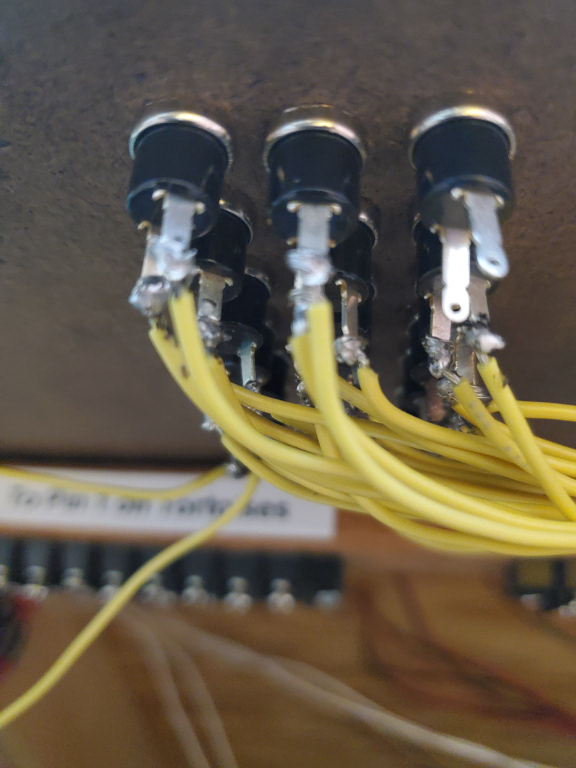 |
| This is the underside of the pushbuttons. As seen in the diagram from Monday, below, pushing the button provides contact for the two wires - one from the "+ COM" port on the DS64, and one from the wired up route port from the DS64. The far right one is the last one that needs to be wired up - as soon as I get my new spool of yellow wire. |
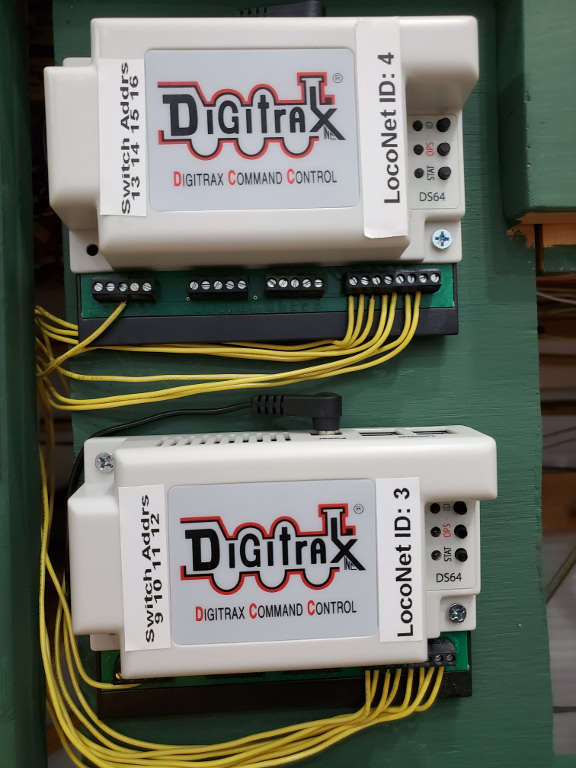 |
| Where the wires go on the DS64 - Note the lone wire on the left, which goes to the "+ COM" port. The others are the eight routes. Also note on the top DS64 that the far right route hasn't been wired yet. So close....can't believe I ran out of wire. I started with an entire 100' spool!! |
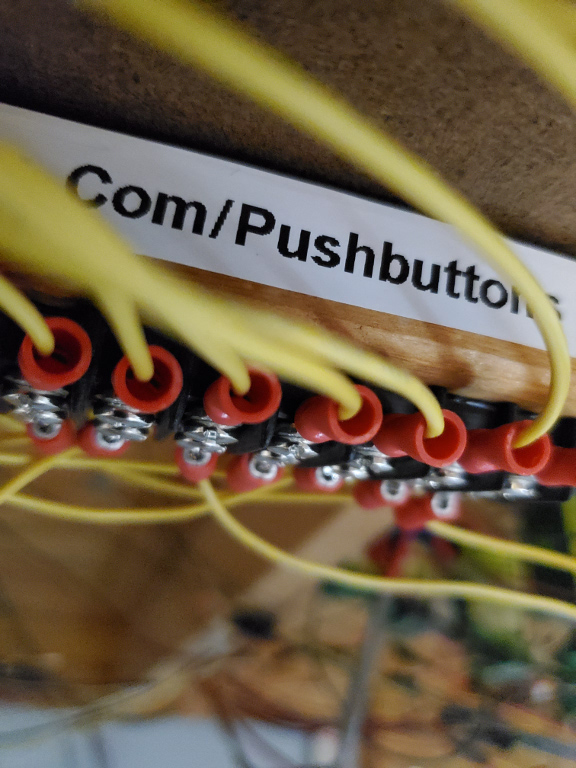 |
| And, here's where that lone wire from the "+COM" port on the DS64 goes. From here, it splits off to go to each pushbutton. This 8 position barrier strip has half of its positions wired together to one of the DS64, with the other half wired for the other one. |
June 8, 2020 – Monday Afternoon Circuit Drawing (8 June 2020)
I was able to get most of my job search stuff done in the morning. So, as an exercise in distraction (I obsess a lot when looking for a new job), and as a memory jogger, I created the wiring diagrams that I mentioned yesterday. Now, if I can find time either this week or next weekend, I'll start doing the actual work of wiring up the control panel, Tortoise switch machines, and DS64s. These diagrams should help my productivity, significantly, as I would have to re-jog my memory at the beginning of each work session. And that exercise could take up the majority of my free time!!
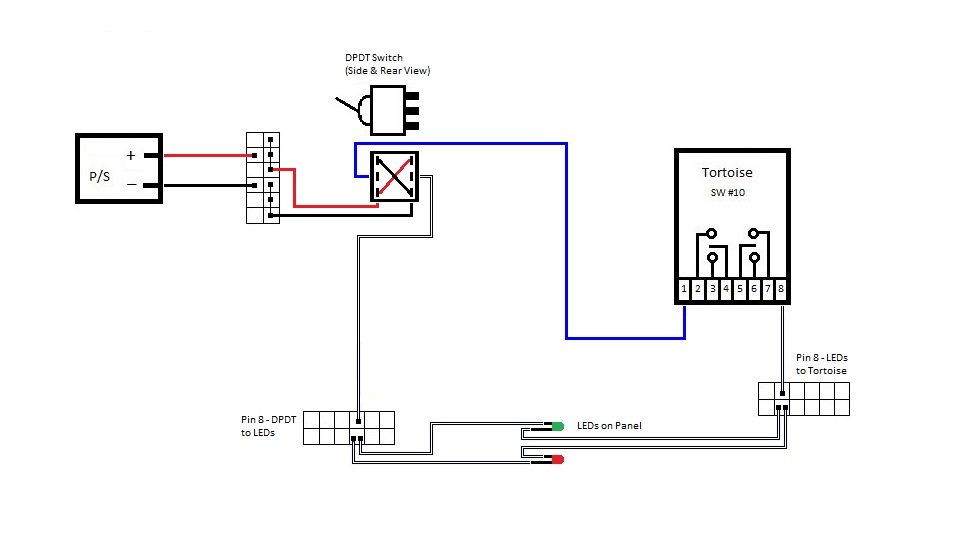 |
| This diagram describes how to wire a DPDT switch to control a Tortoise switch machine, and also provide LEDs as indicators of which leg is aligned. |
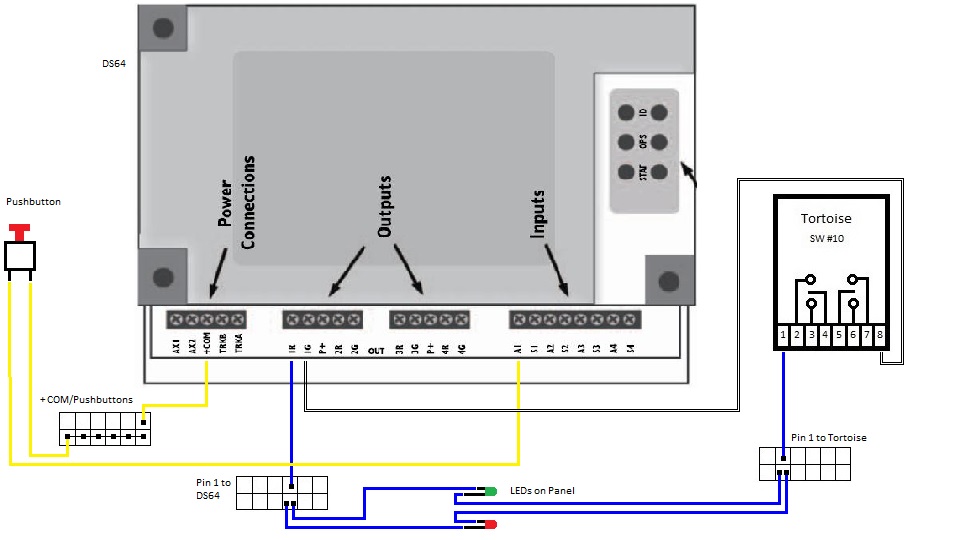 |
| This diagram describes how to wire the DS64, along with push buttons, to control a Tortoise switch machine via routes from the DS64, and also provide LEDs as indicators of which leg is aligned. Pressing the button tells the DS64 to execute a route - in this case, the first route. |
June 7, 2020 – More Time On My Hands, But Less Money: COVID-19 Strikes Again! (7 June 2020)
I found out on the Tuesday after Memorial Day that my company would be having layoffs, due to COVID-19. I knew this was coming, as I was part of the planning, but I wasn't sure of the exact timing. However, I found out on Wednesday that my position would also be eliminated. So, I now have even more time on my hands, but less (no) disposable income for hobbies. I did order some wire and connectors, so that I could continue with wiring up the signals, turnouts and control panel. After taking care of a bunch of tasks associated with no longer having a job, I was finally able to work on the layout for a few hours, today. I installed 6 barrier strips behind the new control panel and also noodled through how I had previously hooked up the turnouts to the DS64s, LED indicators, and the push-buttons and toggle switches. I'll probably spend the rest of the evening working on a diagram or two that I can put in here - so that is clear what needs to be done in the future, rather than trying to re-engineer these things every time! I'm also considering a separate section where all of this technical data (wiring diagrams, paint colors, etc.) can reside in a single location.
May 25, 2020 – Even More Progress During A Holiday Weekend! (25 May 2020)
I started much earlier today, heading to the home office to fix a diagram for the BD-1/SD-1 hookups - see below. I was having an issue with the Einfahrt Signal at the south entrance to the Murnau Bahnhof. After wiring it up, it always showed "Green". After some additional tests, I noticed that the Einfahrt Signal at the north end had the same issue - and it had been working for four years, previously! After reviewing the diagram, I noticed at least 3 mistakes and 1 omission. The good news is, I think I wired most of this up correctly - even with the mistakes on the diagram. the bad news is, I still have an issue that I need to figure out with the Einfahrt Signals. I'm hoping to find it today. It's bizarre, considering these (and the Block Signals) are the simplest signals to wire up, because they don't have any crazy logic with the Tortoise switch machines!
I was able to wire up two Dwarf signals and also add a wire the full length of the layout that will (supposedly) give me the Green/Yellow aspect for the Einfahrt Signal on the north end of Murnau Bf. That, combined with a few tweaks seem to improve that signal. However, I'm seeing Green/Yellow when I should see Green, currently. The Einfahrt Signal on the south end of Murnau Bf is still a complete mystery. It's so simple, and yet it won't work. Oh well, there's always next weekend.
I ran some trains to test out the signals. I had a track cleaning train that I used to clean many of the tracks. Others will just have to remain dirty, for now. If events work out in the next couple of weeks, I may by the Lux clean cars set, which includes a vacuuming car and a polishing car. The 2-pack is pricy, but I'm already seeing that hand cleaning will be nearly impossible with catenary - even if I don't actually use the wires (just the posts)! So, I need to find some way to clean the track easily, and quicker than doing it by hand. Of course, the old model railroader adage still holds true - used tracks don't need to be cleaned as often. So, maybe I need to run trains every weekend!
I have my layout broken out into blocks, for the purposes of signaling. Somewhere, I had a list of those blocks, but couldn't find it. So, I'm placing it here, at the very least:
| Block # | Description |
| Mainline: München - Garmisch-Partenkirchen (KBS960) | |
| 1 | Small block between Staging and the start of the Helix |
| 2 | Helix up to Murnau Bahnhof (I call this München to Murnau, IMH - MMU) |
| 3 | Murnau Bahnhof, Track #3, which is the southbound arrival track for the mainline to Garmisch-Partenkirchen (MMU Tr3) |
| 4 | Murnau Bahnhof, Track #2, which is the northbound arrival track for the branchline to Oberammergau (MMU Tr2) |
| 5 | Murnau Bahnhof, Track #1, which is the northbound arrival track for the mainline to Munich (MMU Tr1) |
| 6 | Hechendorf Ramp, Murnau Bahnhof to Hechendorf, southbound (MMU - MHDF) |
| 7 | Hechendorf Ramp, Hechendorf to Murnau, northbound (MHDF - MMU) |
| 8 | Hechendorf Üst, Track #2, which is the southbound arrival track heading to Garmisch Partenkirchen (MHDF T2) |
| 9 | Hechendorf Üst, Track #1, which is the northbound arrival track heading to Murnau Bf (MHDF T1) |
| 10 | Hechendorf Üst to Ohlstadt Bf, which is single tracked (MHDF - MOH) |
| 11 | Ohlstadt Bahnhof, Track #2, which is the southbound arrival track for the mainline to Garmisch-Partenkirchen (MOH Tr2) |
| 12 | Ohlstadt Bahnhof, Track #1, which is the northbound arrival track for the mainline to München (MOH Tr1) |
| 13 | Ohlstadt Bf to Eschenlohe Bf (MOH - MECH) |
| 14 | Eschenlohe Bahnhof, Track #2, which is the southbound arrival track for the mainline to Garmisch-Partenkirchen (MECH Tr2) |
| 15 | Eschenlohe Bahnhof, Track #1, which is the northbound arrival track for the mainline to München (MECH Tr1) |
| 16 | Small block between Eschenlohe and Staging representing Eschenlohe to Garmisch-Partenkirchen (MECH - MGP) |
| Branchline: Murnau - Oberammergau (KBS963) | |
| 17 | Murnau Bf to Bad Kohlgrub, which passes Murnau Ort and Jägerhaus (MMU - MBKG) |
| 18 | Bad Kohlgrub Bahnhof, Track #2, which is the southbound arrival track for the branchline to Oberammergau (MBKG Tr2) |
| 19 | Bad Kohlgrub Bahnhof, Track #1, which is the northbound arrival track for the branchline to Murnau (MBKG Tr1) |
| 20 | Bad Kohlgrub Bf to Altenau Bf (MBKG - MALT) |
| 21 | Altenau Bahnhof, Track #2, which is the southbound arrival track for the branchline to Oberammergau (MALT Tr2) |
| 22 | Altenau Bahnhof, Track #1, which is the northbound arrival track for the branchline to Murnau (MALT Tr1) |
| 23 | Altenau Bf to Unterammergau Bf (MALT - MUAG) |
| 24 | Unterammergau Bahnhof, Track #2, which is the southbound arrival track for the branchline to Oberammergau (MUAG Tr2) |
| 25 | Unterammergau Bahnhof, Track #1, which is the northbound arrival track for the branchline to Murnau (MUAG Tr1) |
| 26 | Unterammergau Bf to Oberammergau Bf (MUAG - MOA) |
| 27 | Oberammergau Bahnhof, Track #2, which is the main arrival track for passenger service (MOA Tr2) |
May 24, 2020 – Memorial Day Weekend And Nothing Better To Do (24 May 2020)
So, I finally got up off the sofa after watching 3 Bundesliga matches on this Memorial Day weekend. I still plan on doing more tonight and tomorrow, but I thought I'd post some pics of my new additions. I got the DS64s mounted, and I also installed 3 siginals - 2 dwarf signals and an "Einfahrt" signal, which an entry signal into Murnau Bahnhof from the south. I need to wire up those three signals - likely tonight. I also need to create at least 2 (maybe 3) "dummy blocks". I need block detection for "Murnau to Bad Kohlgrub" on the branchline, "Murnau to Eschenlohe southbound" on the mainline and probably "Eschenlohe to Murnau northbound" on the mainline. I need these in order to test the signal on the south end of Murnau Bf. The problem is, I don't have the full blocks for ANY of these - just sections of track that mark the beginning of these blocks. So, I'll do a proper install of the opto-sensors on the south end of Murnau Bf. From those opto-sensors, I'll have to wire up the other end of the blocks a short distance to some sort of harness. That'll have to do, for now. Even if I work on this every weekend for a few months, I probably wont be ready to lay all three sections of track that would complete these blocks. The first one will likely be the branchline. Here are the photos of my progress.
|
|
| New Dwarf Signal. The branchline ahead may be clear, but the switch in the background needs to be properly aligned, or the train will derail. This signal will indicate which way the switch is aligned. Two yellow lights arranged diagonally means that it's OK to proceed. Two red lights in a horizontal row indicates that the switch is not aligned for your track. |
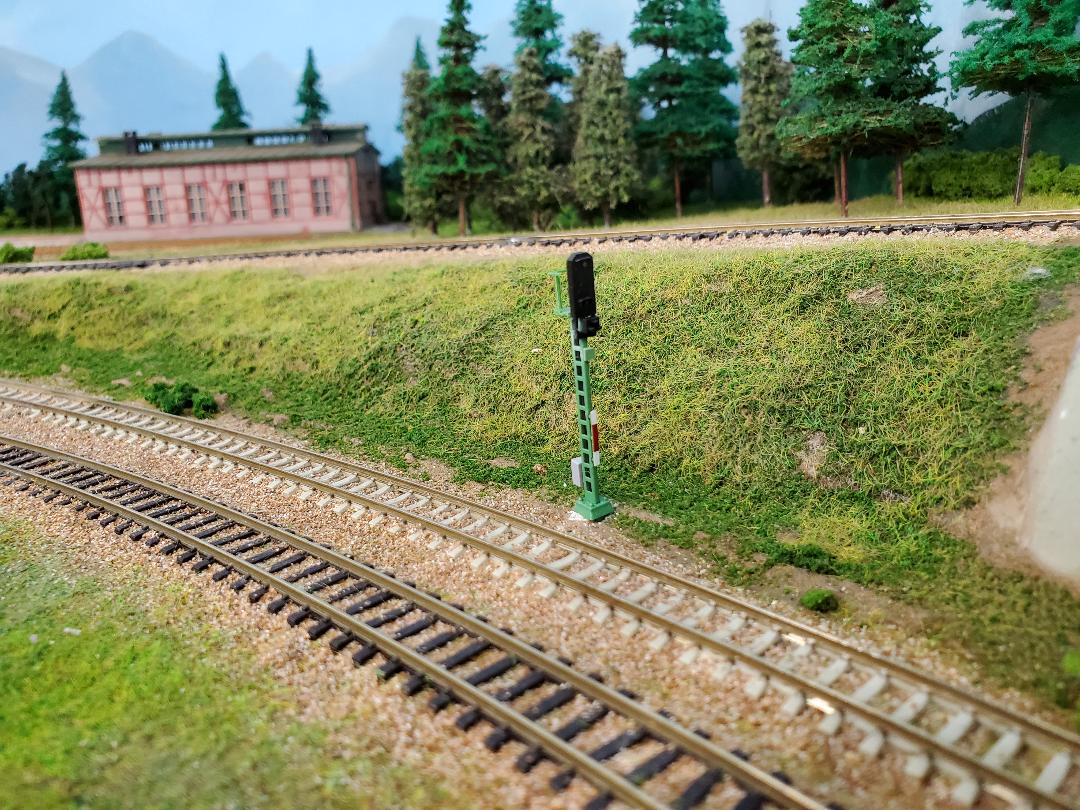 |
| Einfahrt Signal on the south end of Murnau Bahnhof. Green indicates all clear. Green/Yellow indicates to proceed, but prepare to stop/slow as there is another train in the following block. Red indicates to stop as the next block is occupied. |
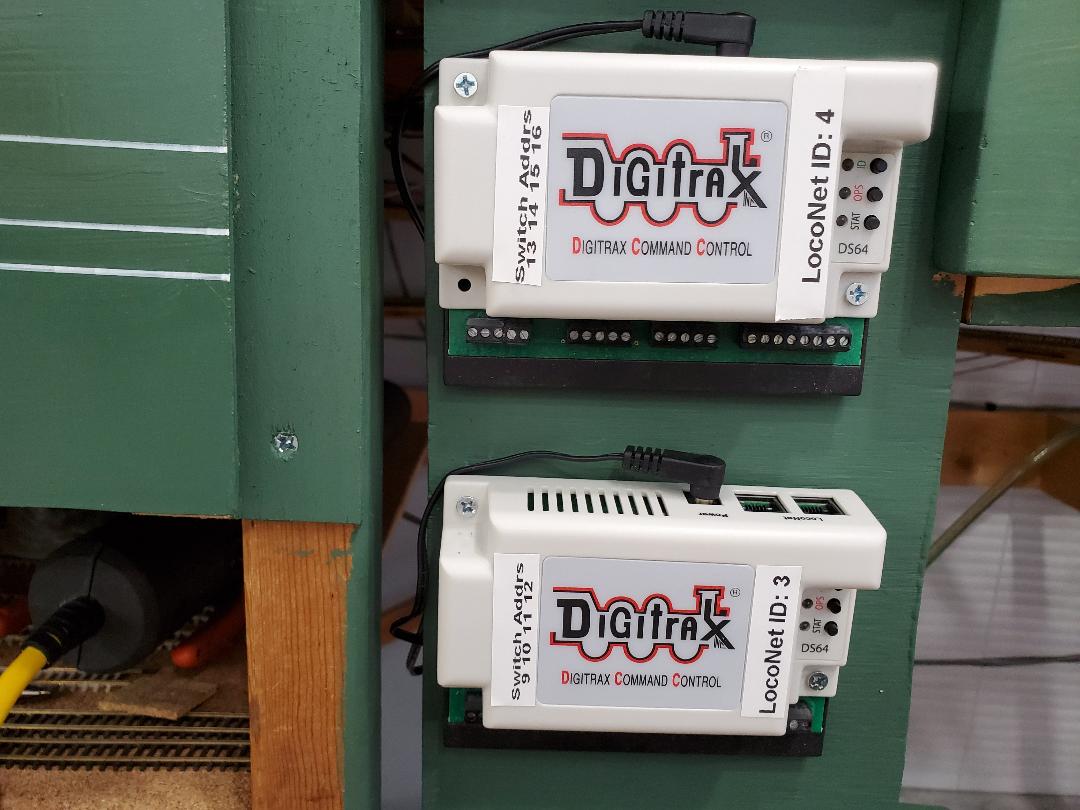 |
| Two DS64s for the turnouts on the south end of Murnau Bahnhof. It looks nice and clean, currently. Wait until I start wiring things up! |
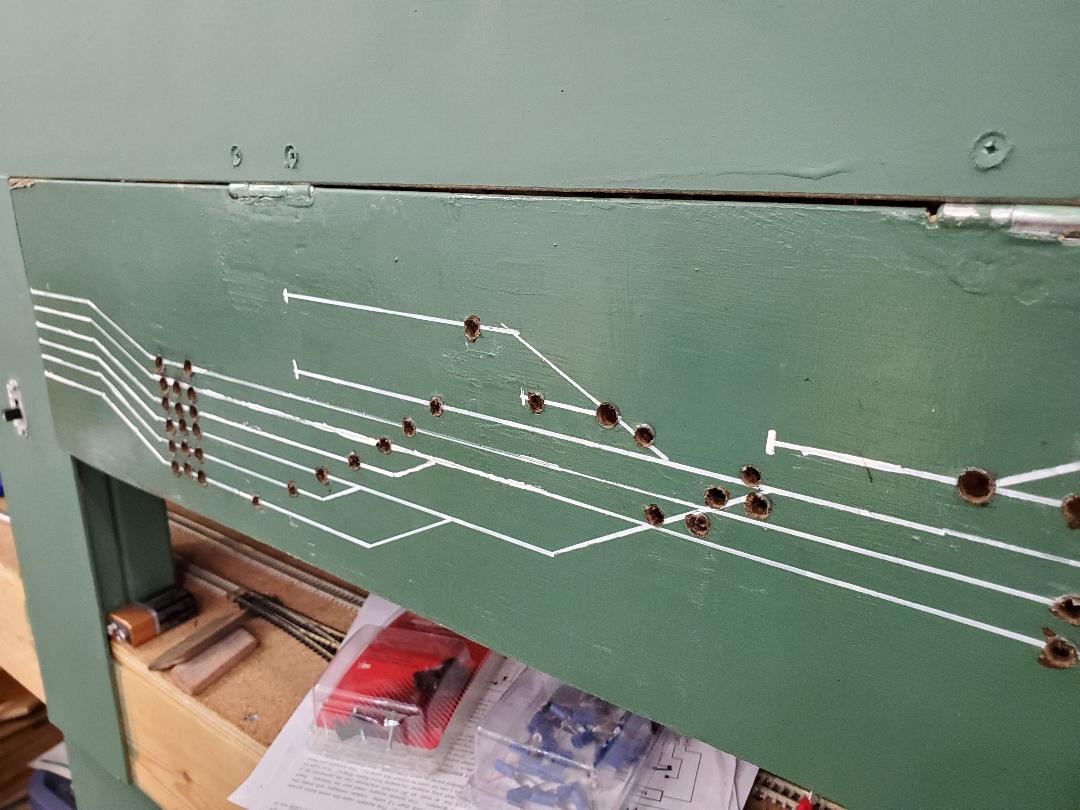 |
| The start of the control panel for the south end of Murnau Bahnhof. All it needs is some lights, push-buttons, toggle switches, and a TON of wiring! |
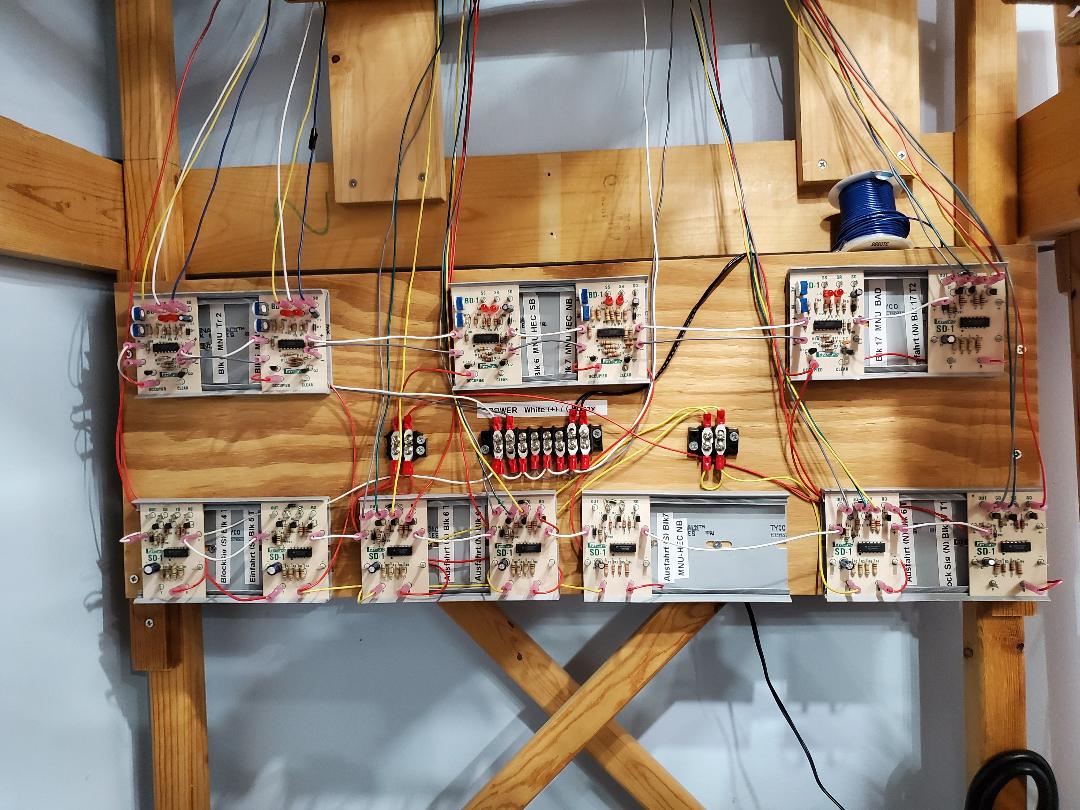 |
| While I'm showing progress, here is the board that I mounted at the south end of Murnau Bahnhof. It has the SD-1 signal drivers and the BD-1 block detectors that I'll need for this section of the layout. I have already tested 2 of the blocks that are fully wired, and they look good. |

May 3, 10, 15, 2020 – Welcome To The COVID-19 Pandemic! (15 May 2020)
Who knew it would take a pandemic to get me back into the hobby room! Well, to be fair, I had spent a few hours, off and on, on the issue I was having with the signals mentioned below. It's funny how hard issues like this can stop my progress in its tracks (railroad pun intended). It also didn't help that I joined the American German Club of the Palm Beaches in February of 2017, and quickly became VERY active in the club. Well, with "work from home" orders and the club being closed - all because of COVID-19 - I figured I could either go stir-crazy or work on my layout. I chose the latter.
So I did figure out how I would solve my problem. I eliminated Switch #12 completely, as it had very little to do with which track was aligned for exiting the station and it just complicated the logic unnecssarily. I also completely separated Tracks 1a and 2 from the other tracks (Tracks 3 - 6). Track 1a and 2 are used for the branchline to Oberammergau. So, I simply check the alignment for Switch #16. If you track isn't aligned, the signal is red. If it IS aligned, then the aspect is dependent on the BD-1 assigned to the segment from Murnau to Bad Kohlgrub (Block 17 MNU - BAD). You can see my solution in the diagram below.
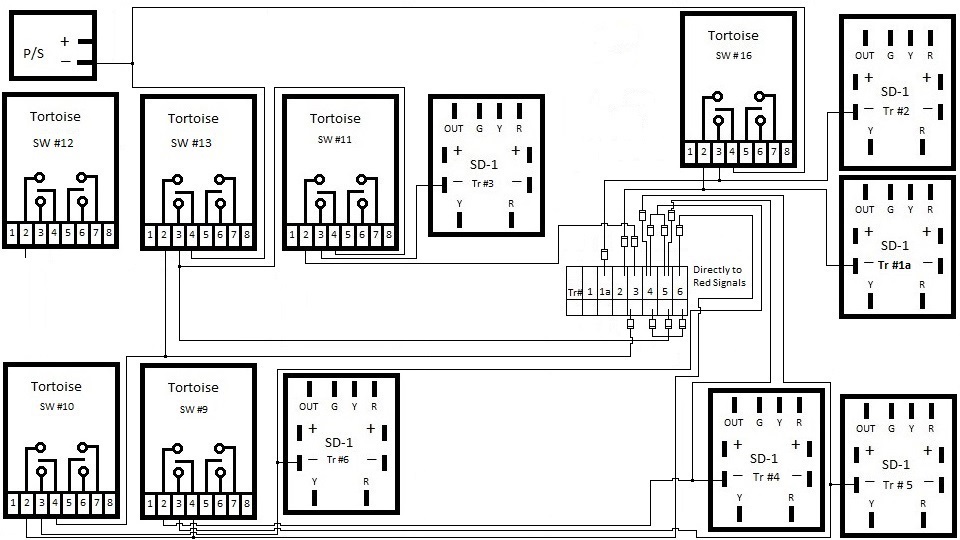 |
|
The wiring diagram between the Tortoises and the SD-1s for the south end of Murnau Bf |
In addition to finally figuring this out, I finished wiring up the panel with the SD-1s and BD-1s and mounted it on the layout. I also wired the signals on the south end to the SD-1s on this panel. I got ambitious and added the front panel for the switches to the south end of Murnau Bf as well! So, next up will be to install the DS64s for controlling the Tortoise switch machines, wiring those up, and wiring up the Tortoises and SD-1s as shown in the schematic above. Simple, right? I mean, it's only been over 4 years since I did this very tedious work. What could go wrong? I'll try to take some photos for the next entry.