Layout Diary & Description of Events
Archive: 2006 - 2014
This page is set up so that the newest information is at the top.
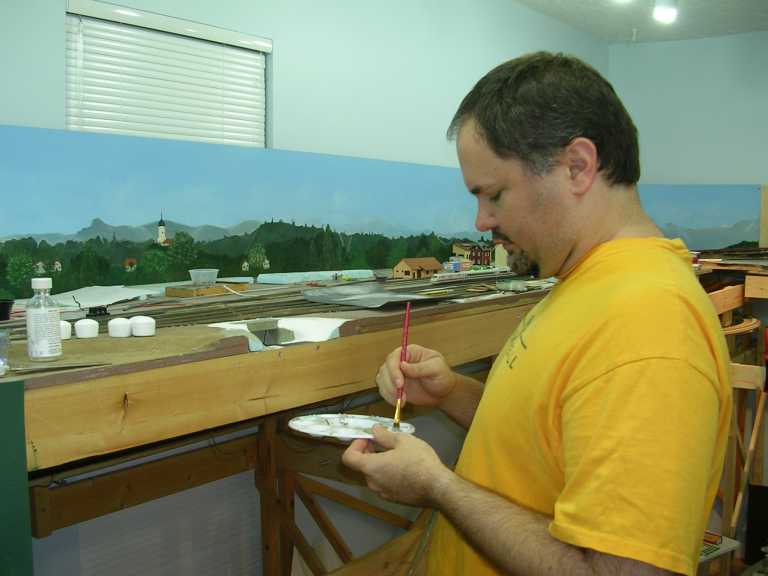
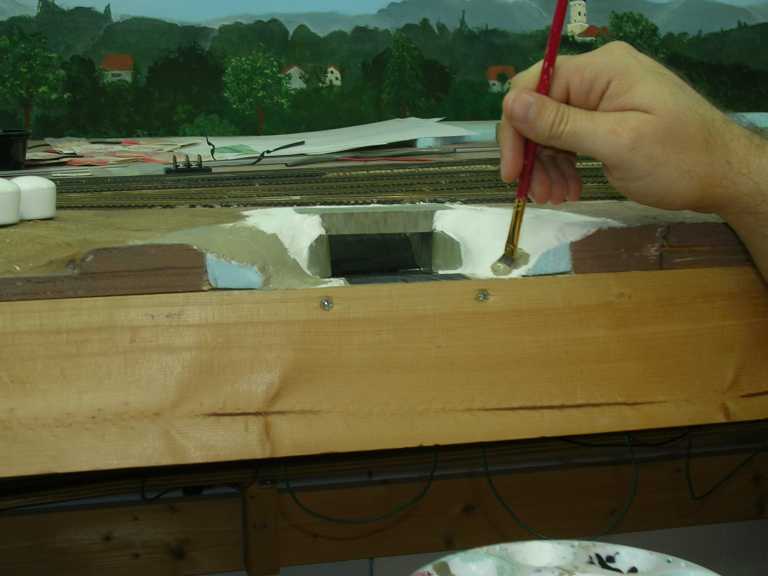
September 3, 2012 – Wiring, And Some Problems With A Tortoise (3 September 2012)
Because of various other tasks, an Iowa football game, and a Ft. Lauderdale Strikers match, I didn't spend as much time on the layout this Labor Day Weekend as I had hoped. The good news is that I purchased sheets of cork for Staging. Earlier in the week, I also made a purchase of several Digitrax items, including some DS64s to control turnouts. I'm guessing those will show up in a week or two.
Monday was the only day I had available for the layout. I wired up all of the remaining loose wires to the new barrier strip - except for a couple of wires that will go on the KBS 963 block. I also messed around with some of the Tortoise machines to ensure that I had made the internal modification to them that would decrease the chance of a short.
It was getting to be the end of the day when I decided to try my hand at installing a Tortoise for the first time in about 7 years. It became apparent immediately that my elongated helix was going to be in the way of my drill. After marking where I thought the screws for securing the Tortoise needed to go, I angled the drill and was able to get the screws in place. I took out 2 of the screws, loosened the other two, and proceeded to add the Tortoise. After tightening the two loose screws and added the other two, the Tortoise was secure. Now I just needed to add the actuating wire. Hmmm... It's a bit tight, but... there! I moved to the top side and was able to get the wire into one of the holes in the throw bar. Perfect! Time for dinner - but before I go, let's just see how the Tortoise works. Initially, it appeared that the wire was holding the closure rail securely to the side of the stock rail. The only problem was that it was the WRONG DIRECTION! The wire wasn't moving from side to side because I had installed the Tortoise too far away from the hole! So, instead of freely moving across the diameter of the hole, it was stuck against the side of the hole closest to the Tortoise. At that point, I called it a day. I'll try again next week.
Side note: Some people suggest that you should start with the bottom deck and end with the top deck when building a multi-deck layout. After trying to install this Tortoise near the back of the top deck, I can't even imagine attempting to do so this with a completed lower deck!! Sure, I had to weave around my elongated helix and some previously installed wires. However, I was able to do this all without having to lean in over 2 feet of lower deck! Plus, I'd have only had about 18 inches of clearance between decks to work with! My advice on multi-deck layout? Unless you have simple wiring and very narrow decks, I'd start from the top and work your way to the bottom deck. I'm so glad I did this! This wasn't the first time I felt thankful of this decision - it was just the first time I thought to mention it here.
Update: I added the Ohlstadt Bahnhof to the layout drawing. The drawing still isn't to scale, and I've moved Hartsteinwerk Werdenfels a bit, due to space constraints. I'll probably have another update to move HWW to where it really belongs, once I get motivated to work on the drawing again.
August 25, 2012 – A Light Work Day (3 September 2012)
I was able to get 2 new batteries for my Dewalt cordless drill. So, I added one of the barrier strips that I needed on the south end of the Murnau Bahnhof. I added the main bus wires, which connects the last barrier strip on the line to this new one. It looks like I'll need to install one more barrier strip to complete this block.
Speaking of blocks, I had decided to divide my layout into four blocks, using a recently purchased Digitrax PM42 to manage the power in each blocks. The blocks will be:
Murnau Bahnhof - The entire station area
Staging - This includes the stretched helix from Staging to Murnau Bf., and all of the staging tracks
KBS 960 - From just outside Murnau Bf., through Hechendorf, Ohlstadt, and Eschenlohe, and right up the entrance of Staging
KBS 963 - From just outside Murnau Bf., all the way to Oberammergau
I was also able to add trim to some of the Murnau station building's windows. While doing this, I noted that some of the walls, where I had added trim previously, had warped a bit. I laid these flat (or slightly raised at one end) and added some weight on top of them. I'll also be adding interior supports for assembly that should help straighten these walls.
August 18, 2012 – Dead As A Door Nail - Cordless Drills Don't Work Without Batteries (24 August 2012)
So, I figured I'd do some more wiring this weekend. Let's see... I'll need to add some barrier strips under the layout. Where's the Dewalt cordless drill? Ah, here we go... Huh, battery is dead. I'll just grab the other one from the charger and... that's strange - that battery is dead, too! Well, CRAP! I wasn't planning on going to the DIY store, and didn't really want to at that moment. Ah! I now have a list! Let's see what else I could be doing.
The Murnau Bahnhof scratchbuilding project caught my eye. After looking at the pieces, I realized I still needed to cut out several windows. So, I stuck a new blade in a couple of Exacto knives and started to slice away. I managed to finish cutting out all the remaining windows, which means all I have left to do before painting and assembling is detail the newly cut windows. I need to give them sills and frames. I also need to install the glass. By the way, I came up with the idea of either printing the panes right on the glass (clear styrene), or printing them on paper, along with the curtains and any other details. I think I'm leaning toward the latter. Printing directly on the plastic would probably mean I'd need to seal them. I think it'll be easier to do it on paper. I'll try both and report back.
A quick word about cutting windows for N scale buildings. First off, it's a HUGE pain! I purchased a Nibbler specifically for this job after slaving away cutting out windows for the Oberammergau Bf building. However, I have found it to be practically useless for anything but doors or very large windows. For doors, it's great because you can just start at the edge of the styrene. It makes perfectly square corners! When it comes to windows, you have to cut or drill a large enough hole to get the head of the Nibbler through the styrene so it can start munching away. A hole that large is usually as big as half the window, so why bother? This is, by no means, a slam against the Nibbler. It's a wonderful tool, and I would highly recommend it - for HO scale or larger. For N scale, several sharp blades in various shapes is the best way to go. In particular, the standard #11 and a narrow chisel blade are good choices. A square or flat file is also essential to smooth and square the newly cut holes for the windows.
August 11, 2012 – Working From The List (24 August 2012)
Working from my newly created list, I was able to bounce around a bit on tasks. I wired up the remaining Tortoises that I had installed so many years ago. That meant I got to use my brand new (at least a year old!) Weller soldering station for the first time! It felt good to do some wiring again. I just realized that I hadn't done any wiring since 2005!
I also painted some track on the south end of the Murnau Bf - in the Lokalbahn station area. I used some paint pens that I had purchased a while back, which worked incredibly well. I highly recommend these! Heck, I even went over some of the other tracks that I had previously airbrushed to give them more of a rust color. I did this on some of the lesser-used spurs.
While painting the track, I realized that several locations where I had insulated rail joiners (at the ends of turnouts) had fairly large gaps between the two pieces of connected rail. This wouldn't do. Even though this wasn't on my list, I needed to take care of this. In the past, I had used a trick I learned from one of the forums I frequent on the Internet. So, I thought I'd see if I remembered how to do it.
I stick small pieces of strip styrene into the gaps and apply super glue to keep them in place. Once the glue has dried, I cut the styrene down as much as I can and then file the rest to match the profile of the rail. A quick shot of the paint pens took care of the side of the rail, hiding the bright white styrene. Oddly enough, a few passes of a dirty track cleaning eraser gives the top of the styrene about the same color as the rest of the rail. There! Now I wouldn't have to stare at those gaps anymore!
July 22, 2012 – Waking Up From Suspended Animation After Over 4 Years! (22 July 2012)
I didn't get much done on the layout this weekend. Looking at the layout, and thinking about what needed to be done besides scenery, I felt like Rip Van Winkle, waking up after a 4-year nap! Everything was foggy. What had I planned on doing when building the next section of benchwork? How did I hook up a Tortoise switch machine? WHERE WAS EVERYTHING?!?!
So, this weekend, I organized. I cleaned. I planned. I even planted a few trees and a set of guard rails. The hobby room had become the storage room, with LOTS of stuff that didn't belong in there. I moved that stuff to another room (until I find a permanent home for it), and then started looking through boxes of stuff - trying to figure out where everything was. That's when I found the guard rails that I needed for my overpass, which hides the entrance to staging. Heck, I didn't even know I HAD these! Score!
I also found all of my electronics stuff, which I'll need in order to finish wiring up the track and Tortoise switch machines that I already have in place. Once I have this done, I can test the existing track, switches, and switch machines, before I move onto either lower level staging or the branchline to Oberammergau.
I decided the best thing to do in order to move forward was to create a list of tasks that I could choose from. I created 3 main categories, and created lists of tasks for each - 1) Scenery & Modeling, 2) Trackwork & Wiring, and 3) Benchwork Construction. While doing scenery in the past, I'd found that I would hit a stopping point - glue needs to dry, paint needs to dry, I've run out of something, etc. By having tasks listed in the different categories, I can move onto something in a different category if I hit a hard stopping point. With limited funds, it was difficult to do this when I last worked on my layout. The good news is that at least SOME funds have freed up - allowing me to buy the dozen Tortoise switch machines I need, or the Digitrax components I need.
As I said, I didn't get a lot done on the layout, but I now feel like I've "had my morning coffee", and am ready to move forward next weekend with a better vision of what needs to be done - time permitting, of course!
July 5, 2012 – Sometimes Life Gets In The Way...Again! (5 July 2012)
Less than a week after my last entry, I was laid off at my job. A summer of job searching, a few months getting into a groove at my new (BETTER!) company, and some plain ol' procrastination has put me another year behind. Actually, during my job searching last summer, I actually did a full-sized sketch of the mainline, KBS960, from Murnau, through Hechendorf, Ohlstadt, Eschenlohe, and on into staging. Yeah, "Ohlstadt". I need to update the drawing on the website, but I shortened the distance between Murnau and Hechendorf, which allowed me to add Ohlstadt between Hechendorf and Eschenlohe. That means that all towns between Murnau and Eschenlohe are now modeled. There is no way to model all stops on the Oberammergau line, so that'll have to stay, "as is".
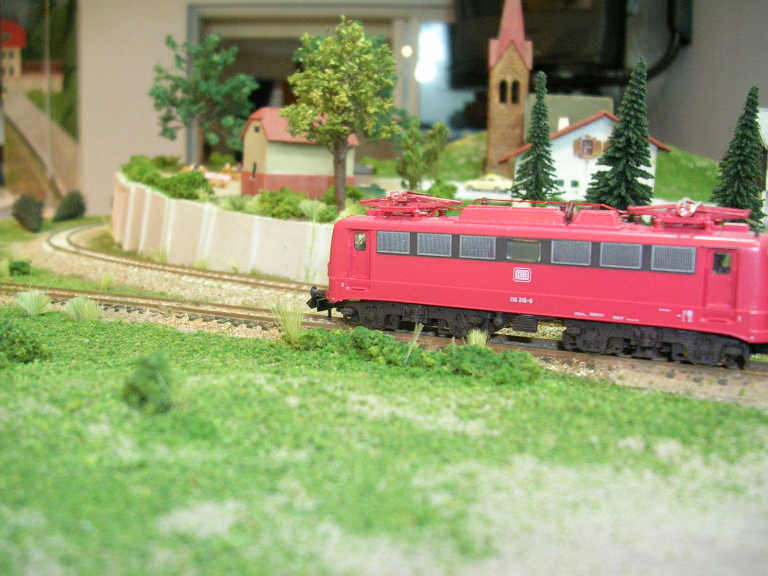
I ordered a Kato ET425 EMU, which has be seen on KBS960 since the early 2000s, I believe. Yeah, it's outside the era that I'm modeling, but it was too cool to pass up. This purchase also got me going on my layout again. I've spent a few hours on it the last couple of weekends, plus the Independence Day holiday. My goal is to complete the basic scenery up to the Murnau Bf. station buildings before I turn my sights on track work and wiring again. I'd like to get the staging area below Murnau completed, and then head out on the branchline - KBS963.
I managed to add a nursery to the layout. This depicts a nursery I encountered in 2001, when I was on my way to check out the blue, DB MoW building that is also on my layout. On the way back to the Murnau Bahnhof, I got lost in this massive nursery - I couldn't seem to find an exit! Anyway, here are a couple of photos of the newly installed nursery.
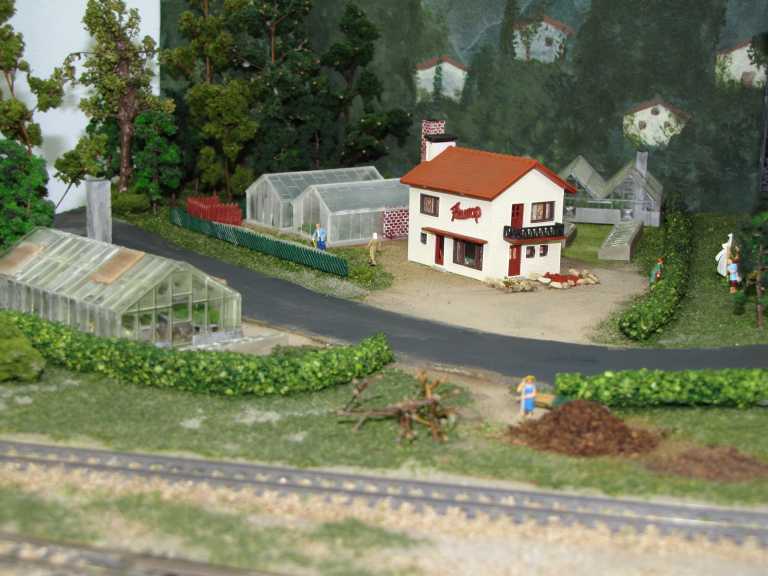 |
| A view of the nursery, which spans a road. It includes three greenhouses and four planter boxes. In the foreground, you see a worker loading a wheelbarrow with wood chips for mulch. To the right you can barely make out a group of ladies hanging the laundry on a clothesline. An employee of the nursery is chatting with them over the hedge, while another employee heads over to check on a customer on the left. |
 |
| This is a wider view of the nursery scene, to give you an idea of where it is in relation to the power station and the DB MoW shed, which are both on the left of the photo. |
 |
| I also glued down the set of buildings on the left side of this photo. To give the illusion that the street bears to the right, I glued a photo of a similar building onto the backdrop. It's not perfect, but I think it does a good job of conveying this when looking down the street at a glance. I need to use a tripod next time - the camera obviously wasn't level. |
June 22, 2011 – Townhome Sold! Just Back From 2 Weeks In Germany!! Time To Get To Work!!! (22 June 2011)
OK, so there were some valid reasons that I haven't been able to post a diary entry or work on my layout for the last few months. We finally decided to sell the townhome. We closed at the end of February, giving me a ton of free time to start back up on the layout in earnest. However, before that could occur, we started planning a trip back to Germany (after SIX YEARS!!) in June. We had a great time, and I was able to do further research on the Murnau-Oberammergau line. I took several photos of the Altenau Bahnhof that I hope will help me when it comes time to scratch build the station building.
I must say that it was very depressing to see what the Deutsche Bahn has done to the lines in Oberbayern. Murnau is a shell of its former self. No goods shed. The canopy attached to the build was torn down. The canopy on the platform was torn down and replaced with a smaller, very industrial-looking one. They have ripped up ALL of the freight tracks. Only four tracks remain - 3 on the main line and 1 for the branch line. The branch line track, formerly known as Track 1a, is now Track 4.
The area where the old Lokschuppen use to be is now a valley with a new roadway. I literally got lost between Murnau Bf and Murnau Ort!! It had changed so much that I truly had no idea where I was! No tracks remain in the old Lokalbahn station. The Lokalbahn station building itself appears to be in good condition. The good sheds nearby are also in decent shape. It was difficult to tell because there are now "Private Property" signs throughout that area - a bit intimidating.
The Oberammergau line hasn't fared much better. Oberammergau has a single track now. The old station building had its waiting area ripped from it. At least part of the bottom floor on the remaining portion of the station building is used as storage by the DB. The rest appears to be rented out as residential apartments. The rail line comes nowhere near the station anymore. They are about 30-40 yards apart. All of the sheds and other buildings have been torn down. The bus haltestelle has been increased in size, and retail shops have replaced all of the old buildings and rail-served businesses. Heck, even the post office across the street has been turned into holiday apartments! The only GOOD thing to report is that they appear to be refurbishing the old Ammergauer Hof, which is next to the old station building.
Along the line, the previous remnants of the passing sidings have all but disappeared. I'm very lucky to have done most of my research in 2001 and 2005. Had I started in 2011, I'd have been lost, and without any photos!
The same could be said for Eschenlohe. None of the holding tracks remain. The spur that served as a team track (I believe) is also no longer there. The whole situation just felt kind of eerie. I guess this is progress. However, at a time when fuel costs are skyrocketing, you'd think there would be a chance to re-energize the freight business in Oberbayern. Well, tearing up all of this track has pretty much ended that possibility!
That's my report on our trip to Germany. Hopefully, the next entry will be about progress on the layout. I'm hoping to take advantage of a 3-day weekend coming up in a little over a week. I'm going to have to figure out where I left off - it's been quite awhile since I ventured into the hobby room!!
December 24, 2010 – Merry Christmas... Now, Will I Get To Work On The Layout?!?! (24 December 2010)
Wow! Three and a half years since my last entry. Not bad. Yes, trying to keep the townhouse in the Disney area occupied has been quite a chore. Even now, with solid bookings from mid-December through the end of February, I find myself busy with various townhouse-related things while on my vacation.
But! The last 3-plus years have not gone without progress. I've done a bit of scenery, worked on the platform for the goods shed in Murnau, added a road, and cemented the larger buildings in Murnau in place. The biggest undertaking had been scratch-building the main building of the Murnau Bf. The outer walls have been cut. Holes for the windows and doors have been added. I still need to do some figuring for the roof, as it is fairly complex.
I've blown away the first week of my vacation without so much as a glance at the layout. I'm hoping to get some work done during the final week of my vacation. At the very least, I'll try to post some photos of my latest work. My goal is to gradually get back into working on the layout - at least on the weekends. Wish me luck!
May 20, 2007 – Some Progress... Where Did The Time Go?!?! (20 May 2007)
Since purchasing our holiday townhouse in Kissimmee in February, I've been focusing my time on that website. I've also been busy with rental portals, bills, and a bunch of other stuff related to trying to rent a townhouse near Disney! BTW, here is the website for our Disney Holiday Townhome.
I haven't been able to do much in the hobby room. However, I have managed to complete two more city buildings and create/install the fencing around the maintenance shed. One of the buildings was from Pola, which I'm use to building, and one from Faller. The Faller building had twice the number of pieces - many of them VERY small. The Faller building is about half the size of the Pola buildings! Go figure. Let's hope my interest has been rekindled. I miss getting out in the hobby room, so that's a good sign. We'll see.... In the meantime, here are the buildings that I've been putting together. The batteries in the camera died before I could take a photo of the fencing or the Faller building, so those will have to wait for another time.
 |
| These buildings are in their proper location. However, I'll need to raise the area by the roads so that the sidewalks aren't even with the height of the roads. |
January 14, 2007 – No Progress, But an Important Tip on Static Grass! (14 January 2007)
I threw my back out while helping my wife create a small garden on the side of our house. This happened on Saturday. Spending several hours at the workbench, hunched over a model, just wasn't going to happen. I'm still in a lot of pain, but I still have tomorrow, so I'm hoping that I feel well enough to accomplish something this weekend!
The good news is that I picked up an excellent tip concerning the application of static grass. This tip came from John Woodall, which he posted on WorldRailFans.org and Railways of Germany.com. Previously, I had only put a single layer of static grass down. This was fine for general ground cover. However, I was looking for tall grass that you see along the tracks. I just haven't been able to get that look of long, wispy grasslands look with the Woodland Scenics grass or the Noch grass. As I had suspected it was operator error, all along. I had tried to add a second layer of grass on a piece of scrap wood with horrible results. After reading John's entries, I realized that I should be using spray adhesive! Of course!!! It had never occurred to me, primarily because I didn't have any spray adhesive, and had never used any. My wife (the artist/crafter) mentioned that she had some, and that she wasn't using it. So, I headed out to the hobby room, bad back and all. I sprayed the glue onto my previous work on the piece of scrap wood, and then applied the static grass. Wow! This looked much better. I did this a couple of more time. Even better! It's not perfect yet, but I'm going to let it all dry and apply at least one more layer. It definitely looks promising! Thanks, John!!
January 7, 2007 – Happy New Year! Model Building Burnout (14 January 2007)
Is it possible to get tired of building models of city buildings? The answer is a definite, YES! I've completed 3 city buildings by Pola, and started another. I've also scratchbuilt a "flat" which is the end of a city building, complete with a Paulaner advertisement. I can tell you that my interest in building this type of model is waning. So, what did I do? I purchased FIVE more from an auction on eBay! The problem is, that I really needed them. AND, I really need to build them and complete this section of the layout before I move on to other scenery. For me, the biggest pain is cutting out all of the "glass" and "curtains" for the windows (typically, 32 windows per building!).
The good news is that I have a three-day weekend, next weekend. The bad news is that I'll really have to push myself to get some of those models built!
December 29, 2006 – Merry Christmas! Finally, a Completed Layout! (29 December 2006)
Well, I finally completed a layout. Of course, I'm not talking about my German N scale layout - I'm talking about the HO Alpine layout under our Christmas tree! Hey, it's nice to say that I've completed at least one layout, right? Anyway, in the spirit of Christmas, I have posted some shots of the "finished product".
As you can tell, I didn't get anything done prior to Christmas. During my Christmas break, I've taken it more slowly than I had anticipated. I'm still building some kits. Currently, I'm on my third Pola city building. These are typical 4-story buildings that you see in almost any German city. I'll have one block of these, and a couple of flats (or partial relief) in Murnau. These will be supplemented with additional details on the backdrop made by my wife.
I enjoy building these models. However, it can get kind of monotonous. I think that may be the reason I haven't gotten more done during the break. I still have three days left (although Saturday is Iowa Hawkeyes day, with the basketball team playing at 1:00PM, and the football team playing in the Alamo Bowl at 4:30PM). I'm still hoping for more progress before I head back to work. I'll post photos of the "city block" when I complete it.
In the meantime, here is my HO "layout":
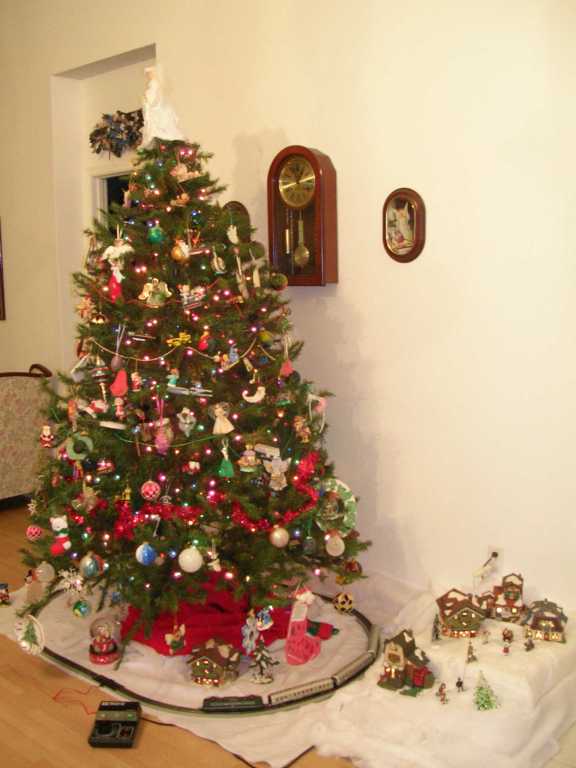 |
| This photo shows my fully completed HO Alpine layout. It's a simple track plan, but the Christmas tree provides a suitable view block to make it seem bigger - yeah, RIGHT!!!! Hey, it was fun to have around the Christmas tree - even if it WAS HO! |
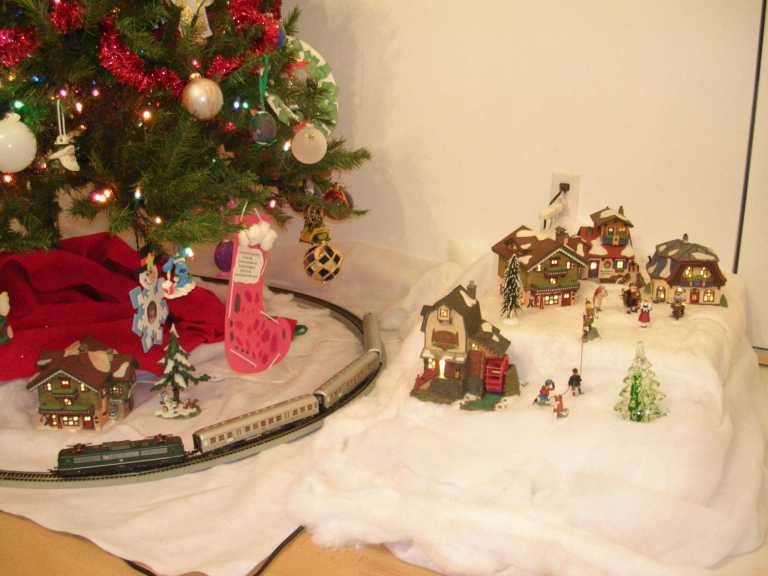 |
| This is a close-up of the village and train. My son is officially a SCALE modeler - or at least a fan of scale modeling. All he could talk about was how out of scale the people were!! I have no one to blame but myself! |
December 11, 2006 – A Great Ops Run on fecNtrak! (29 December 2006)
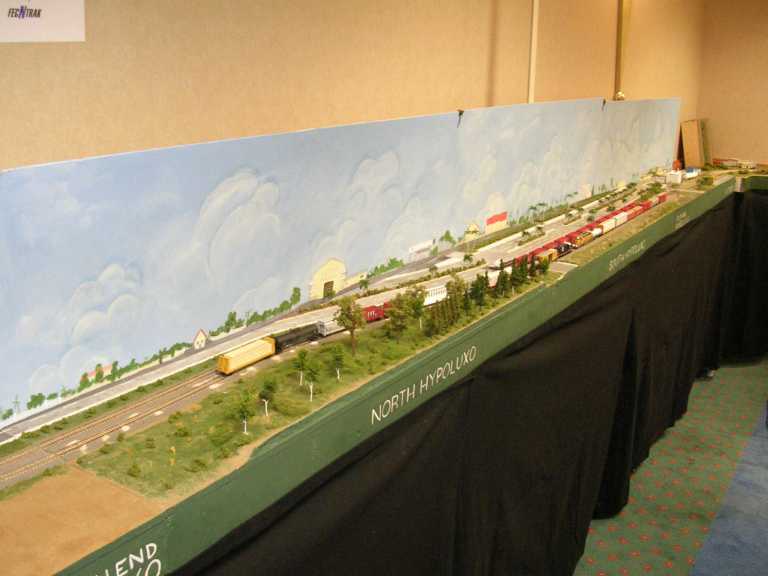
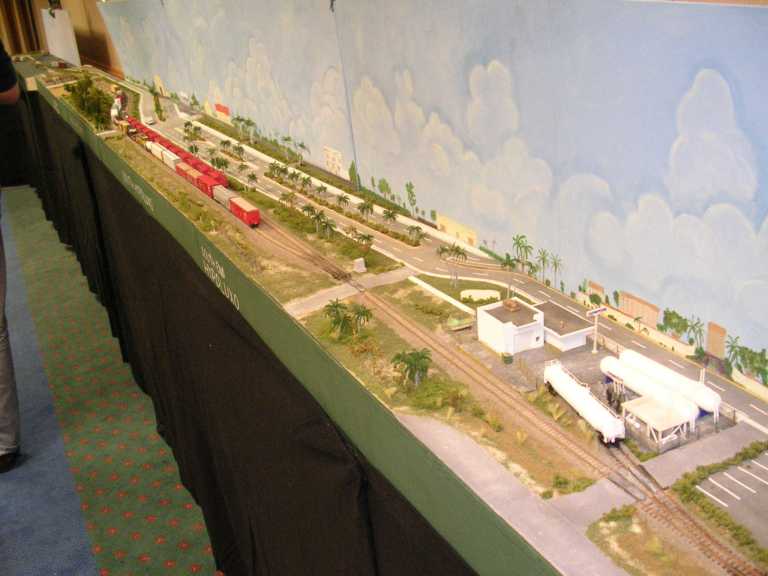
I had BLAST running operations on the FECRS fecNtrak modular layout this weekend at the FECRS Convention! Wow! This was the first serious operating sessions I've ever been involved in. We tried one at a public show in June at the Cocoa Public Library, but there were a LOT of people, and a little too much pressure to really pull it off. This time, it was just FECRS members, and a lot of time. Here are some shots of my modules, which were on the south end of the layout.
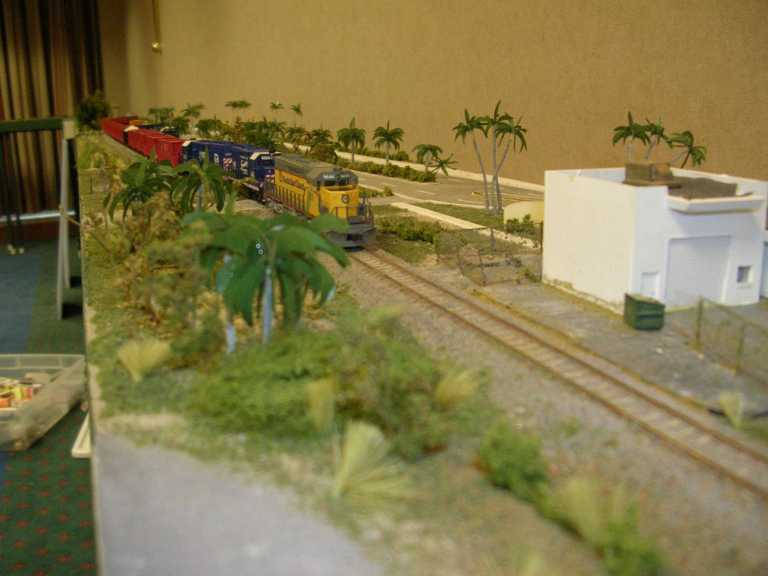 |
| This photo was taken on the south end of the Hypoluxo siding, on the west side of the tracks near AmeriGas in Boynton Beach. A southbound empty rock train is heading out of the siding. |
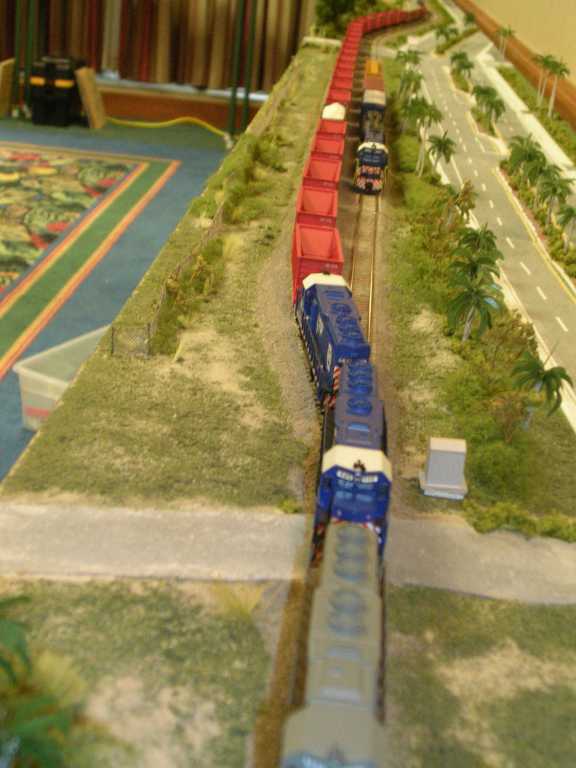 |
| This is an aerial view of the same rock train. You can see the West Palm Beach local holding the main line. |
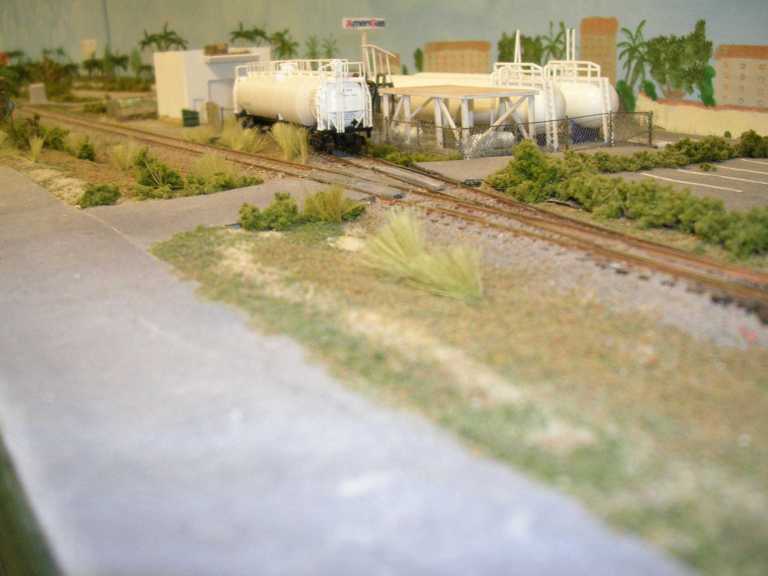 |
| This is a shot of AmeriGas in Boynton Beach. A tank car has just been spotted on the AmeriGas spur by the West Palm Beach local. |
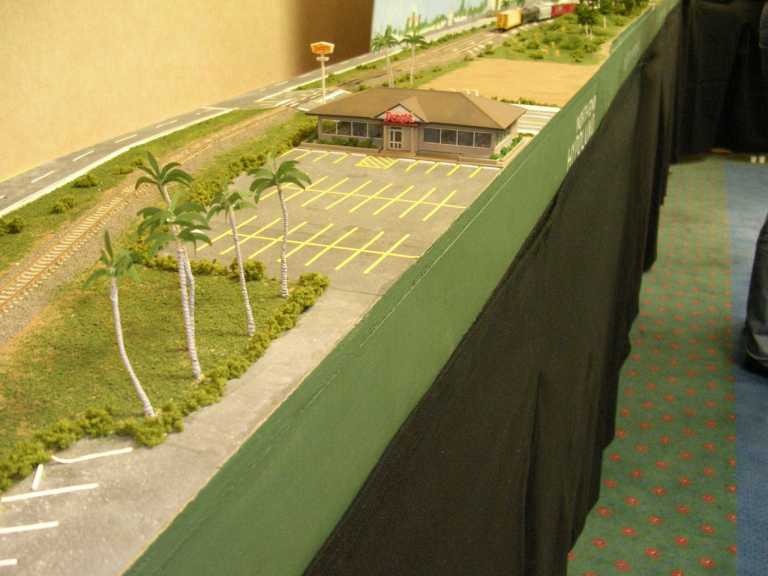 |
| This is Denny's restaurant, which is located on the north end of Hypoluxo siding. You can see the West Palm Beach local, now back in the siding. It is waiting for the next thru-freight before heading out on the main line to complete its switching duties. |
 |
| This is an overall view of three of my five modules. To the left, you can see just the beginning of the fourth module, which has Denny's on it. The fifth module (Boynton Beach) was not used due to space constraints. You can see is leaning against the wall on the right, just past the backdrop. |
 |
| One final overall view looking north. |
November 21, 2006 – No Progress - Just A Quick Update (21 November 2006)
I had created the November 5th entry awhile ago, but hadn't had a chance to upload it to the website. The last couple of weekends have been busy with relatives and outside activities. This weekend is Thanksgiving. After that, I'll dedicate at least one of the following two weekends to my fecNtrak modules. I need to do some fine tuning of some of the track prior to the FECRS Convention on December 7-10. So, it's looking like very little will get done between now and mid-December. It is my plan to spend quite a bit of time working on the layout during the Christmas/New Year's holiday week. Hopefully, there will be at least one (and maybe two) entries here prior to Christmas. We'll see....
November 5, 2006 – A Model, Some Roads, and a Needed Clean-Up (21 November 2006)
I was able to do quite a bit this weekend. I pulled up the foam tape around the roads, smoothed them out, and painted them. I also added dirt around the roads. The roads still need some weathering, but that's about it.
I broke out some of my model building kits to get an idea of where I want them to go in this area of the layout. I built a Vollmer apartment/shop model. After building it, I realized that I wanted this behind the Murnau Bf building. It wasn't a total waste of time, as this area will be next in line. For the area I'm working on now, I've decided to go with the Pola and Faller kits that have more of an Altstadt (old city) feel. The Vollmer model looks more modern, and wouldn't fit with these models. Right now, my plan is to have a city block of these older buildings, with a construction site on one corner. I decided on a construction site because of several factors. 1) I don't have another corner building to finish off the block. 2) It seems like there is always SOME construction going on. 3) This gives me an opportunity to detail the courtyard created by the block of buildings. 4) It exposes more of my wife's backdrop!
I believe I'll also add a nursery to the left (north) of this city block. There is (was?) a nursery between the Murnau Bf and the electrical substation that I accidentally walked through on my research trip to the substation. It was huge! Rows of plants and trees everywhere! Mine won't be so big. However, I plan on getting a couple of greenhouses and attempt to make it "appear" to be fairly large.
I'd like to place a warehouse between the road and the tracks. Again, on my research trip, I walked past this building. It appeared to be grocery distributor. Heck, it may have even been a catering business. Either way, I'd like to add this building to the layout. It can be an "out-of-the-box" model, but I'm going to be a bit picky about WHICH model goes there.
Finally, as I was starting to build the Vollmer model, I realized how messy my work area (and my wife's!) had gotten. It would have been impossible to put the model together here! So, I took an afternoon and cleaned up the area and re-organized my tools, paints, brushes, glues, etc. It seems to have been contagious - my wife cleaned HER area, too!! Of course, the fact that we were having two different sets of relatives (hers AND mine!) come to stay with us over the next two weeks may have had something to do with it as well.
October 31, 2006 – A Mid-Week Update and a Photo (31 October 2006)
I still have much of the week free, so even more progress may be made. However, I had a chance to give an update, so I thought I better take advantage of the situation. I was able to lay Smooth-It for the roads in the back of the layout. I haven't removed the foam tape or sanded the roads smooth, but the Smooth-It is dry. I was also able to create the gates that will be used for the MoW shed. I created the fence for this area as well, but I haven't added the "chains", or tooling (the stuff used to make wedding veils) to the fence just yet.
I'm still hoping to try out the new Woodland Scenics static grass before the weekend. I'd also like to finish making the chain link fence, and possibly sanding down the roads. In the meantime, here is an updated photo of the overpass.
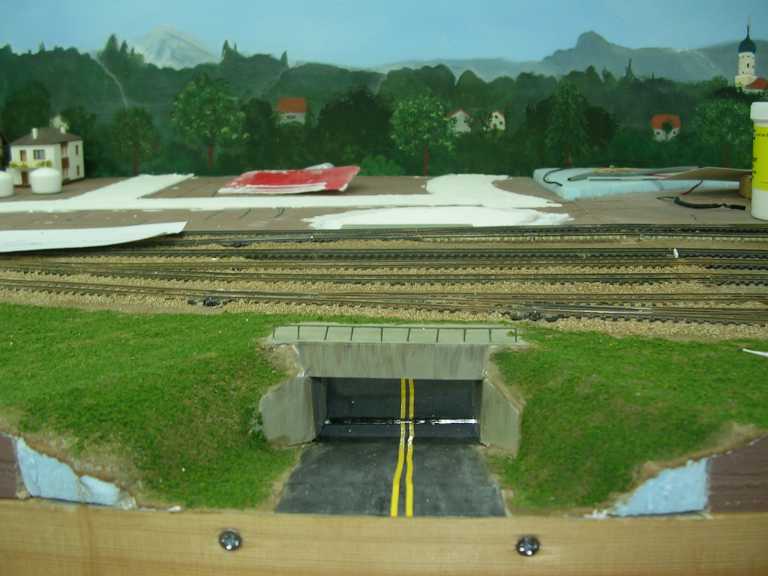 |
| This photo shows the newly installed railing on the overpass, as well as the striping on the road below. You may be able to tell that it is more difficult to pick out where the mirror starts on the left than on the right. That is because I used black paint in an attempt to hide the line between the road and the mirror. I will do the same thing to the right side in the near future. You can just make out the other end of the overpass on the opposite side of the tracks. The white spot on the far side of the tracks is the decent leading to the overpass. The other white areas are the new roads. |
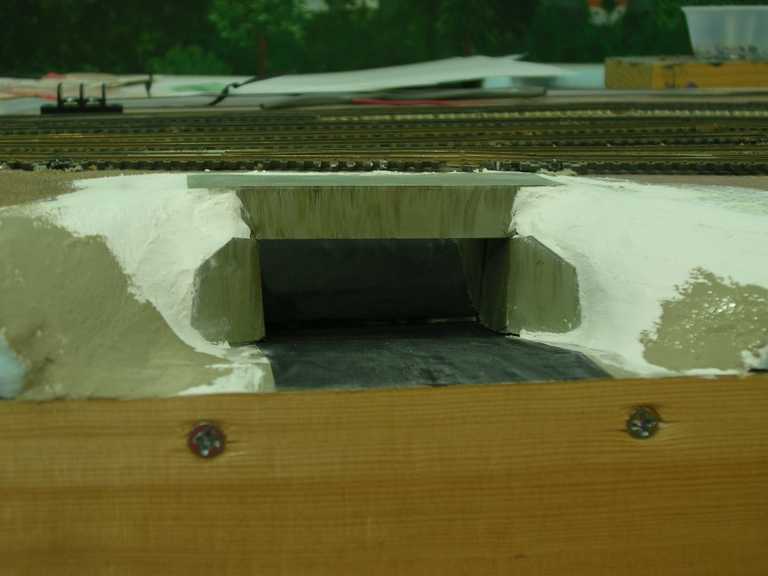
October 29, 2006 – The Other Side of the Mountain (Overpass!) (29 October 2006)
I didn't get much done this weekend. Partly because my wife had another craft show, and partly because what I DID get done was tedious. I took out a section of homasote on the other side of the tracks, opposite the aisle-side opening to the overpass. (FYI, it's not easy to cut a chunk of homasote out of the middle!) This was done to create what appears to be the other side of the overpass. Since the layout height is at shoulder level, it wasn't necessary to cut a hole completely through the layout like I did for the front side. By dipping down just half an inch, it gives the illusion that the dip continues to an appropriate level. I will be adding trees and bushes around this area to further hide the fact that it drops only a half inch. I created the concrete bridge section to match the other one, and cemented it in place. I then added the Hydrocal to create a smooth drop under the overpass.
I also laid out the next section to be scenicked by drawing where the roads and buildings will go. I have temporarily stopped work on the garden area. I seem to work from front to back. This is a pretty dumb way to do things, and so I'm going to try to correct the situation. I'll be working on the area in the rear, just in front of the first section of the backdrop, for the next few weeks. Once I get this area completed, I'll go back to the garden area. In addition to drawing in the roads and building locations, I also put down some foam tape to outline the roads in preparation for laying some plaster.
On second thought, considering the amount of free time I had, I actually got quite a bit done this weekend!
I also managed to make it to the Hobby Depot this weekend. I had accidentally left my plastic weld bottle open for a couple of days. Poof!! Half of what was left in the bottle evaporated. Surprise! So, I used this as an excuse to visit the hobby shop. While I was there, I also picked up some Woodland Scenics static grass. I wanted some brown and gold grass anyway. Plus, I wanted to see if the WS stuff was longer and/or stood on end better than the Noch stuff. I'm still not convinced that it isn't operator error, but I wanted another brand to do some comparisons. I'm hoping to use WS stuff this week on a piece of scrap wood first. It's suppose to rain all week, so I may have some time to "puff some grass" (that sounds bad, doesn't it?), and build some chain link fence.
October 22, 2006 – Don't Fence Me In (29 October 2006)
I decided that I needed to finish up the area around the substation. I had let it linger because I didn't want to get the soldering iron out to make the chain link fence or the gate for this area. I decided that I already needed to make the railing for the overpass, so I broke out the soldering station and made some fence and railing. I also scratchbuilt the metal rolling gate for the facility. I'll try to get some photos of the fencing and railing soon. I still need to make chain link fence for the entrance to the Maintenance of Way shed. I might be able to do that during the week.
I managed to put down the striping for the road that goes under the overpass. As expected, this really shows off what a mirror can do. If I could do it again, I would not have placed the mirror at such a steep angle. With the road dipping below track level, very little angle was needed. This didn't occur to me until it was too late - I'm NOT ripping up the overpass and starting over. Besides, it certainly looks "good enough". After all, it fooled my kids and my in-laws!
October 18, 2006 – What's a Garden Without a Shed? (19 October 2006)
This week, I've had a couple of nights where I had some time to tinker around in the hobby room. So, I started to build a garden shed out of balsa wood. It has one window and a door. It also has a porch (or patio) for the front. I may add a picnic table to the porch. There may not be enough room for one. We'll see.
I also added some grass to the area around the gardens. When I put down the dark earth, I was left with a very stark contrast between the dark dirt and the original layer of lighter dirt. By covering this transition, the scene is more blended.
Here are some shots of the garden area, and another one of the overpass:
 |
| This photo is taken along the road. It highlights the dirt rows where vegetables need to be planted. I may leave one of these gardens barren just to show the dirt rows. I'm still undecided. |
 |
| This is a broader view of "gardeners' row". You can see two of the three planted gardens, and the four unplanted gardens in the middle. The two wooden sheds have not been planted, but are in their approximate locations. The metal shed is a placeholder, although I'm beginning to like the idea of a local resident purchasing this shed from the DB for use in his garden! |
 |
| This photos shows the scratchbuilt garden shed with porch/patio. It is made out of balsa wood with a plastic door and window. Luckily, these sheds are very simple in design, so each of them can be built in an evening, and then painted the next. |
 |
| This is a another shot of the scratchbuilt garden shed and porch/patio. This view give you a better idea of the rows of vegetables that I created. I'll be adding bushes and some flowering plants around the vegetable gardens, along with fences and a couple of Maypoles. |
 |
| This is a quick shot of the overpass. It still doesn't have a railing on top or the highway striping, but I figured the dirt and foliage was an improvement. There will also be some bushes added. Notice the ballasted track near the overpass. This is also a new addition. |
October 15, 2006 – Doing a Little Gardening (19 October 2006)
I decided to fill in the area in front of the tracks near the electrical substation. Several months ago, I had torn out the homasote on the front of the layout in this area in order to get a hill down from the tracks. The entire west side of the Murnau Bahnhof has this characteristic. Below the hill are several gardens, which are separated from the tracks by trees, bushes, and the hill. I had already put down the plaster and initial layer of dirt down. Now, it was time to put down the dark dirt that you typically see in gardens. Once this layer was down, I went back and created "rows" by sprinkling additional dirt in parallel lines. As I sprinkled the new dirt onto the surface, it absorbed the existing glue. This caused the rows to disappear a bit. I kept adding dirt until the absorption stopped. I had to go back and add a little alcohol and glue to make sure the rows were secured.
Once everything had dried, I added foliage with some tweezers. Let me tell you, it's HARD getting rows that small to look good. I have seven garden patches in this area, and it took me a couple of hours to get just three of them finished! I'll try to take some photos of the area before it is completed. Maybe later this week...
October 8, 2006 – When in Doubt, Ballast Some Track (8 October 2006)
I didn't really have any large chunks of time this weekend, so I did several small projects. I used my Noch puffer bottle to add static grass to the lower level, in the area near the entrance to staging. I also added static grass to the hill next to the scratchbuilt building at the electrical substation. I ballasted another section of track, including several switches on the north end of Murnau Bahnhof. I also did a little weathering on the buildings at the electrical substation.
I was certainly more interested in working on the layout this weekend. It's just too bad that time didn't permit more work to get done. There's always next weekend, right?
October 1, 2006 – The Iowa Hawkeyes & Bayern München are Cramping My Modeling Style! (8 October 2006)
Time and enthusiasm were again at seasonal lows. Iowa football games and Bayern München matches are getting in the way of prime modeling time! I can watch other college football games or Bundesliga matches while modeling, but not when these two teams are on TV!!
I was able to build a road near the front of the layout just north (to the left) of the new underpass. This road will have gardens on the side nearest the tracks. Homes, which would be on the other side of the road, will be "off-layout" and not modeled. With the leftover plaster from the road, I created a concrete pad around the electric substation. I ended up pouring this too thick, and it cracked in some places. I decided that this actually looked pretty good, so I went with it! I added some gravel around th edges, to make it look like the concrete was breaking up at these locations. I then weathered the entire pad. My wife thought it looked good, so that was good enough for me! I'll try to take some photos of this in the near future.
I also did a little scenery around the underpass. I added grass and touched up the paint. Next, I'll need to add a railing on the top of the concrete structure. I'll probably make this out of brass.
Here are the photos I promised of the newly installed underpass and the scratchbuilt building for the substation:
 |
| A rare photo of me actually working! My wife snapped this shot while I was working on the underpass. By the way, have I mentioned how much I LOVE the backdrop that my wife painted? |
 |
| This is a closer shot of the unfinished underpass. You can't tell just yet, but there is a mirror inside the underpass. Once I put the two yellow stripes down the middle of the road, it will become more apparent. |
 |
| This photos shows the base coat of "Mudstone" (from Ceramcoat) being applied. After the base coat a layer of dirt (from Arizona Rock) is added, and then some grass. I'll probably add some bushes as well. |
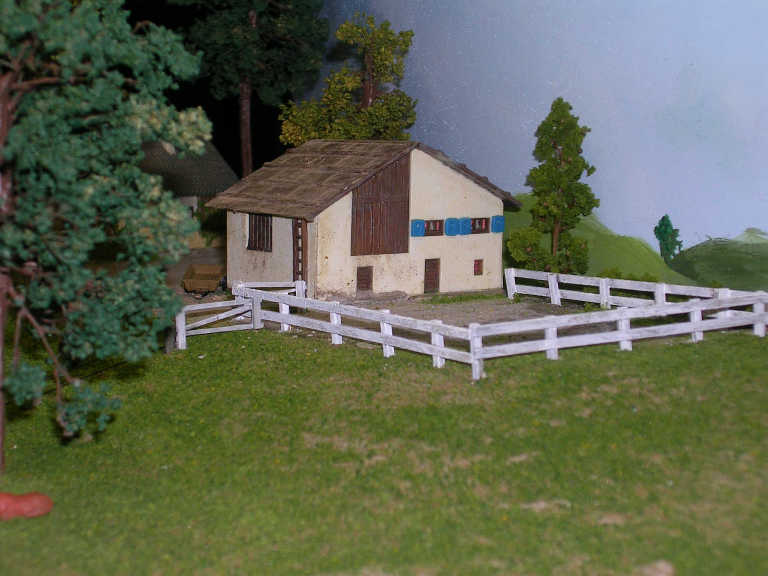
 |
| This is a shot of the scratchbuilt building (white building on the right) at the electrical substation. This is a very plain building, and was an easy scratchbuilding project. All it needs is a little more weathering. Note the white area next to the building. This will get a base coat, a dirt layer, and some grass. It will also get a chain link fence. The road into the substation and DB workshop will get an automatic metal gate. |
September 24, 2006 – Running on Empty (8 October 2006)
I'm not sure why, but I just haven't been overly enthused about "working on the railroad". I had purchased a Noch puffer bottle and some static grass that finally arrived last week. I tried last weekend to use it with minimal success. I believe I got the wrong size for the grass. I was looking for longer grass that would go around the right of way - not quite close enough for the railway to maintain, but outside the farmers' fences and/or property line. You see this in many photos of railways in Germany and North America. The grass I got was only about 2 to 4 millimeters high. The color was too light, so I dry brushed some darker greens to provide variation. As ground cover, it looks pretty good. As tall grass - not even close.
September 10, 2006 – Succumbing to Peer Pressure - From My Wife! (13 September 2006)
All I really needed was a little push. Yes, I had been considering (and reconsidering!) adding the prototypically correct road underpass at the north end of the Murnau Bahnhof, but really didn't have the guts to do it. "There isn't enough clearance without chewing into benchwork", I would think to myself. "Why didn't I do a more thorough job of designing this beast!", would be my next thought. The problem was that I only had an inch (14 N scale feet) of homasote and plywood to work with. Any deeper, and I'd be cutting into the 1"x4" pine benchwork, which would weaken that section.
I told my wife about my dilemma. She started throwing out ideas. I vetoed them all. Finally, she stated, "You know that you absolutely need to do this. If you don't, you'll never be happy with the layout!" Then I started looking at my photos. I saw a solution!
The road dips considerably on the east side of the real underpass in order get enough clearance. Why not do it on the west side (aisle side) as well on my layout? By doing this, I'd have over an inch of clearance, and that even included allowances for the bridge itself! I was never going to have the underpass go all the way under the trackwork. There are too many switch machines and other electronics to make this practical. I was planning on using a mirror on the aisle side, angled in such a way that it appears that the road continues past the mirror. The other side of the tracks cannot be viewed from the aisle, so I was only planning on cutting through the half-inch layer of homasote to provide what will appear to be a descent to the underpass. I would hide the entrance with trees and bushes so that it would not be apparent that the descent is not deep enough to match up with the aisle side.
So, during the weekend, I cut out a trapezoidal section of homasote and plywood at the front of the layout. I added an incline by screwing a piece of scrap wood to the front 1"x4" cross member at an angle. I then added some foam to the sides to provide a smooth transition to the embankments on either side of the underpass. Next, I scratchbuilt a bridge portal and wings out of styrene. I also created angled slots on either side of the opening. These slots are where the mirror would slide in place. Once the mirror was in position, I placed the portal over the mirror. The next step was to make a road. I used a method I've used on my FEC oNeTRAK modules - black, fine-grit sandpaper. I cut the paper to size and glued it down. The final step (for this weekend, anyway) was to add the hyrdocal plaster to smooth out the embankments and to fill in any holes around the bridge portal.
In retrospect, I really should have taken some "step-by-step" photos. I'll try to take some this weekend, before I go any further. A picture is worth a thousand words - maybe more, if I am the writer!!
September 4, 2006 – It's a 3-Day Weekend - Is Jay Sick Yet? Yep! (13 September 2006)
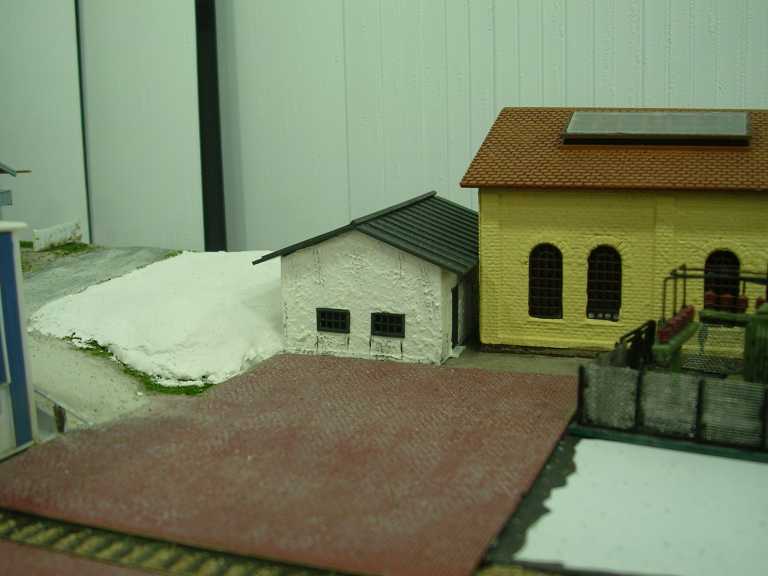
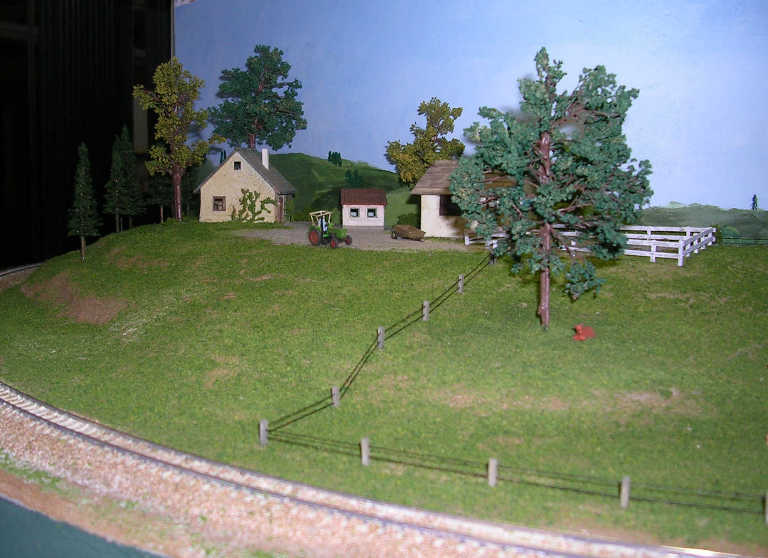
I started coming down with a sinus infection on Sunday, but I felt good enough to carry on with my work on Monday. Albeit, work moved at a slower pace. I worked on the area behind the DB maintenance shed. After looking at some video and photos of that area, I realized I should have left more room next to the road. So, I got out the extruded foam and the hydrocal and extended the hill. While I was letting this dry, I decided to scratchbuild the front section of the building that sits just below this hill. It's a simple building - metal roof, white, stucco walls, and very few windows on the section I was planning on modeling.
This building went together fairly quickly. A couple of things made this possible. I just happened to get some "metal roof" specialty styrene at the hobby shop the previous weekend. Also, I had purchased a "Nibbler" from MicroMark several months ago. This was my first chance to use the Nibbler. It certainly made quick work of the door. The windows were a little more difficult to get started. The windows weren't much bigger than the square blade of the Nibbler. Drilling the hole to make room for the Nibbler had to be much more precise that I had hoped. However, once the Nibbler was able to fit into the space, it made very short work of squaring out the windows. I'd have to say that this tool would probably be much more useful in HO scale. I'm not giving up on the tool, mind you. It does make very nice square corners, and it is easy and fast to use once you have space available for the blade. And, as I mentioned, the doorway was a snap! I'll post photos of this area in the coming weeks.
September 3, 2006 – A Very Good Weekend - And There is One Day Left! (3 September 2006)
All of the preparations made during the week paid off. Even though I didn't spend large amounts of time on the layout, I did get a lot accomplished. And, as the title of this installments states, I still have a day left! Rather than bore you with lots of paragraphs, I'll show some photos of the work that was completed.
 |
| Compare this photo with the one from May 29! The top level has many more trees. The bottom level has a nearly completed farm scene. |
 |
| This is a closer shot of the farmstead. |
 |
| This is a close-up of the barn. The fence was scratchbuilt from real wood (balsa). I gave it an undercoat wash of gray followed by a dry brush of white in order to give the fence a weathered look. |
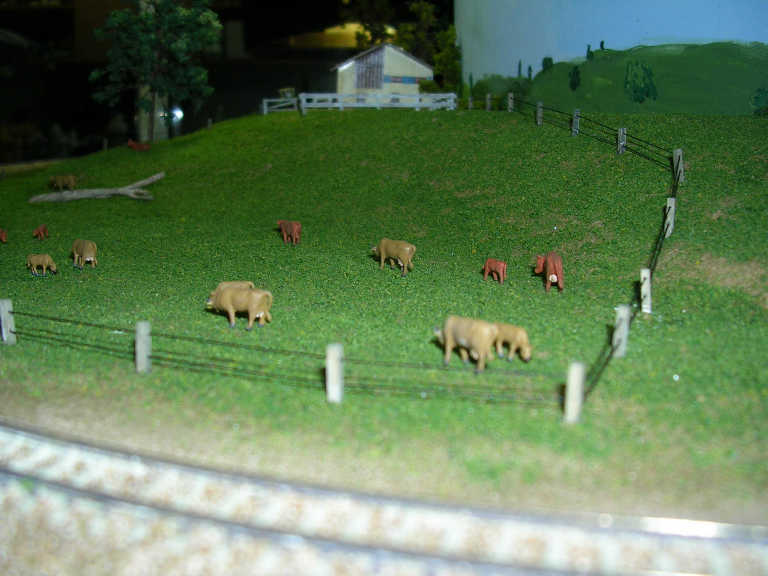 |
| This is a shot of the cattle and the barbed wire fence. This fence was also scratchbuilt. I drilled holes into each post, and then threaded them together. This made it easy to plant the fence. |
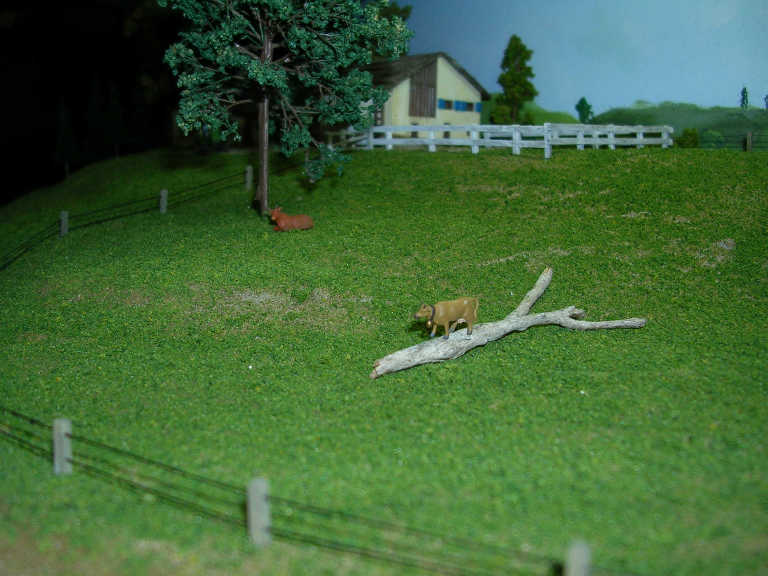 |
| I know - you would be more likely to see a goat perched on an old fallen tree than a cow. I've actually seen this in Iowa, but I probably won't keep the cow there. My daughter wanted this shot, so I obliged her! The fallen tree is an actual twig from our bottlebrush tree in our front yard. |
 |
| This is a close-up of the farm equipment. I have purchased the Noch puffer bottle and some static grass. When this comes in, I plan on adding the static grass to the front of the farm, and have the farmer cutting it with his tractor/mower. |
 |
| I added the completed house in the back and the construction scene in the foreground. The construction scene features a couple piles of dirt to the right ,a couple of stacks of plywood on the back porch, a pile of junk in the middle, and the obligatory concrete spill next to the junk pile. I also added the wooded area in the back left. The smaller trees to the right of the house, and the larger tree on the far left are made using the Nandina plant and flocking. The ones in the center are the trees we made from kits. |
 |
| This new house with the white picket fence is nearly an exact replica of the actual house near the DB maintenance shed in Murnau. Once painted the proper colors, I couldn't believe how close this out-of-the-box model was to the real thing. COOL! |
That's a quick look at the progress I've made. Additionally, my wife added some trees to the backdrop on the lower level. I'll post a photo of this when it is closer to completion. I still have the grassy area behind the church to finish. I'm planning on putting a park there, complete with benches and a swing set. After that, I'll be able to move south into Murnau. I'm really itchin' to get working on the station platforms, even though I have several other projects to do before I get that far. However, I may just do them anyway! I'd also like to start working on the Murnau station building itself. That is a major undertaking. I may just add the covered area to the Oberammergau station instead. That may satisfy my scratchbuilding urge for awhile.
August 30, 2006 – A Series of Unfortunate Events - And Then Some Progress! (30 August 2006)
Well, Hurricane Ernesto turned out to be a weak tropical storm. However, that didn't happen until they already announced the closure of our facilities at work for Tuesday AND Wednesday! Since putting up the hurricane shutters wasn't required, it was time to get to work! Tuesday was spent working on trees and planting houses.
I planned on having a farm on the lower level as trains go into staging. Once I identified a couple of buildings, I starting making my usual modifications to them. For the house, I chose what had been a mill. Since the back side (where the water wheel use to be) could not be seen from any angle, it was a good choice for a farm house. I also had a barn that needed very little changes. To finish off the farm, I took a garage off the base of another house and planted it so that the garage door is facing away from the front of the layout. This allows people to use there imagination. Is it a garage, or a machine shed? Or, possibly some other farm building?
I took the house that was originally attached to the garage off the base as well. This one I planted on the upper level near the back. Again, I repainted the house, including the roof.
My wife and I started creating trees again. This time we used parts of a Nandina plant for the structure and flocking for the foliage. I had read about using Nandina in Model Railroader and thought that the trees looked really nice. My mother-in-law (who supports my hobby as much as my wife!) mentioned that she had those plants throughout her condo complex. I told her to start collecting branches! Currently, I have enough to make about 50 trees of varying size. My wife and I made about 20, and I have to say they look great! They definitely look more delicate that some of the other trees we've made. Don't get me wrong, both types look good.
I planted several trees on the upper and lower levels on Wednesday. I also put down the grass on the lower level. Next, I worked on scratch building a barbed wire fence using balsa wood for the posts and thread for the wire. Using a pin vise, I drilled two holes into each post for the wire - 34 posts in all! I didn't get a chance to install it since the grass around the farm hadn't dried. However, the posts are strung with the thread. I'm hoping that all I'll need to do is punch some holes in the layout and plant the posts after spacing them out. With luck I'll get to this later this week. If not, then definitely during the holiday weekend.
Note to self: Photos! I need to take photos of my progress this weekend.
August 27, 2006 – If I Didn't Have Bad Luck, I'd Have NO Luck at All! (30 August 2006)
Well the bad luck just keeps on a rollin'! We had a the main circuit breaker go bad in the house this weekend after a storm. After an expensive "emergency call" on Friday night, we found out that the fan motor on our air handler for the air conditioner was also ruined by the storm. It took until 2:00AM to get the new fan motor installed. Yet another "emergency call" to pay for. Hurricane Ernesto is also headed our way, so I had to prepare for that as well. My wife's parents were in town, and my wife had an in-home craft show. All of this added up to practically NO progress. I did manage to finish a white picket fence for one house and add the next layer of concrete for the sidewalks. Hopefully, the upcoming 3-day weekend won't be as busy.
August 20, 2006 – Oh, So THIS is the Hobby Room! (20 August 2006)
Yes, after 2.5 months, I finally got a chance to work on the layout. After my last entry below, a vacation to Iowa (and the Black Hills in South Dakota), holidays, and LOTS of overtime at work completely stopped progress on my layout. Also, I took a couple of weekends in July to work on my Florida East Coast Railway oNeTRAK modules, in preparation for a show in Cocoa Beach on July 29.
So, like every other time I've stopped work on the layout for an extended time, I worked on small things this weekend. I added grass to areas around the fascias. I also started added grass to the lower level. I'll try to get a couple of photos in here in the next couple of weeks. I added a "house under construction" on the upper level. I included a couple of stacks of plywood, some piles of dirt, and some general construction garbage. When it is done, it should look like a fair representation of a construction site. I also tried to add sidewalks and driveways "after the fact". I had already laid grass around the houses on the upper level. I immediately realized that I didn't have sidewalks or driveways, but haven't done anything about it until now. I started by adding some Arizona Rock "Concrete" over the top of the grass. It doesn't look TOO bad, but will definitely need another coat. I'm hoping that I won't have to use a putty knife to take the whole thing up! We'll see.....
Hopefully, I'll be working on the layout almost every weekend until November. I still have no money for more Digitrax equipment, Tortoise switch machines, or other electronics, so scenery work will be ongoing until at least January. This is fine with me. My wife likes this part of modeling, so we do a lot of it together!
May 29, 2006 – A 3-Day Weekend with Lots of Plans - What Could Go Wrong? (29 May 2006)
Sickness. That's what could go wrong! I haven't been sick in over 2 years! In spite of being a bit under the weather, I gave it a go on Saturday. I got the fascia on the lower deck just below the northern part of Murnau installed and painted. I was taking it very slowly so as not to make my condition worse. Well, it got worse anyway. By Sunday morning, I was full-blown SICK. I'm not feeling any better today, but figured that I could at least put an entry in the old diary. Here is a quick shot of the new fascias and the backdrop for the bottom level. Other than this shot, my wife has forbade me from even entering the hobby room. Sigh....
 |
| This sure beats looking at all of that nasty dimensional lumber! This section of the lower level could have been finished this weekend! |
 |
| OK, One more photo. This is a section of the backdrop that my wife is painting for me. After I place buildings, trees, bushes, etc, in the foreground, she will go back and touch up any places that require it. I just LOVE the church! |
May 21, 2006 – Giving North Murnau a Finished Look (26 May 2006)
This weekend was spent building a fascia for the north end of Murnau, and also a backdrop for the section of track just below the northern end of Murnau. I've decided to use an Alpine green for the fascia. My wife also got a chance to get a base coat of sky blue on the backdrop. Since the land forms were already in place, I couldn't just attach the fascia, and then use a jigsaw to cut the fascia to the profile of the existing land forms. I attached the fascia to the layout, used a pencil to mark the profile, and then took it down for cutting. This took longer than I had hoped, but it certainly gives the top part of the layout a more finished look.
May 14, 2006 – Good Fences Make Good Neighbors (26 May 2006)
I wasn't able to devote much time to the layout this weekend - or the entire week, for that matter. I needed a picket fence for a house I'll be planting near the back of the layout. I didn't have any picket fencing, so I decided to make my own. I didn't really have the right dimensional styrene for this, but I REALLY wanted to get working on this. So, the slats on the picket fence are a scale 16 inches wide. I would have preferred 4" - 8", but I don't think it looks too bad. I'll try to post some photos of it once I finish the scene.
May 7, 2006 – Biergartens and Houses and Churches and Trees - Oh My! (9 May 2006)
This weekend was spent planting trees and bushes, and doing some more ballasting. I also "planted" the tables and people in the Biergarten. I added grass to some additional sections of northern Murnau. While it's not complete, I finally decided to stick some photos on the website.
One other purchase was made this week. I order some compact fluorescent light bulbs (CFLs). The halogen flood lights that I was originally using were too hot, too yellow, didn't light up the room sufficiently, and were electricity hogs. They were also starting to burn out. So, instead of replacing them with more halogens, I went with 27W, true daylight CFLs. They are the equivalent of about a 120W standard bulb. Plus, there is very little heat and the color really is closer to true daylight. AUSGEZEICHNET!!
OK, so here are some photos using the new lights. I think there is a BIG difference from previous photos, don't you?
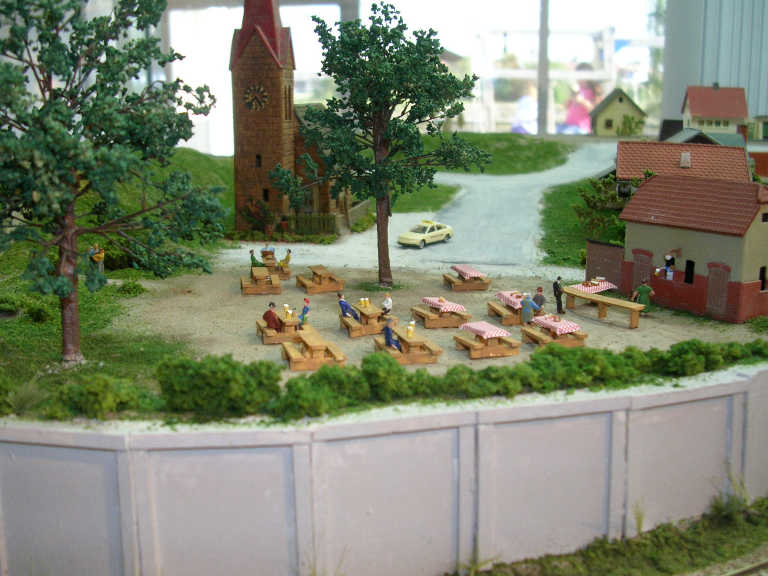 |
| Here is an overview of the Biergarten. The two large trees were made by my wife! Check out the tablecloths. Maybe they are a piece of cake in HO, but try them in N! Each table could fit on a dime! |
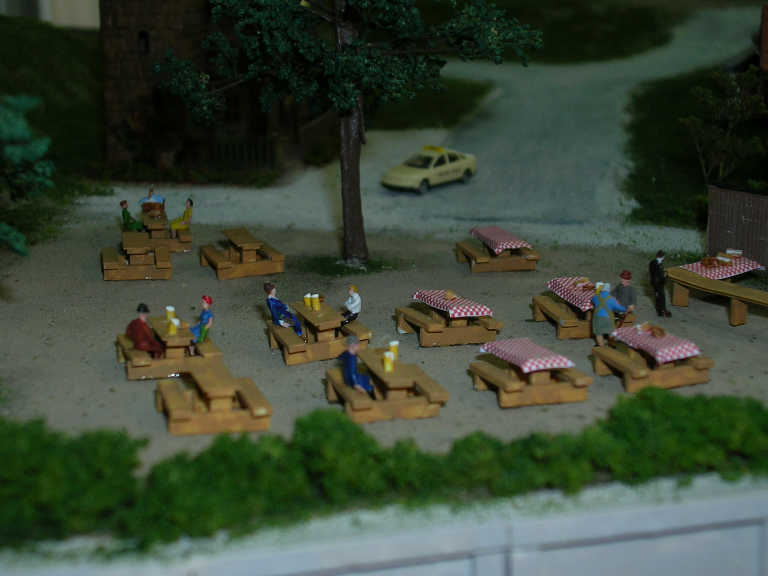 |
| Here is a closer (albeit darker) shot of the Biergarten. Note the frothy head on the beer by the man in blue, front and center. Also, you can see the man sitting at the table with the tablecloth is being waited on. The ladies in the back left have brought their own basket of food. Check out the pretzels and bread on the tablecloth at the serving table, and also on the two tables closest to the serving table. I tried to get a better close-up, but this was as good as I could do - for now. |
 |
| A shot of the backside of the Biergarten. A taxi is waiting to take away anyone who has had "a few too many". |
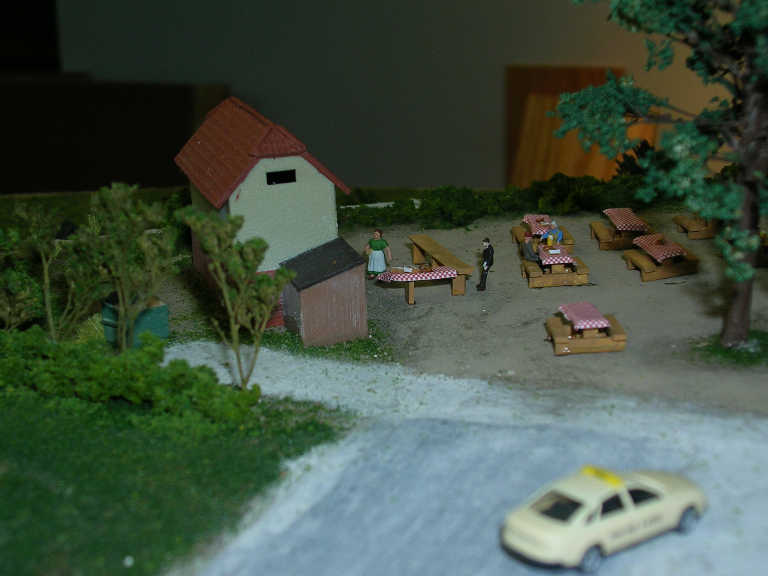
 |
| The lady in the building passes yet another beer to one of her co-workers. She appears to be spilling some of it, as the froth is sliding down the glass. Also, you can get a decent shot of the pretzels and bread on the serving table. |
 |
| A BR110 takes some time off on passenger service to push some ballast hoppers into a storage spur. To the far left you can see part of my wife's painting of the Oberammergau Bahnhof. The painting is on four sections, and serves as folding doors for our pass-thru window to the kitchen. The other side of the painting (the side facing the kitchen) is a landscape painting of Oberammergau as seen from Romanshöhe, which is also very nice! Luckily, my wife enjoys Oberammergau as much as I do! |
 |
| Another shot of the BR110 with its hoppers on the escape track. The mainline to München is just to the left. |
 |
| Yet another shot of the ballast train, this time from just next to the bumper stop. |
 |
| A view down the street of the local Biergarten. The three houses to the left had bright blue or red roofs, trim and shutters (and glue marks) before I worked on them. I think they are now quite acceptable. |
 |
| Here is what you see when you come into the layout room. Note the overpass, which is used to hide the entrance to the elongated helix used to get to staging. Also, my wife has started to work on the backdrop again. She has added the second layer - distant trees - which are in front of the mountains. She'll work on distant buildings (or should I say rooftops and church steeples, since that is all you will see) next, followed by closer foliage. The final step will be to add building flats/reliefs and actually foliage. Finally, you can see my new CFLs burning brightly (and COOLLY!) above the layout. This shot was taken at night, and it still looks like daylight on the layout. You can see the older halogen floodlamps (and the poor light they emit) in the reflection of the sliding glass door to the left. Those will be going away once my next shipment of CFLs arrive. |
 |
| Here is a better shot of the overpass. You can see the blue MOW Lokschuppen and the electric substation from the back. You can also see the half-relief, yellow electric company building on the left. The houses on the left, and the one with the big chimney in the middle are simply extras that I forgot to move. |
 |
| One last overview shot. Again, it's not finished, but I think it looks good enough to photograph. By the way, you can see my wife's art studio in the reflection of the sliding glass door. You can also see a hint of her painting of the Oberammergau Bahnhof in the second pane. I may have to take a shot of this and post it here. I think it looks great, and I'm very grateful to my wife for keeping with the KBS963 motif! |
April 30, 2006 – Cool Things Come in Small Packages (9 May 2006)
This week was a week of little projects. I don't mean simple or quick - I mean LITTLE! I had decided that I wanted to model a small, local Biergarten - nothing like to huge ones you see in München. I found a place to add one, but I was going to need tables, benches a serving building, etc, etc. I decided to scratchbuild some picnic tables and also a serving counter. I also had an extra building from another kit that I would use for the serving building. Oddly enough, this building had "his and hers" restrooms attached on the side - perfect! After seeing the tables, building, and serving counter set up, my wife's imagination (and my own!) began to wander. "I need to have beer in a Biergarten", I said. So, I took some small styrene rod, painted it a beer-like color and chopped it into little "Maß's". Adding a dab of white paint on the top gave the beer a frothy head! In many Biergartens, tables with tablecloths indicate table service is available. Tables without tablecloths are self-service. "I need to have some tablecloths", I said. So, I went to the computer, pulled up MS Paint, and made some tablecloths! Wow! That really made a difference. "You can't have a Biergarten without bread and pretzels", my wife said. I turned to her and said, "I'll make the bread, but YOU have to make the pretzels, since it was your idea". "OK, but how can I make pretzels that small?", she asked. I then went over to my electronics stash and pulled out a small piece of 18AWG stranded wire. From that small piece, I pulled one of the strands out, and gave it to my wife. I then handed her some jeweler's tools and told her to go for it! The smile that came over her face told me that she was up to the challenge. In no time at all, we had loaves of styrene "bread" and several wire "pretzels"!
April 23, 2006 – Seven Weeks of Nothing, Then Lots of Progress! (9 May 2006)
Well, things have certainly picked up! I recently won a $100 gift certificate at my local hobby shop. This allowed me to purchase several buildings. It also allowed me to buy some conifers and pine trees. I'll be using these in the very near future. I also was given a "gift certificate" for trains from my family for my birthday a couple of months ago. I finally decided to purchase some ballast and powder from Arizona Rock. The ballast and fine powder are made from real rock. I selected a ballast that looks almost exactly like the ballast I've seen around the Murnau area (in photos and in person). I couldn't believe my luck!
Once I received the ballast and powder, I immediately ballasted a section of track on the north end. I also used the powder to cover the north end wherever there wasn't any ballast. Wow! Texture! It looked like REAL dirt! Maybe a bit too much texture for N scale, but certainly better than painted plaster!
With the rest of my "gift certificate" from my family, I purchased some Silflor grass. I had done this two weeks ago, and was very excited to use it. Unfortunately, it has been backordered. After seeing the results of adding dirt and ballast, I just couldn't stand the temptation to add grass. So, I used ground foam. I can always go back to sections and add the Silflor later. Right now, it was just killing me to see the bare dirt and no grass.
April 16, 2006 – Back from a 7-Week Hiatus (9 May 2006)
Due to MANY other obligations, I was unable to work on the layout for more that 7 weeks. I figured I should start out slowly in order to get back into the swing of things. I did little projects, such as filling gaps in the rails with styrene, and then painting the styrene to match the rest of the rail. It actually looks pretty good. I thought that the tops of the styrene segments would return to a bright white when I went over them with a BrightBoy the first time. Not true! The styrene actually held a bit the grime from the BrightBoy, making the tops of the styrene a grimy black! COOL!!
I had purchased several houses on eBay over the years that had already been assembled. Many were poorly built, with glue marks and such. Several other houses were older Faller models that looked very toy-like, with bright colors, such as red and blue on the shutters and roofs. I decided that by carefully painting these that I could make them in to useful models. I picked three models to work on - 2 of the toy-like Faller models, and another model (Faller? Vollmer?) that was poorly constructed and had several glue marks. I think they turned out quite well. I hope to have some photos of them in the near future.
I had also purchased a highway overpass from Pikestuff while attending a craft show with my wife. (Hey, I couldn't stay at the craft show the entire weekend. I considered it my "pay" for helping my wife with her booth.) I had planned on using a bridge or overpass of some sort to hide the descent into staging on the north end of Murnau, so I figured I might as well purchase the thing and build it. I built it, painted it, weathered it, and installed it over the course of a week while I was waiting for some of the other projects mentioned above to dry (glue or paint). I had to scratchbuild the concrete drainage/retaining wall and the base supporting the bridge on the wall. The rest was straight out of the box. I think it looks very nice. I still need to add guardrails to the end of the overpass, however.
I also decided to install a retaining wall around the curve on the descent to staging. I had purchased these retaining wall pieces a couple of years ago, and decided that now was a good time to use them.
February 26, 2006 – To Airbrush or Not to Airbrush? (26 February 2006)
Continuing with my theme of no focus, I decided to paint some track during the week. I guess this doesn't really fall into the same "non-focus" category as some of my other projects. I actually had some free time during the week, and decided I wanted a simple project that could be stopped at any time. I decide that painting track would be a good project. I had discussed with my wife the techniques I could use to paint the track. I had originally planned on airbrushing everything. My wife wasn't thrilled about this. She was concerned about the fumes and the overspray. I have a spray booth that I made for painting models (a cardboard box with a hole for a vacuum cleaner hose). This booth probably couldn't be used easily to paint the tracks. So, I decide to try using a brush to paint the track. It actually worked fairly well! I used rail tie brown on the rails and all wooden ties. This was easy, as I simply brushed every bit of track. The more tedious part was painting ONLY the rails for the trackage that had concrete ties. Even this wasn't too bad. Next week, I'll probably go over some of the spurs with rust color, and give the ties a dry brushing of white to simulate older wooden ties. The mainline will not be touched, as little rust would build up on these rails.
I also worked on the area around the MOW Lokschuppen. I added a base for the transformer, so that it is level with the brick area. I also created a retaining wall with a railing behind the Lokschuppen. I then filled in the gaps between the wall and the foam I already had in place with some plaster (lightweight Hydrocal). I'll need to let this set up, and then sand it down properly. Then, I'll need to add a road, another building and some fencing. After some grass, bushes and trees, I'll have this scene completed! If everything turns out OK, I'll post some photos. If not, well......
February 19, 2006 – Still No Focus - I'm All Over the Map! (19 February 2006)
I can't decide if get bored quickly, or if I'm just not very disciplined. Either way, I once again veered off my path. FYI, my goal has been to get enough scenery in place that my wife can work on the backdrop for Murnau. I'd like to get stuff (temporarily) placed so that I have an idea of what I want her to paint. So what did I do this weekend? I worked on an area that really HAS NO backdrop! Once again, I was down around the MOW Lokschuppen and the electrical substation. This time, I decided to try my hand at terra-forming. I used some blue foam and some cardboard strips to create some hills on the northern end of Murnau. They aren't done, but I think they look decent up to this point. Of course, right now the area looks like a snow scene - all white, with no details. Anyway, here's a photo of the area I worked on:
 |
| The northern end of Murnau, with its white hills. This area will have several details, including some gardens, which seem to be so prevalent in Bayern. I'm hoping to have a highway overpass on the left, in order to cover the descent to staging. Houses will be primarily on the brown areas. Pasture land and a small wooded area (more trees, Tina!) will also be located on the hillside. |
February 12, 2006 – More and More Trees (19 February 2006)
Tina and I continued throughout the week building trees. Time was limited, so this was a good project as each step didn't need to be done quickly after the previous step. I think our current total is 16 trees. Like I told my wife, "Sixteen down, only 384 to go!" Her eyes got really big after I told her that. However, after the initial shock, she seems to still be on board with helping me out in this area. Whew!!
As I had mentioned I had created a pad, and subsequently purchased brick paving. Here is the pad with the paving. I threw the substation in its proposed location, for effect.
 |
|
| View of the future location of the electrical substation. Note the brick pavement around the tracks of the Lokschuppen!! |
February 5, 2006 – The First of Several Hundred Trees! (19 February 2006)
I have been fairly busy this week and weekend. I really didn't want to get another project started. Then, my wife mentioned that she would be willing to help build some trees. COOL! I had purchased 4 tree kits (each making a dozen or more trees) a few years ago at an NMRA convention. All I needed to do was go to the hobby store to buy some super glue (and pick up some brick styrene while I was at it - I'm always thinking!). So, Tina and I started building a forest! Here is proof that my wife helped me:
 |
 |
| Tina stuck the branches on the trees while I prepared the trunks and the branches. What a team! | Some finished trees. Now they need to be planted. |
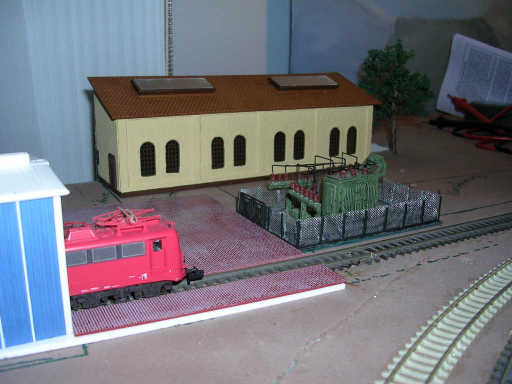
January 28, 2006 – We Have Electricity! - An Electrical Substation for Murnau (19 February 2006)
Well, I finally bit the bullet and broke out the model of the electrical substation. I was right - a LOT of little pieces! As it turns out, I only needed one of the two transformers that I built. However, I'm sure I'll find a place on the layout for the second - like along the line to Oberammergau. After building the substation, I started thinking more about the area around this and the MOW Lokschuppen. I decided that I needed to build a pad for the Lokschuppen. I built a pad of styrene around the tracks that lead into the Lokschuppen. Eventually, the pad on the outside will be covered by brick, as that is what the pavement is made of. Now I just need to get buy some brick styrene!
January 15, 2006 – An Addition to the Oberammergau Bf (21 January 2006)
I lost my focus for a weekend. I was thinking of beginning the transformers for the electrical substation, which is located next to the MOW Lokschuppen. However, it appeared to be rather involved (lots of small pieces) and I really didn't want to get it halfway done, and then have all of those small pieces laying around during the week.
Instead, I decided to add the waiting room onto the Oberammergau Bf building. I had already cut out the walls for this project so my first job was to cut out doors and windows in the walls. The roof also needed to be done. After assembling the addition, I realized that the roof color on the original part of the building wasn't quite what I wanted. Also, the cap tiles where the sections of the roof meet at the peaks were horribly oversized. So, I took a hobby knife and cut off the cap tiles, which were quarter rounds of styrene, and replaced them with full rounds of styrene, but with a much smaller radius. Once this was done, I experimented with some colors to find the right color for the roof. I found the following mixture to be almost perfect - 6 parts "Burnt Orange" (from Americana), 1 part "Mississippi Mud" (from Americana), and 2 parts "White" (from Ceramcoat). I also used this color to paint some of the tiles on the waiting room portion of the building. These represent "replacement tiles", which you can see on some of my photos of the prototype building. The color used for the majority of the roof for the waiting room was "Brown Velvet" (from Ceramcoat). Below are two photos showing the new addition. The photo on the left give a better indication of the actual colors used on the model.
 |
 |
| Oberammergau Bf. (true color) | Oberammergau Bf. (a bit yellowed) |
January 8, 2006 – One Building Makes Two - Sort Of (21 January 2006)
Keeping with the idea of creating scenery for Murnau, I took a ConCor (made by Heljan) warehouse, and cut it in half for use as relief buildings set against the backdrop. Other than this modification, the only other thing I did to the building was paint it. The original color of the walls was a VERY NASTY, bright yellow. I mean, this was almost "glow-in-the-dark" yellow! I used a combination of baby powder and "Antique White" (from Ceramcoat) to create some "stucco". I then slapped this mixture on fairly heavily onto the walls. While the bricks still show through, it definitely adds a stucco flavor to the building. I used "Raw Sienna" (from Ceramcoat) for the roof color. Once the backdrop is completed, and trees are added around the structures, I think they will look very nice.
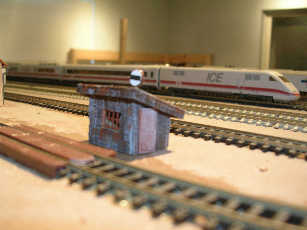
I also had an Arnold weigh scale model that I was considering for the station. After assembling the building, I realized that it looked nothing like the scale house that is in Murnau. I'll be using that building someplace else. (Pictures will be provided at some other date.) Instead, I tried my hand at modeling the scale house from balsa wood. I figured since the prototype structure was made from wood, why not give it a try. I found that cutting thin balsa WITH the grain to be a pain. Making this type of cut will sometimes cause the entire piece to split. I may try placing masking tape on the back prior to cutting with the grain next time. Murnau's scale house is pretty run down. So, after building the structure, I really dirtied it up. Below are photos of the warehouse(s) and the scale house. The scale itself has not been weathered just yet.
 |
 |
| Warehouses (half relief) next to the old LAG station track. | Scratchbuilt weigh station building. |