Layout Diary &
Description of Events
Archive: 1998 - 2005
Back to Layout
Diary
This page is set up so that the
newest information is at the top.
December 30, 2005 – Murnau has a
Güterschuppen and Lokschuppen!
(21 January 2006)
With my renewed interest in creating scenery
for the layout, I set out to build the Murnau goods shed. Arnold has a shed that
is very close to the one found in Murnau (until it burned to the ground in
2002!). I made a few modifications to the original model in order to get it to
look more like the structure in Murnau. I added wooden ribs to the walls. I also
created four additional freight doors, including two doors and a wooden platform
on the backside of the structure. I have considered filling in two of the doors
originally on the model, as they are not at "platform level". I haven't made my
final decision on this just yet. I will be placing a platform around the
building on the sides closest to the tracks. I painted the building using 5
parts "Old Parchment" (from Ceramcoat) and 1 part "Peaches 'n' Cream" (from
Americana). Here are two pictures of the building in its current state. The
picture on the right is a better representation of the actual color of the
building.
 |
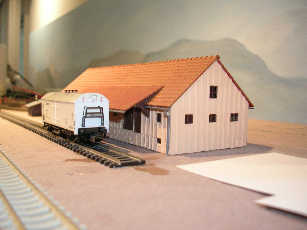 |
| Murnau Güterschuppen -
north side |
Murnau Güterschuppen -
south side |
Another building that was needed was a modern
Lokschuppen, which is on the north side of the Bahnhof, and houses maintenance
of way equipment. This structure is an aluminum structure that is regularly seen
in Germany, the US, and many other places around the world. Pikestuff makes
several of these structures in N scale. They have a single-stall locomotive shed
that is (almost) perfect for my needs. Unfortunately, the structure has a bay
door on both sides. I had to seal the back door, add white styrene ribs, and
"DB" logos to the building. I also painted it a darker shade of blue ("CSX Blue"
from Polly Scale). For a minimal kitbash, this is VERY close to what the
prototype building looks like.
 |
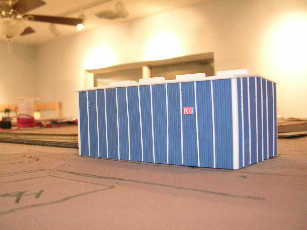 |
| A front view of the MOW
Lokschuppen in Murnau |
A backside view of the MOW
Lokschuppen in Murnau |
December 23, 2005 – When Life Hands You
Lemons - Make Lemonade!
(21 January 2006)
It certainly has been a long time since I last
posted. That's probably because I haven't DONE anything on my home layout! I had
a successful FECRS convention in September. The AmeriGas module looked very
good. I even had AmeriGas contact me about doing a story about the module for
their employee newsletter. Very cool!
Hurricane Wilma came right over our house as a
Cat 3 hurricane on October 24 - my daughter's birthday! Wilma really messed with
my routine. Thanksgiving and Christmas would continue this trend. Major problems
with my wife's minivan, and buying presents for Christmas meant that there was
NO money available for model railroading. It looked as if I wouldn't be touching
my layout for quite awhile.
Then, I received an e-mail from my friend,
Joachim Wolf. I told him of my financial situation, and that what I wanted to do
next (install DCC stationary decoders) was going require a major purchase on my
part. This meant no progress would be made on my layout for awhile. In his
e-mail, Joachim mentioned that he was working on his milling machine that he was
making for his club (MBC Pfaffenwinkel) so that they could scratchbuild some
buildings for their layout. Then it hit me. Of course! I could work on some
structures!! I was so focused on getting the Murnau Bf wired and functional that
I had not considered doing some scenery.
I hadn't finished scratchbuilding the
Oberammergau Bahnhof building. I also needed to build several buildings for the
Murnau Bahnhof area. THIS would be my new focus! Thank you, Joachim!!
July 17, 2005 – Heading South!
(17 July 2005)
Yep! I'm heading south on KBS 960 and
KBS 963. I have finished all tracklaying in the Murnau Bahnhof!! This is a bit
misleading, however. I still have 8 switch machines to install on the south end
of the station. I also have to wire up the tracks to terminal strips and the bus
wires. However, from the top, it looks complete!
Besides finishing up the south end of Murnau
Bf, I also modified 5 Tortoises and installed the last one on the north end of
Murnau Bf. I'll need to order more edge connectors, as I have used the last of
my supply with these 5 Tortoises.
During the week, I'll probably begin wiring up
the track. I may even install a Tortoise or two. I also have four more sections
of flextrack to install on the Hechendorf Ramp before I run out of benchwork.
I've already gone as far as I can on the Oberammergau line, which is just beyond
the bridge that crosses the mainline. After I'm done with that, I'll be forced
to build more benchwork.
Once I am to this point, I'll probably focus on
my FECtrak modules. I need to build a re-engineered module carrier. The new one
will be on rollers and be able to carry all five modules. This is also needed so
that I can build more benchwork for my Murnau layout. Space is now at a premium,
and the modules are getting in the way. With this new module carrier, the
modules will fit under the layout. Since the new carrier will also be on rollers
it can also easily be moved, which is NOT the case with my current carrier.
I will also be working the AmeriGas spur on one
of my modules. I was approached by Amerigas about my module of their facility.
The head of Public Relations saw it on the Internet when she was looking for
ideas for the company newsletter. She would like some photos of the facility and
a brief write-up about it for the AmeriGas employee newsletter. I told her that
I hadn't made the building, but that I would send her photos and a brief story
when I was finished. So, my goal is to have it done for the FECRS convention on
the weekend of September 24. Luckily, it is a fairly simple building, so it
should be fairly easy to scratchbuild.
July 10, 2005 – Wiring My Layout -
An Electrician's Nightmare!
(10 July 2005)
The momentum from last weekend has carried over
into this weekend. Due to Hurricane Dennis, our plans for the weekend were
cancelled. This allowed me to continue on with my work on the layout. I started
working on wiring up the switch machines. This is only for track power - it is
not the wiring to power the Tortoises themselves. I use Peco Electrofrogs, and
am using the micro switches in the Tortoises to power the frogs. This requires
quite a bit of extra wiring.
The title of this entry says it all. With every
new wiring endeavor, the underside of my layout gets more and more messy! I had
big plans to keep everything neat and organized. Unfortunately, much of the
initial wiring (track feeders and the like) was done several years ago. Now, I'm
just kind of throwing stuff together.
By the way, my "flexible" method for wiring
Tortoises is paying off this weekend. I've encountered a couple of problems,
including a nasty short in one of the Tortoises that I can't seem to localize,
and the flexibility of being able to take one wire off the switch machines, or
the entire edge connector (and all wires!) has been a REAL saving grace. It's
quick and very easy to localize problems. After wiring up two or three
Tortoises, I run a couple of trains to see if I've screwed anything up. This is
also very helpful. Plus, it breaks up the monotony of wiring all day.
One thing I forgot to mention in the July 4
entry - I can now run a train from the entrance of staging on the lower level,
to the south end of the Murnau Bf. Previously, I was missing two key switch
machines on turnouts leading into the station. Without the Tortoises, nothing
was keeping the blades up against the stock rails, which prevented trains on the
helix from entering the station. This is no longer a problem. This only issue I
have now is that none of the Tortoises is powered, so they are stuck in whatever
position they happen to be in until I get some Digitrax DS54s.
July 4, 2005 – Double Slip Switches
- Just Do It!
(10 July 2005)
Well, I finally laid, not one, but TWO double
slip switches at the south end of the Murnau Bf! I finally got tired of staring
at them and doing nothing with them. So, I took advantage of the long weekend
and stuck those suckers on the layout! Holes have been drilled for the switch
machines and the four wires are sticking through the roadbed waiting to be wired
up. The biggest problem was getting all of those plastic, insulated rail joiners
to line up properly (and at the same time!) Whew! It's all downhill from here -
literally! The Hechendorf Rampe looms ahead.
I finished wiring all of the track (not the
switch machines) that I have currently laid. I have one spur in Murnau that is
closest to the front edge of the layout that isn't fully hooked up just yet. I
want to use this track as a programming track for my Digitrax. I'm going to
install a switch that allows you to go from programming to normal running on
this track only. It is fully isolated, easy to reach, and normally only has
freight cars stored on it. I figured this would be the perfect location for such
a track as I really don't want a dedicated programming track laying around
somewhere.
I installed two more Tortoises. I now only have
one more Tortoise to install on the north end of Murnau. When it's all said and
done, I'll probably have 8 or 9 more to install on the south end, including FOUR
to control the two double slip switches.
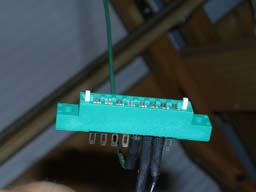
I also got all of the frog wires hooked up to
all of the Tortoise switch machines that I currently have installed. I'm using
8-position edge connectors along with my switch machines. These edge connectors
have the perfect spacing between pins, but are a little sloppy on either side.
Before I went to Germany, I welded some styrene shims on either side of the
connectors for a perfectly snug fit. I made the shims a bit taller than the
connectors, which also allows me to use them as guides when I'm slipping them on
the switch machines.
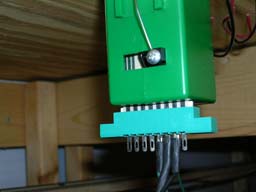
I hook up the wires to the edge connectors with
Atlas HO rail joiners. I strip the wire, and solder it to the rail joiner on one
side. I then slide the other side of the rail joiner onto one of the edge
connector's pins and use a pair of needle nose pliers to slightly pinch the
joiner, which makes for a snug fit on the pin. Once this is done, I take the
joiner off the pin and apply shrink wrap to the joiner and wire, and then insert
the new "female" connector onto the appropriate pin. Finished!
This method allows me full flexibility. I can
either take all the wires off the Tortoise by removing the entire edge
connector, or I can take individual wires off by sliding them off the pins of
the edge connector.
|
|
The edge connector used
with Tortoises. Note the strips of white styrene used to make
the fit snug. These also make a great guide when slipping
the connector onto the Tortoise.
|
The edge connector
installed on a Tortoise switch machine. Pins 1 and 8, used
for powering the Tortoise, have not been wired. Pin 5 has
the wire leading to the frog on the turnout. Pins 6 and 7
are wired to each rail and are used in conjunction with the
Tortoise's micro switch to provide power to the frog.
|
June 26, 2005 – Shaking Off the Rust
(30 June 2005)
I found some free time on Sunday, so I decided
to do a little wiring. I'm still trying to get all of the track that I currently
have laid hooked up. I also have 3 more Tortoise switch machines to install.
Once I've done that (and wired all of the switch machines!), I'm going to finish
up the south end of Murnau Bf. I have set my goal for this summer to be finished
with all of this once and for all. I have decided that my FECtrak modules will
be neglected this year - no changes. The only thing I want to do is build a
better carrier for them. If I can get that done, I'll be happy.
This weekend is a long weekend (Independence
Day is on Monday). I'm hoping to make some major progress in those three days.
Stay tuned.
June 1 - June 15, 2005 – A Trip to the
Prototype! (23 June 2005)
It took 4 years, but we finally made it back to
Germany for 2 weeks. Wow! What a great time! I'll spare you the touristy
details, and only fill you in on the railway-related items. I got some decent
shots of Unterammergau, which will be going in the Unterammergau section of this
website. I also took some additional photos of Murnau and Oberammergau that may,
or may NOT make it here. I didn't get photos at three other locations that were
in my plans - Altenau, Jägerhaus, and the old Hechendorf Bahnhof area. I guess
that just means I'll have to plan another trip!
The highlight of this trip was meeting with TWO
Modellbahn clubs - one in Bad Kohlgrub and one in Peißenberg. Both were very
gracious and hospitable. It was embarrassing for me to require them to speak
English - my German is sooooooo bad!! I will have to work on this before my next
trip.
The Bad Kohlgrub group opened their club up to
me on a night on which they normally do not meet. Some of the members from the
Peißenberg club showed up as well. The Bad Kohlgrub group models KBS 963 - of
course! They had recently been forced to move to this new location and
rebuild their layout. I must say that they have made excellent progress. Their
scratchbuilt versions of the Oberammergau and Murnau stations were awesome!
Naturally, their Bad Kohlgrub station was perfect! I hope my efforts in N scale
are half as good as their HO layout! It was great to speak with people with the
same modeling interests as mine. It was a terrific evening that ended with
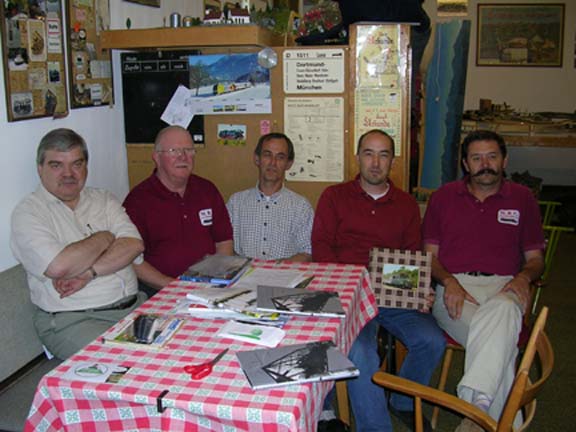
railway discussions over a few beers - perfect! Here are a couple of photos of
the club. Unfortunately, a couple of members from the Bad Kohlgrub group managed
to sneak out before I could snap their photo.
 |
|
Pictured
here at the Modellbahn-Club Bad Kohlgrub, from left to right: Gerhard
Breu (MBC Bad Kohlgrub),
Herbert Schmid (Vice
President, MBC Pfaffenwinkel), Heiner Hildebrandt (President, MBC Bad
Kohlgrub),
Joachim Wolf (MBC Pfaffenwinkel), Josef Zehentbauer
(President, MBC Pfaffenwinkel)
|
 |
 |
| Oberammergau Bf on the
MBC Bad Kohlgrub layout. |
Murnau Bf on the MBC
Bad Kohlgrub layout. |
I headed over to
Peißenberg the following Saturday to meet with MBC Pfaffenwinkel whose clubhouse
is conveniently located in the second floor of the Peißenberg Bahnhof! Getting
there was a lot of fun as well. I took a BR 625 from Oberammergau to Murnau, a
BR 111-pushed train from Murnau to Weilheim, and a BR 628 from Weilheim to
Peißenberg!
The Pfaffenwinkel
group has their operating session on Saturday, and is open to the public. I
arrived around 3:30PM - just in time for "Kaffee und Kuchen"! After some good
conversation, good coffee, and AWESOME cake, we headed to the layout room. All I
can say is, "Wow!". This club is very much into fine details.
One gentleman is
stringing homemade catenary wire IN PLACE! The wire (or should I say, "cable")
he is using is very small gauge (I'd say smaller that 24 AWG, but bigger than 30
AWG) and is made up of several strands of even smaller gauge wire that is
twisted like an actual cable. This would look great on an N scale layout. On an
HO layout, it is very close to prototypical!!
When completed, the
layout will also feature prototypically accurate cabling for all switches,
signals, and crossing signals. They will be cosmetic only, but talk about
detailing! I have done some research, and found that Weinert even makes these
pieces in N scale. Of course, I'm FAR from being ready for this type of
detailing. However, Joachim has piqued my interest!
The layout can be
computer controlled by an operator located in the "Stellwerk", which overlooks
the Weilheim Bf. The program they use is called STP, and was written exclusively
for the ZIMO control system, which is what MBCP uses. A scripting
language accompanies the program, making it extensible. This allows custom
scripts to be written to suit the needs of the club.
The club has also
purchased a milling machine that will create building parts, such as walls, windows,
doors, and roofs, which will allow them to create prototypically accurate
buildings instead of using commercially available kits. These will be created as
drawings on a PC. These drawings are fed to the machine, which spits out an
exact copy of the drawing in styrene plastic! Not only is this very precise and
as accurate as the drawings, in most cases it eliminates the need for separate
window pieces or door pieces because they are all part of the single piece of
styrene!!
I could go on and
on about the details, and I could post photos of the club here. However, to do
the club justice, you really should head over to their website:
http://www.mbcpfaffenwinkel.de/.
They have much better photos than I could provide, and the website is very
comprehensive.
It was great to
finally meet Joachim. And, it was a pure pleasure to meet such fine gentlemen
(and lady) as Herbert, Sepp, and the rest of the club members. They really made
me feel welcome, and I appreciated that very much! They may have another visitor
in late August or early September. I told my friend and co-worker, Hermann
Roessel (a Dießen native), about the club. He is hoping to stop by during his
trip to Germany.
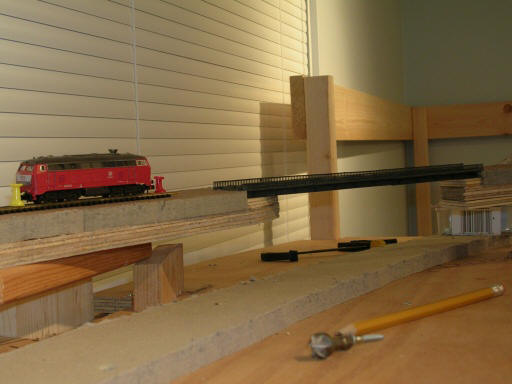
May 16, 2005 –“Bridging” the Gap –
The Flyover (16 May 2005)
Well, I took down the Masonite that was beginning to develop a very nice curve.
This was required in order to get the plywood down for the Murnau Ort area,
which includes the KBS963 flyover of the mainline. I have the wood in place,
and I have built the bridge. The bridge is not complete, but it was in good
enough shape to be included in the photos below. Once I have benchwork and trackwork for this
section along the wall completed, I may actually try to scenic the flyover. Why
is this so important? Well, I need to figure out how I’m going to handle the catenary in this section of the layout. Not only does the
main line go under the branch line, but it will also be passing through the
backdrop at this point and reappearing on the other side of the peninsula. I
need to make sure that this is all in place before the area gets too built up.
Next weekend, I hope to have the backdrop back in place. We’ll see….. Finally,
some more photos.
|
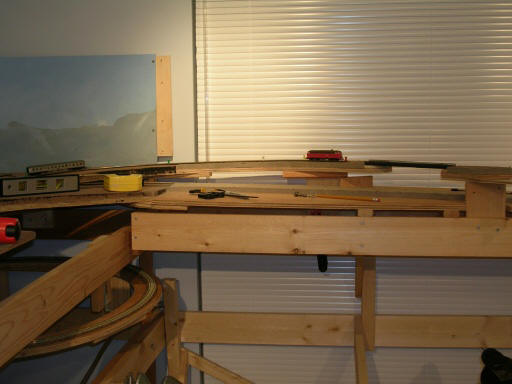
A view of the new wall section and
the partial peninsula. The peninsula will also have two levels.
|
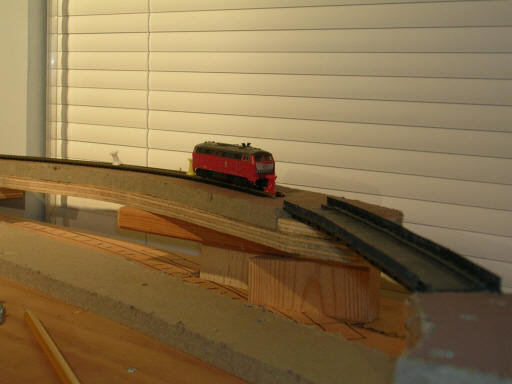
A view of the flyover with the
bridge temporarily in place. The homasote (gray material) on the lower level
is the main line.
|
|
|
|
|
A top view of the flyover. From
here, KBS963 curves onto the upper level of the peninsula. KBS960 continues
its descent through the backdrop and around the walls.
|
An overall view of the flyover.
You can see KBS960 descending as KBS963 climbs and curves toward the
peninsula.
|
May 1, 2005 – What The Heck – Let’s Start The Peninsula! (8 May 2005)
While working on the new section of benchwork, I started to install the backdrop for the top
level. Once I started, I realized that I needed additional supports for the Masonite that I was using. I’m curving the Masonite by wetting it and clamping it in place. The
problem is that I have a long section of Masonite
that I don’t want to cut up. In order to support it, I’ll have to build the benchwork of the peninsula up to the loop on the end. So,
I’ve now started on the peninsula! I have the lower section built. Now I need
to do the upper section in order to properly support the backdrop. I’m starting
to realize that with every new section of benchwork,
I get squeezed a little bit more for room to store all of my models and tools.
I may have to take a break and reorganize everything!
April 24, 2005 – More Benchwork (8 May 2005)
I started out this weekend with the
intention of doing more wiring. I strung up some bus wire, but starting to
think about what I was doing. This was something I could do after work during
the week, or whenever I had a spare moment. This weekend, I had several hours
of free time. Why not cut up some wood and add the next section of benchwork?
Right now, I’m kind of pigeon-holed
as to what I can do. I MUST get the Murnau Bahnhof trackwork
wired and tested to make sure it works flawlessly before I can work on the
lower level staging. This includes installing and wiring up all of the switch
machines, and installing any and all Digitrax components that I’ll be using
with these switch machines. This is a mountain that I don’t necessarily want to
climb all at once. Building the new benchwork will
allow me to work on some simple trackwork, wiring,
and possibly even scenery when I’m not interested in “climbing the mountain”.
With this in mind, I worked on the section
at the far end of the layout that forms the bottom of the “W” on the layout.
This section includes the flyover of the mainline (KBS 960) by the
Murnau-Oberammergau line (KBS 963). It will also include Altenau Bahnhof on the
other side of the “W”. This section is a bit tricky, as the left side (near
Murnau) will have two levels, while the right side with have three levels!
April 17, 2005 – Where Did The Time Go? (8 May 2005)
Two category 4 hurricanes, Frances
and Jeanne, hitting my area caused a whole lot of problems. Luckily, these were
small problems compared to what others had to endure. The house and family survived
with very little damage. However, it threw all plans, including the Florida East Coast
Railway Society’s convention, out of whack. Cleaning up after the hurricanes,
planning for a new convention in January, the holidays, and, finally, the newly
scheduled convention itself, made it nearly impossible to work on the layout.
Honestly, the layout didn’t even cross my mind until April. Well, this weekend
I started small. I finished up some wiring – attaching feeder wires to terminal
strips, adding a Tortoise switch machine, and beginning to run the bus wire. It
wasn’t a lot of work, but it was a start.
July 11, 2004 - Finishing Up For The
Summer (12 Jul 2004)
This weekend was spent sealing as
much homasote with latex paint as I could find. I was originally only going to
seal the section I had cut for the south end of Murnau Bahnhof. However, the
brown paint that I had was getting old, and I totally destroyed the lid while
prying it off the can! Luckily, it was a small can of paint! I sealed homasote
until it was gone. I also got a chance to figure out the trackwork
for the south end of Murnau. I painted it onto the homasote for convenience.
I'll be spending the rest of the
week cleaning up the layout room. I'll be setting up my FECtrak
modules so that I can do some scenery on them. Until September, I have decided
to devote at least one day of each weekend to the modules. If time permits,
I'll work on my home layout the other day. Any free time during the week will
also be used to work on the modules. As promised, here are some photos.
|

|

|
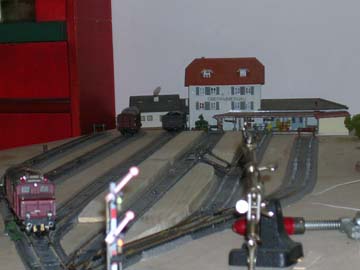
|
A view of the south end of Murnau
Bf. The Lokschuppen is on level ground while KBS963 (middle line) is heading
up a 2.5% grade and KBS960 (two lines to the right) are heading down a 2.5%
grade. Further down the line, KBS963 will cross over KBS960 and a roadway.
|
A view of the Lokschuppen from the
south. I plan to kitbash the Lokschuppen to better
reflect the prototype. This will include adding on to the back end. The
prototype appears to have this very same modification! The roof will also
require some modification. This is a very good starting point, however.
|
|

|

|
|
This is a view of the second turn,
just under the south end of Murnau Bf. The turn has about a 17" radius
and is less than a 1% grade. The rest of the helix is between 2.5% and 4.5%.
|
After traversing the ramp, this is
the final curve into staging. You can see the first leg of the ramp at the
top and the second leg in the middle.
|
|

|

|
|
A BR218 emerges out of staging
with a 16-car train on its way up to Murnau. A backdrop/fascia will be
located approximately where the last coal car is to the far right. Once
trains leave the top of the layout, this turn will be the only section of the
elongated helix that will be open and have scenery.
|
This is the view people will have
when they walk into the layout room. Here you can see the first and last
turns on the elongated helix. Unfortunately, the top turn is close to a 3%
grade in order to clear the benchwork on the
downward descent. The bottom turn is around 1%.
|
July 10, 2004 - TrainOps
Program (12 Jul 2004)
I created a program this week that randomizes
some operations based on year and day of the week. Categories include the
Passion Play, tourist trains, ICE trains, track and catenary
maintenance, unit rock trains for Eschenlohe, and power transfers for the BR141
on KBS963 and the BR628 used on the line from Garmisch to Kempten. I have other factors figured in as
well. For instance, if the program generated a Saturday in 1990, Passion Play
trains would come to Oberammergau.
However, there would be no ICE trains, as they didn't appear until 1991. A
Saturday in, say, 2001 would have an ICE1 and an ICE-T, but no Glass Train for
tourist runs would be possible as it was damaged and taken out of service in
1995. Another for instance would be a Monday in 1992. Not only would you see
regular freight on KBS960 (and possibly on KBS963!), but you'd also see the
unit rock train bound for München from Eschenlohe. I have truly random events,
such as track and catenary maintenance, and tourist
trains, weighted so that they each have a chance to occur. Events such as
tourist trains may be weighted so that they have a better chance of happening
on the weekends rather than during the week. I will be using this program when
I begin my operations.
July 5, 2004 - Helix Complete! (12 Jul 2004)
I had a three day weekend that I was able to dedicate (mostly) to my layout. I
completed the helix down to the staging under Murnau. This includes benchwork and track. I have run a few test trains up and
down the ramp and I would say the size of train that can make it up with only
one locomotive is about right. I used a BR218, and later a BR110, to pull 28
freight cars up the grade before I noticed slippage. The important thing to
note is that TWO of those freight cars were Roco
cleaning cars! The added weight and drag make these cars equal to 5 or 6
regular freight cars. I am confident that a 14-coach ICE1 or a 35-car freight
can make it between levels with no problems. Of course, I can always double up
the power when necessary. Also, I noticed no issues with "string-lining"
of cars around the curves. With the exception of the top curve, I reduced the
grade on the curves to less than 1%, which may have helped avoid this problem.
I'm guessing that if the two Roco cleaning cars had
been at the end of the train, instead of next to the locomotive, I may have
experienced some issues.
Another accomplishment was getting the plywood and homoasote cut out for the south end of Murnau Bahnhof. I
made this a single piece, and added cuts in two different locations in order to
get the three different elevations that I will need. The area around the old
Lokschuppen will be level. The line to Oberammergau
will be on about a 2.5% incline. The double track mainline will be on a 2.5%
decline. I'll try to post pictures once I get this piece installed. I have
found that I get very smooth vertical curves when using this method. By
starting with the 0.5" plywood/0.5"homasote on the level, and then
bending it, you get a very nice transition. The first location that you secure
the plywood (about 18 inches out) should be slightly less than the grade you
ultimately want. For instance, I used 2% when attaching the plywood to the
first riser instead of 2.5%
It looks like the curve for the Oberammergau line in this area will be a bit
tight. It looks to be about a 15" radius, which is much tighter than my
preferred 18" (or greater!) radius in viewable areas. The good news is
that it is an inside curve, so you won't see the big gaps between the coaches.
I'll probably strategically place foliage in front of some of the
curve to reduce the viewer's ability to see the whole curve.
June 21, 2004 - Helix Humping (21 Jun 2004)
A fairly busy weekend on the layout. I was right about
getting cork and track laid on the second curve of the helix. A bonus was
getting the subroadbed for the second straightaway
finished as well! As far as subroadbed is concerned,
I only need to do the lowest curve that leads into the staging yard, and I'm
done with the elongated helix. Once I get to this point, I'll probably clean up
the wiring a bit and install the last four Tortoise switch machines on the
north end of Murnau Bf. Time permitting, I'll begin finishing up the south end
of the station. I'm guessing that I'll have to switch gears to my Florida East Coast
Railway (FECtrak) modules before I finish the south
end. We'll see.......
June 19, 2004 - Heading North! (21 Jun 2004)
A change in jobs in early April really opened up some time
for me to get some things done. Unfortunately, all things were not layout
related. Things have progressed, however. The title of this installment says it
all - I'm out of the Murnau Bf and heading north! I've started the single-track
descent down to the staging yards. I've completed the first turn, and the first
straightaway. The second curve has cork, and will probably have track laid
before the end of the weekend. After the first couple of feet on the
straightaway, I stoped using homasote subroadbed. This made things unnecessarily thick, and I
didn't want to waste the homasote on the elongated helix. Besides, I'd like at
least a little noise from the helix as a positive indication that trains are
still on the track! Wow! Things sure do move fast when you have only one track
and NO turnouts!
Back to the Murnau Bf for a moment.
I still have four Tortoise switch machines to install on the last turnouts.
Once I have finished my elongated helix, I'll put the staging tracks on hold
until I have the south end of the Murnau Bf completed. This will be easier to
do now rather than wait until staging is completed. As I mentioned in my last
entry, I'm not looking forward to installing the two double-slip switches. I am
prepared to take as long as I need to make sure they are reliable. They are in
a key section of track that absolutely cannot fail!
One last note - I had to make my
first compromise in the track plan. The first switches encountered as you head
into the station from the north had to be eliminated, due to space restraints.
These switches led to the spur where the maintenance building is located. These
switches only appear to be a convenience, so eliminating them won't be a
problem. (A couple years from now, watch for an entry where I eat these words
when operations break down due to the missing switches!)
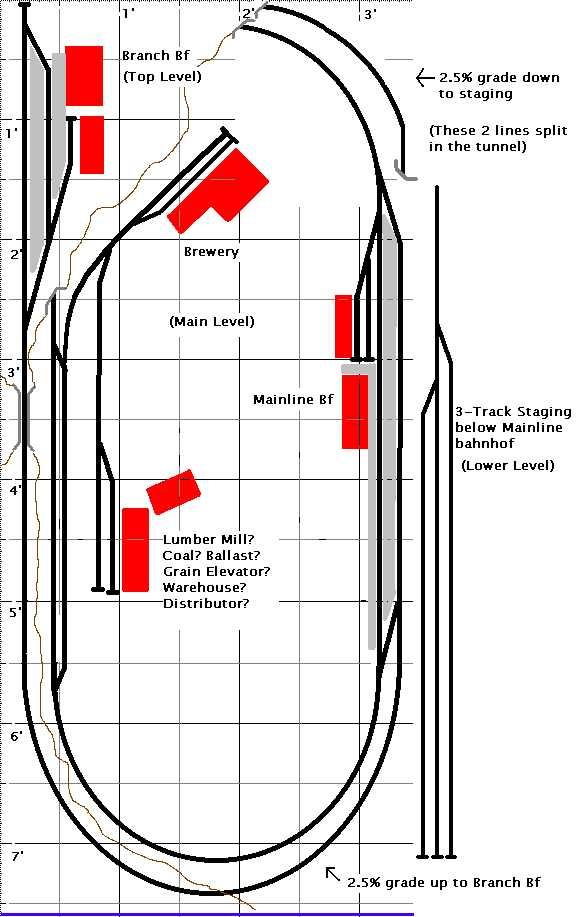
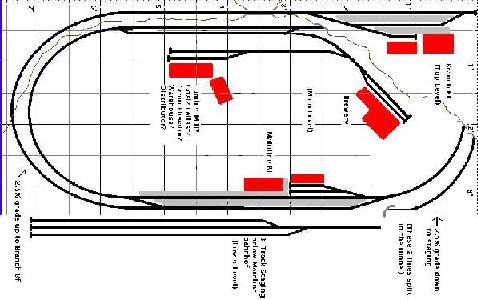
 The blue circles indicate the eliminated turnouts and trackage
I have about a month before I'll
probably stop work on the layout for a few months. I am the Events Director of
the Florida
East Coast Railway Society. I am in charge of organizing and running our
convention each year in early October. I'm also the founder of FECtrak, our society's oNeTRAK
club. From the end of July until the beginning of October, I'll be working hard
on the convention details and also working on my five FECtrak
modules. Right now, they look like the Plywood Central RR, with the exception
of one module. I have a LOT of work to do on
these as well! My goal is to finish one per year. So far, I'm a year behind!
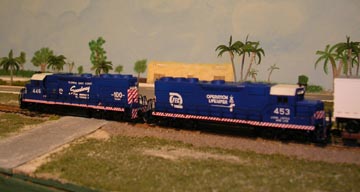
Here are a couple of photos of my one, semi-scenicked
module.
|
|
|
|
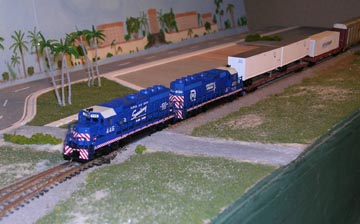
FEC GP40-2 #446 in the centennial "Speedway" livery, and FEC GP40-2 #453
in the "Operation Lifesaver" livery.
|
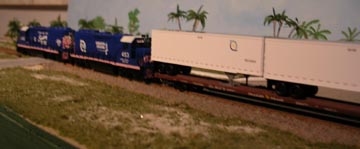
A northbound intermodal train,
with FECX trailers, takes the main as it approaches the south end of Hypoluxo
Siding in Boynton Beach, Florida.
|
|
|
|
|
A shot of the same intermodal
train as is passes the switch for Hypoluxo Siding in Boynton Beach.
|
|
March 21, 2004 - Back at It Again (21 Jun 2004)
A month of weekend activities and being sick most of that
time have kept me from working on the layout. However, I got a chance to work
on it for a few hours today. Three more Tortoise switches, four more turnouts,
and some more yard track were installed. I'm about 6 turnouts away from heading
out into open (and SINGLE TRACK!) country! I don't know what I'm dreading more
- the staging on the lower level or the two double-slip switches waiting for me
on the south end of the Murnau Bahnhof! However, once I get those two things
finished, the track plan is pretty simple until I do the final piece of the
layout - Eschenlohe and the Hartsteinwerk Werdenfels. Oberammergau will be interesting as well, but
nothing compared to the stuff I'm doing now.
February 15, 2004 - Continued
Progress (21 Jun 2004)
I continued work on the north end of the station in Murnau.
I did a little wiring, but mainly was doing some track "mock-ups" to
see what my space needs would be as I finished the station and started the
descent down to staging. Right now, things look a little tight. I think it is
still workable, but I certainly didn't leave myself with any wiggle room!
February 8, 2004 - A Good Week! (21 Jun 2004)
I actually had an hour or two on
several nights this week. This weekend I had several hours to work on things. I
added 5 Tortoise switch machines to Murnau Bahnhof and finished wiring up the
existing track. As I watched Bayern München defeat Hannover, 3-1, I was able to do
some modifications on the Tortoises. This includes creating a larger dead area
during the travel of the switches in order to reduce to possibility of a short.
Don Crano's website (http://home.neo.rr.com/mrwithdcc/) describes how and why to do this.
Now
that I have the existing track pretty much in order, I can start adding new
track to Murnau. I wanted to get the wiring in for the top level before I
headed downstairs to the second level. I'll probably head north and finish the
track as the line heads out of Murnau Bahnhof, and down into the helix in the
coming weeks.
Speaking
of the elongated helix, I have the subroadbed
completed from the initial descent, down through the first turn, and then on
down to the far end, just before the beginning of the second turn. Due to clearance
issues, it's a little steeper in certain locations than I'd like, but it'll
have to do. I had to make sure that I could clear the top benchwork
by the time I had curved around to the back on the initial turn coming out of
Murnau. There's a dip of about 4%, but the rest of the helix is in the 2.5% to
3% range. On the positive side, this will allow me to have the second (and
probably third) curves be level, which should be less of a strain on trains
using the helix.
Photos!
Oh, yeah! I promised photos, what, a year ago? Well, these aren't great, but
they give you an idea of what I've done.
|
|
|
|
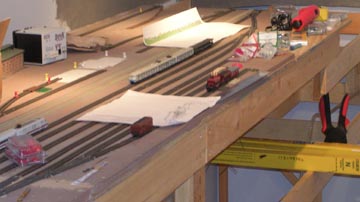
This is the main
portion of the Murnau Bf.
|
Under Murnau Bf.
Installing and wiring Tortoise switch machines is a slowing process. Note the
initial descent of the elongated helix in the back.
|
January 19, 2004 - Some Benchwork, Some Wiring
(21 Jun
2004)
This
was a holiday weekend, so I was able to take advantage of one day of the
three-day weekend to do some benchwork and some wiring.
I actually did quite a bit of work, but it sure doesn't look like it! I also
cut some scale lumber from used matchsticks. I'll need lots of these for the
lumber company in Unterammergau. I already have about
seven boxes cut - a good start!
November 23, 2003 - Some Unexpected Progress (30 Nov 2003)
I
had a chance to work on the benchwork today. I did a
little painting of the homasote on the north end section of Murnau Bf. as I
watch Bayern München defeat 1860 Munich, 1-0. I also began adding supports for
the helix. The Thanksgiving holiday weekend will not provide much time for work
on the layout, as we have plans to get together with family.
November 3, 2003 - Back "On Track"? (30 Nov 2003)
It
has been a strange year since my last entry. A new job in April and the
untimely death of my father in May forced me to think of things other than my
layout. Additionally, I am the Events Director for the Florida East Coast Railway Society. I am in
charge of organizing our annual convention each year. This has taken an
additional 10 - 20 hours per week that I hadn't expected. I honestly don't see
myself working much on the layout for another month. I DID make a little
progress since my last entry. I will try to post a couple of photos soon to
show what has been done. Basically, I have the benchwork
for the side of the room that will hold the Murnau Bahnhof and the lower level
staging. I have the backdrop in place and primed with white. A portion of it is
painted blue as well. Luckily, my wife is a decorative artist, and will be
helping me with this. The bad news is that this is her busy season (just before
Christmas), and she will be limited to the amount of time she can spend on it.
In the meantime, I'm going to install some Tortoise switch machines under the
Murnau Bahnhof. Once this and the rest of the wiring is complete, I can add the
lower level, including the elongated helix used to transition from the Murnau
Bahnhof down to staging.
February 16, 2003 - Clean-up (16 Feb 2003)
I
spent the weekend tearing out all of the wiring and track on my "practice
layout" - a 3ft x 7ft, multi-tiered layout of a German branchline.
The Tortoise switch machines will definitely be re-used, as will all of the
turnouts. The wiring and lumber will be useful as well. I may be able to
salvage much of the straight Peco flextrack.
However, I think the track that was in the turns is pretty much trashed.
Even
though the layout was functional, I wasn't using it anymore. It was eating up
valuable space that I was going to need in the near future for the Murnau
layout. I must say that if I had to revert to a small layout again, I would
definitely consider building this layout, or something very similar, again. I
had big plans for operations, and it could have been operated by up to three people.
One would run the local freight; One would run the local passenger; One would
run any express trains that would go through the main station.
I
envisioned the main station being a kind of Berchtesgaden,
which is the terminus of a branchline that has one InterCity train per day. The difference would have been
that there would be an additional stop to be made for the local trains, which
was the upper station. InterCity trains would come up
from staging to the main station (maybe after making a complete circuit of the
main oval). The engine would then run around the train, and head back into
staging.
The
local trains would be push-pull. They would be pulled up from staging to the
main station. They would then push up to the branchline
station on the upper level. The move would be reversed on the way back to
staging.
The
local freight trains would have to service both industries, plus the two
stations with their goods sheds. This would involve some intresting
moves, including leaving some freight in the main station just prior to heading
up to the branchline station. The industries would be
interesting as well since the one industry would need to be used as a
switchback in order to get into the other industry. Depending on the number of
cars at the industries, careful planning of switch moves would be required. The
siding by the industries would allow the freight crew to perform runarounds,
and also would keep them out of the way of passenger traffic.
Below
is a diagram of the layout. Click on the image to see a larger version.
February 9, 2003 - Benchwork (9 Feb 2003)
Due
to time and money constraints, I didn't even consider building benchwork until the beginning of the New Year. For the last
two or three weekends, I have been slowly constructing the benchwork
that will hold my staging yard on the lower lever, and the Murnau Bahnhof on
the upper level. I'll be using Homasote on top of plywood throughout the
layout. However, when I first started working on this portion of the layout, I
couldn't find any Homasote! So, I settled for some cheap sheathing that I
thought was similar. I believe this stuff will work, and I'm planning on using
what I bought. However, now that I have found a source for Homasote, I will be
using it exclusively from now on. For those of you who do not know what
Homasote is, it is a product made of pressed, recycled newspaper. It typically
comes in 4ft.x 8ft. sections, and is 1/2 inch thick. Homasote is very dense,
which helps reduce sound. It also accepts nails very well. I like this because
I use thumbtacks to hold down my track until the glue dries. Homasote is great
stuff, but a little expensive. After hearing the difference with and without
it, I think the price is worth it.
My
goal is to be able to start laying track in the staging yard by the end of
February. Let's see if my next entry shows up by then!
|

|
|
A full-sized drawing of the staging yard, complete with helix track
and staging tracks representing München
|
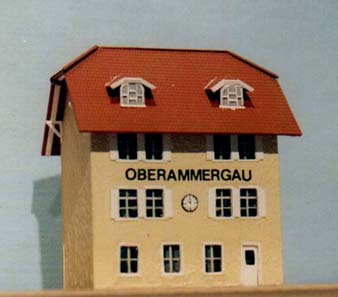
January 31, 2003 - Scratchbuilding (9 Feb 2003)
I
have been working on my first ever scratchbuilding
project - the Oberammergau
Bahnhof main building (Empfangsgebäude). I have been
doing this, off-and-on, for almost a year. I finally have the main portion of
the station completed. I'd like to change a couple of things, add chimneys, and
a little weathering. However, I felt it was time to take a photo of it. I also
have to finish the waiting area before I can finally claim victory. I have
found that I like scratchbuilding. I'm not very good
at it at the moment, but that has never stopped me in the past from doing
something anyway!
One
technique I (and my artistic wife) came up with was the way we created the
stucco look for the building. I took some antique white Ceramcoat
paint, and added some cornstarch to it to thicken it up. I slapped this mixture
onto the styrene in a fairly thick (for N scale) coat. Once I had the coverage
I was looking for, I took a stenciling brush and stippled the surface of the
styrene. This caused portions of the paint/corn starch mixture to rise and gave
me the stucco effect I was looking for. I think it looks great!
Everything
on the building was created with plain styrene, except for the roof. I
purchased sheets of tiled styrene for roof. I'll probably buy some brick sheets
in order to make the chimneys. I can tell you from experience that working with
miniscule pieces of plastic is NOT all fun and games. For instance, the
supports just under the roof (see photo) are impossible without a good set of
tweezers and a steady hand! The windows were similarly difficult. In the
future, I will probably just print a window pattern on my bubblejet
printer, and place it behind some clear styrene instead of painstakingly
cutting the individual pieces that make up the window latticework. Ugh! In
fact, I may replace the windows on the roof of this building with these. Those
windows are the one thing I find completely unacceptable about the building. I
was working too quickly, and doing it far too late at night. Word of advice:
Quit working when you feel like you have lost interest in the project. It will
still be there tomorrow!
|
|
|
The scratchbuilt Oberammergau Bahnhof main building. Work in
progress - 8 Feb 2003
|
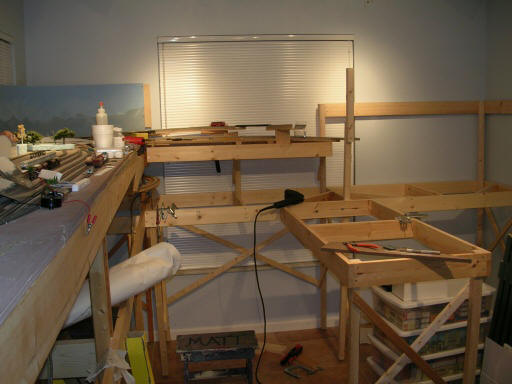
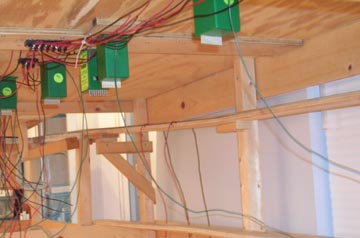
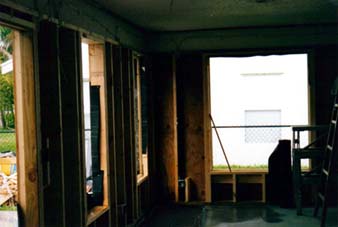
October 6, 2002 - The Addition (9 Feb 2003)
The addition has now been officially complete for about 3 weeks. Benchwork construction will probably begin in another 2
weeks. Due to the extra cost of the addition, funds are a bit tight right now.
Luckily, wood and screws don't cost much! Here is the area I have to work with.
Not exactly a basement like they have up north, but it's more than enough to
build an N scale empire!
|
|
|
|
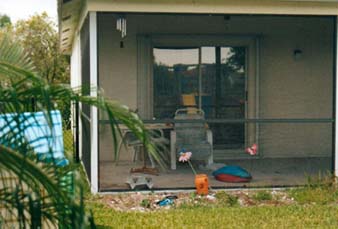
Before: The patio at
the back of the house is to be enclosed. The enclosed room will be a hobby
room for my layout and my wife's decorative art.
|
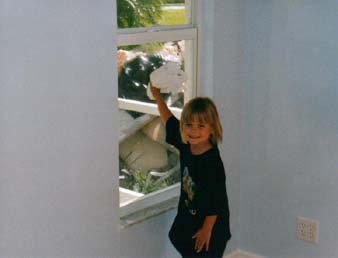
After (sort of): The room is taking shape.
|
|
|
|
|
Cleanup Duty:
Kerstin (in her Oberammergau
shirt!) helps with the cleaning once the room has been completed.
|
|
|
|
|
|
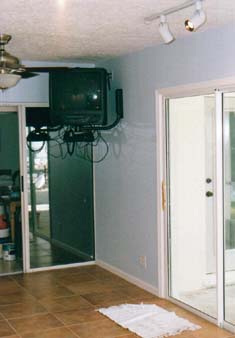
Amenities: A TV, for
watching all of those train videos for inspiration!
|
|
|
|
|
|
|
May 27, 2002 - The Addition
Since
1997, we had discussed building an addition onto our house. The addition would
be 10'8" x 26', and would house my layout and my wife's arts and crafts
studio. Finally, we got serious about the addition at the beginning of 2002.
With interest rates being very low, we decided this would be a good time to
refinance our mortgage. With the refinancing paperwork completed in March, we
had the money necessary to build the addition. We spent the month of April
getting approvals through our homeowners' association, getting drawings made,
and finding a suitable contractor. We finally had everything in place by
mid-May. Drawings were finalized, permits were approved, and construction began
the last week of May. I would receive approximately a 10'8" x 16' area in
which to build my layout, while my wife would get the remaining 10'8" x
10' area for her studio.
May 27, 2002 - Laying Track
After
building the initial benchwork for a portion of the
Murnau Bahnhof, I decided in the summer of 1998 that it was time to try my hand
at laying and wiring some track. I felt that this section of the layout would
be the most complex, track-wise, but would be relatively easy to do considering
it was a large, flat area. I could basically employ the typical beginner's
"track on a piece of plywood" method. I modified this slightly by
screwing a piece of Homasote to the 3' x 7' piece of 1/2" plywood. I
sealed the Homasote with a thick coat of brown latex paint to reduce the
possible expansion of the Homasote I had heard so much about. The Homasote was
great because I could use pushpins to hold the track in place while I was
gluing the track down.
I
decided to use Peco Code 55 track, turnouts, and
double-slips for three main reasons:
1.
I liked the look of code 55 over code 80, but was concerned about some of the
large flanges on my German locomotives and rolling stock. The Peco Code 55 track is really code 80 that is sunk into the
ties. The advantage of this is that there is no need for tie clips on the
inside of the track to hold the rails in place. This allows for larger flanges
to be used on the track.
2.
At the time I started looking at track, Peco was the
only company that produced code 55 (or code 80, for that matter!) track with
concrete ties. The area I'm modeling has a combination of wood and concrete
ties in use. Actually, there are a couple of places (Oberammergau Bf. being one of them) that
appear to use steel ties. I believe I can paint the concrete ties to closely
resemble the steel ties.
3.
A feature I like about Peco flextrack
is that it is fairly rigid, and holds its shape when curving it. However, I
also have a few pieces of Atlas flextrack that is
easily curved and doesn't hold its shape at all after curving. I have used the
Atlas flextrack to create transitions from straight
track to curved track. I lay the Atlas track down and keep it in place with
pushpins. I then mark the natural curve of the Atlas, and then replace it with
the rigid Peco. This has worked on a test layout that
I created. I will see how it works on the Murnau layout in the near future.
I
laid most of the track from just north of the goods shed to the first
double-slip to the south. There was a lot of experimenting. One thing that I
did that I will NOT be doing on other portions of the layout was to drill holes
for the wiring prior to laying the track. In other words, I had to match up the
holes to where I had soldered the wire to the flextrack.
This required meticulous measurements and precise drilling. Since then, I have
abandoned this method in favor of another that is less time consuming. Now, I
simply prepare a section of rail between two ties by removing the plastic
covering the rail, and cleaning and tinning the area. I then lay the track and
drill holes between the proper ties on the outside of the rails after laying
the track. I then slip the feeder wire through the hole, strip it, make an
"L" shape, and tin the exposed wire. Once this is done, I simply put
a little flux on the wire and place the bottom part of the "L" under
the rail and apply heat from the soldering iron. I push on the wire from
underneath the layout in order to ensure I have good contact between the wire
and the rail while I solder them together. This method has been fast and
effective on a test layout I have been working on since the fall of 2000.
Once
most of the track had been laid on this section of the station, it quickly
became a storage shelf for tools, locomotives, rolling stock, buildings, etc. I
tried my hand at installing a few Tortoise switch machines, but little was done
after the initial track laying exercise. For awhile, it was used to test new
locomotives that I acquired. It even lost this duty once my 3' x 7' test layout
was fully wired. This section sat around and collected dust for 3 years!
In
the fall of 2001, we installed wood laminate flooring throughout the house.
This resulted in the dismantling of the benchwork
that held section of the Murnau Bahnhof. The board with the trackwork
was placed in the garage, and has remained there to this day. Unfortunately,
the elements have taken a slight toll on the track work. I'm guessing it will
take a few days to get it back to an acceptable condition. For now, it waits
for the completion of the layout room.
Summer, 1998 - Benchwork
Construction
of the benchwork began in earnest in the winter of
1997. It began with a test bench that later became the storage place for the
tools I used to make my benchwork. It didn't turn out
too badly, considering I had done practically no woodworking before. I had some
concerns, but I decided to go ahead and take a crack at the section of benchwork that would support the majority of the Murnau
Bahnhof. Considering the lack of proper tools, the benchwork
was extremely stable. I followed the instructions from a book on building benchwork from Kalmbach publishing.
This book was extremely helpful for a "newbie". I actually received
compliments on the benchwork from others that work
with wood!
Nächster Halt:
Layout Diary