Layout Diary & Description of Events
Archive: 2016 - 2019
This page is set up so that the newest information is at the top.
July 29, 30, 2017 – Working In Stealth Mode (30 July 2017)
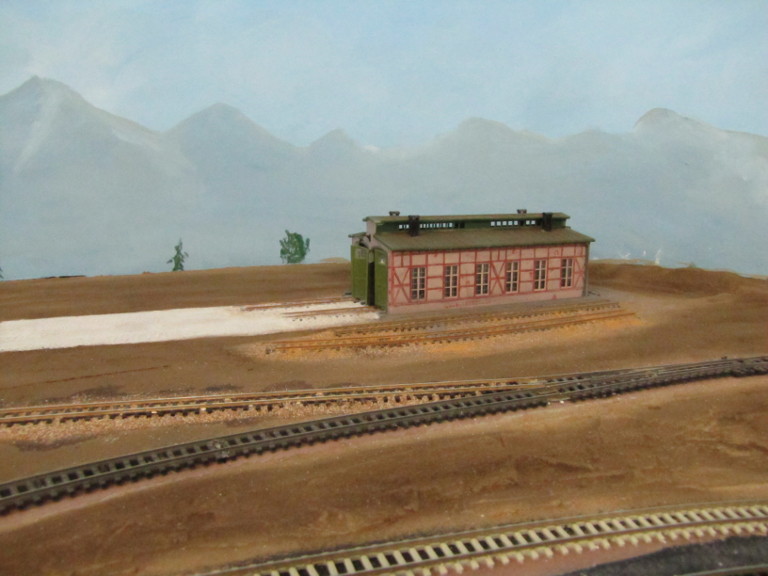
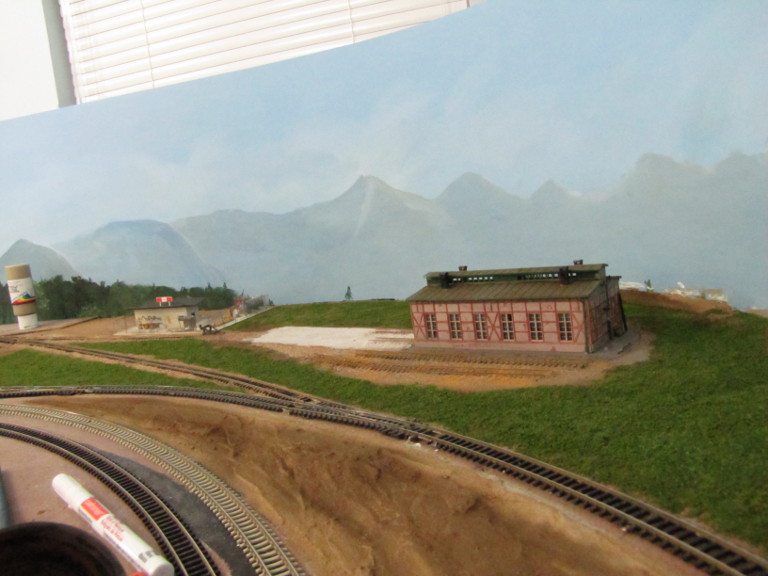
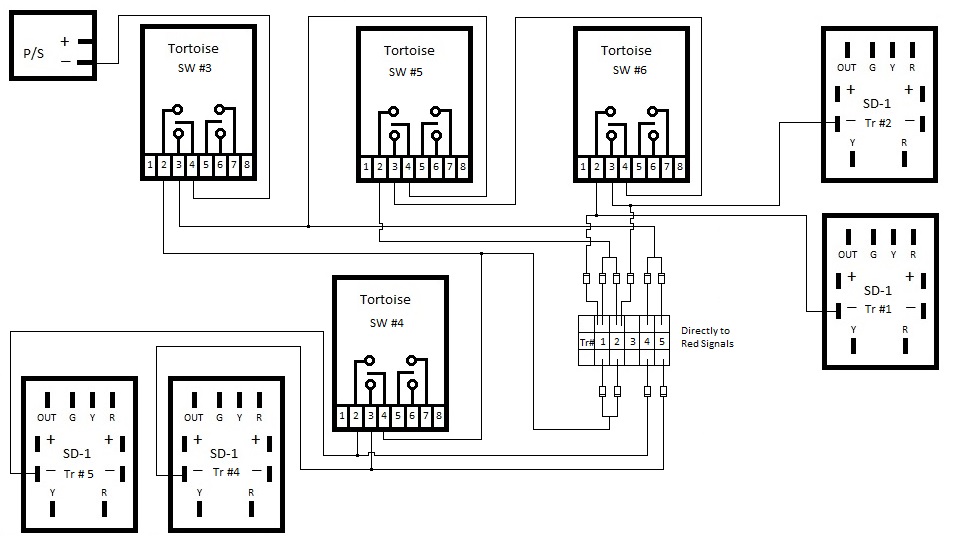
So, just because I haven't had an entry in three weeks doesn't mean that I haven't been busy. I've put in several hours trying to figure out how to wire up the SD-1s and Tortoises in order to get the appropriate aspect for each of the signals at the south end of Murnau Bf. This has me tearing my hair out - what little there is! I have made one concession - for Track 1a, I will simply go by track occupancy of the branchline (KBS 963) between Murnau and Bad Kohlgrub. I may add a dwarf signal to provide an indication of the turnout as at stop-gap measure. That leaves me with Tracks 2, 3, 4, 5, and 6. Track 2 and 3 are the only ones giving me fits. Track 2 needs to be aligned for KBS 963 in order to show the indication for track occupancy rather than a simply double red. Track 3 needs to be aligned for southbound KBS 960. The problem is the two double slip switches. I'm trying to figure out a way to handle 4 different configurations for the first double slip switch (Switches 12 and 13, below). I need to be able to change signals for 3 of the paths. The 4th one - tracks 2-6 heading southbound on the northbound track - will be a special situation, and I'm not planning for that one. Trains would have to get special orders to proceed southbound on the northbound track anyway.
OK, so here's the diagram of the track and signal arrangement. Tracks 1a and 2 need to head down the branchline (KBS 963), while tracks 3-6 need to head south on the mainline (KBS 960). I'll figure it out, soon. I'm considering using a Circuitron ER-2 or ER-1. These are external relays that may help in the logic for the first double slip swithc (Switches 12 and 13). My head is hurting. I'm stopping for tonight.
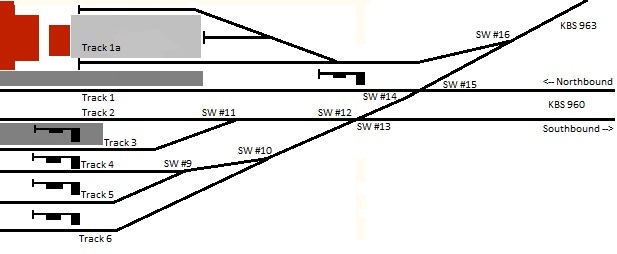 |
| Signal and Switch Diagram for the South End of Murnau Bahnhof |
July 3, 4, 2017 – What Just Happened?! (4 July 2017)
Life. Life just happened. A bunch of reasons - some real, some perceived - have kept me from my layout for nearly 10 months. Marching band, holidays, winter marching band (where did THAT come from?!), planning for a major remodel of our master bathroom and kitchen, planning a 22-day trip to Germany, and the actual remodel and trip themselves were all legit reasons. Joining the American German Club of the Palms Beaches and my daughter's high school graduation would be a couple of other good ones. However, sprinkled about in there was just general procrastination - a HEAVY sprinkling!
It took a trip to Germany and a 4-day Independence Day weekend to finally get my juicing flowing to the point that I finally ambled back into the hobby room on Day #3 of the 4-day weekend. As always happens when I'm away this long, the thing that keeps me away even longer is the thought of trying to figure out where I left off. This time, I actually read my last blog entry to see if that would help. It did! It should be no surprise, as that is one of the reasons I have these entries, but it still was a rather pleasant one.
I spent Monday organizing some things and doing a general overview of what I needed to do. As mentioned below, I was waiting on some orders - connectors, SD-1/BD-1 boards, etc. Well, I had everything I needed to move forward, so I was ready to start early on Independence Day. I finished off the evening by working on a diagram, so that I could use it tomorrow.
Tuesday was a full-blown work-day. I added another track for an additional SD-1 board that I figured out I would need while doing the diagram the previous night. I added the board, and then proceeded to wire up as much as I could. Once I hit a stopping point, I headed to the layout to label the Tortoise switch machines that would be controlled by another front panel (and would be involved in the operation of the signals on the south end of Murnau). Once that was done, I figured out which turnouts would need to be set for the various routes, so that I could use them in the logic for the signals. It's pretty complicated down on the south end, with 2 double-slip switches together. They don't call them puzzle switches for nothing - and I had TWO of them! After writing all of the possibilities down, it was time to head back to the computer to try to come up with a diagram that made sense. Before I started working on that, I decided to write this entry - mainly because what I was about to do was daunting, and this seemed like a nice break before I started.
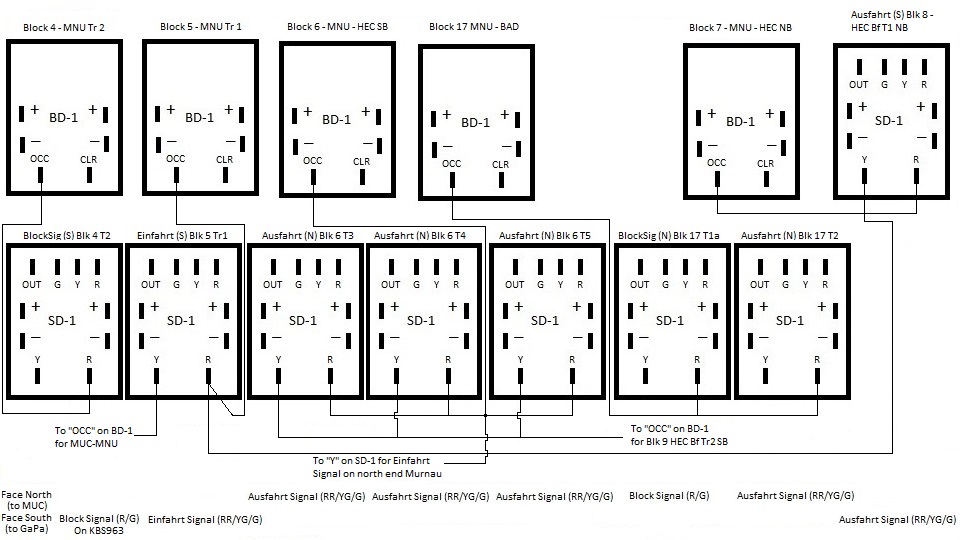
Here is the diagram of the BD-1 - to - SD-1 connections. I hadn't done this in nearly a year and a half. Even though this one was simple, compared to what I'm about to do, it was still rough remembering what I had done, originally.
|
|
|
The wiring diagram between the BD-1s and the SD-1s for the south end of Murnau Bf |
September 10, 11, 2016 – Trying To Recreate Something I Did Almost A Year Ago (11 September 2016)
I started the work needed to wire up the signals on the south end of Murnau Bahnhof. On Saturday, I snuck a few hours in between watching soccer and the Iowa vs. Iowa St. football game. I started by finding an appropriate piece of 1/2" plywood for my panel that would contain all of the BD-1s and SD-1s. I then added the tracks (not the railroad type) that would hold the boards in place. I finished up the day by soldering the isolating diodes (1N4001) to the SD-1s, so that the "slow aspect" on the Ausfahrt and Einfahrt signals would be yellow/green instead of just green.
On Sunday, I inserted the boards into the tracks and added a terminal strip to the panel for power. I was ready to spend the rest of the afternoon wiring up the boards to the point where I would have to mount the panel. Unfortunately, I was running low on spade connectors, so I took care of the power for the BD-1s only. After taking look at the panel that I had done on the north end of Murnau Bahnhof, it quickly became clear that I'd have to re-remember what I had done. It was looking pretty complicated, so I need to sit down and create a diagram like I did for the first one. Maybe I'll get a chance to do that this week.
Depending on how things go, I may have some time to work on the layout next Sunday.
September 3-5, 2016 – Home Improvement Trumps Layout Improvement (5 September 2016)
So, my long, nothing-but-working-on-the-railroad, 3-day weekend was one big set of interruptions. Mostly, it had to do with remodeling the guest bathroom. But, there were other distractions, including the first Iowa (and UCF) football games of the season. I also attended what may end up being my final match for the Ft. Lauderdale Strikers. They've moved to a cricket stadium (seriously!) - and it's even further away that Lockhart Stadium! The new Brazilian ownership has screwed this team up so much that I won't be renewing my season tickets. So, that will be one less distraction in the future.
I did nothing on Saturday. On Sunday, I decided to install two newly arrived decoders. I purchased a DCC Fleischmann BR 101 from a gentleman from Europe. The lok was from a starter set with pre-installed decoder that I simply could not get to work on my Digitrax DCC. I made a deal with the seller that I would keep the lok if he would refund me $30 - enough to buy a new (Digitrax) decoder. He agreed to this. So, I ordered a Digitrax DZ146IN, and also a DZ126IN for a special run Minitrix BR 218 that advertised a play about King Ludwig II. Both decoders utilize an NEM 651 plug, which are common in newer model loks from Europe. Needless to say, neither installation went well, at first.
For the BR 101, I removed the original decoder and tried to install the DZ146IN. Of course, unlike the original decoder, it didn't have a harness. The decoder is typically supposed to fit directly into the NEM socket. The problem was, (again, a lok from a starter kit with a weird set up) the decoder wouldn't physically fit in the area where the socket was located, which was on the side of the frame. So, I decided to cannibalize the original decoder, snipping off the plug and wires, which made up the NEM harness. After briefly attempting to solder the tiny wires to the pins on the DZ146IN, I gave up. I grabbed a DZ125 from my DCC drawer and used that instead. I de-soldered the wires from the NEM 651 plug, and then soldered 4 wires (Orange, Gray, Black, and Red) to the plug. I then wired up the Blue, Yellow, and White wires to the lights - just like what was done with the original decoder. Ta-da!!! It worked like a champ! So, I now have a specialized decoder (DZ146IN) that will be in need of a home, at some point. More importantly, I have a beautiful BR 101 roaming the area around Murnau!
The BR 218 was a pain, but in a different way. Popping in the DZ125IN was easy enough. However, the lok wouldn't move. It turned out that the little copper strips in the socket needed to be adjusted, so that they held the decoder in place - and in contact with the main board. Once that was figured out (and it took me a while!), the lights turned on... but the lok just sat there, humming. After a bit, it started to move, albeit erratically. There is nothing wrong with the decoder (I even tried it out in the BR 101 before I installed the DZ125). I think the engine is working as expected as well, but I believe the gears are mucked up with old grease, which is causing some binding. I'll have to make my way to the local hobby shop for some grease and oil. I think once I've cleaned this up, this lok will run just fine. After having it traverse the helix a few times, it started to work fairly well. Maybe the old grease started to warm, allowing for less binding. I had the same issue the next morning, running it cold - very erratic - and then smoothing out after a bit. Yeah, it's definitely maintenance time for this lok!
Monday was the most productive day. I got my Arnold BR 627 to work again. I have no idea why it stopped. It would just sit there, with a high-pitched hum, whenever I increased speed. I'm not quite sure what I did to fix it, but it did finally start moving after I messed with the internal workings a bit. I also installed that last two turnouts on the northern half of Staging. I also wired up those turnouts, plus 3 more. So, I've done as much as I can in Staging until I replace the southern end. But, of course, I can't do that until I wire up the signals, blocks, and Tortoise switch machines on the southern end of Murnau. That will be my focus for the next several working sessions.
No photos - none of the progress I've been making, recently, has anything that is truly "photo worthy".
August 27-28, 2016 – Finding Issues While Showing Off The Layout And Becoming A DecoderPro Pro (29 August 2016)
I was decompressing after a week-long trip to Seattle - where I got a chance to see the Seattle Sounders beat the Portland Timbers, 3-1, in a hotly contested rivalry game. It took me a while to get out to work on the layout. About the time that I did make it out there, my daughter asked her friends, who happened to be visiting - "So, have you seen my father's layout?" They hadn't seen it in action. So, I pulled out the Fleischmann BR 103, which has full sound, and started it up. I put the pantograph up, since I hadn't tested the catenary with an "Einholmstromabhnehmer", which is a single-arm pantograph that you see on many modern electric loks, as opposed to the "Scherenstromabhnehmer", which a pantograph that looks like a scissor-lift. The single-arm pantos go higher into the air when not constrained by the catenary wires. I had some concerns about their performance, so I thought this would be a good time to check them out.
My daughter's friends really liked the details on the layout out, and were equally impressed as the BR 103 pulled out of the station with the CityNightLine train. I held down the panto until it entered the section with catenary. As it curved around into the helix, everything looked great. Cool! As it made its way down the helix, I noticed the pantograph was in a strange position. Hmmm.... It was pulled back and nearly touching the roof of the lok. It must've caught on something. I fixed it, and let it finish its run. As it was about to enter Staging, it caught the catenary wire just under the bridge hiding the entrance to Staging. OK, I'll need to fix that.
With the girls heading out to do whatever it is that teenaged girls do, I ran the BR 103 back down the layout. This time, I followed all the way around the curve on the top level of the layout. It made it through the entire section of catenary. Huh?!?! And then, I saw it - the screw I had installed at the top of the helix! It was going to be where I attached the final section of catenary wire before heading into the helix. The problem was - I was able to angle the catenary upward (disengaging the pantograph prior to entering the helix - no need for catenary in unscenicked areas) much earlier than I had originally planned. My tests with the scissor-type pantographs revealed no issues with the screw that I had left in place. However, with the single-arm pantos, they just barely touched the screw - just enough to rip them in the wrong direction. (Picture your elbow bending in the wrong direction - Ouch!!) With a bit of difficulty, the screw was removed.
I had an even tougher time getting the wire under the bridge to behave. Again, with the scissor-type pantos, there were no issues. The single-arm types were a little more sensitive - tending to wiggle from side to side a bit. This caused them to move the wire around a bit, making it easy for the panto to slide out from underneath the wire, and getting hung up. I had to make the wire more secure where it met the backdrop. It wasn't easy, but I believe the problem is solved. So, a few minutes of showing off the layout ended in a 2-hour troubleshooting session!
The rest of Saturday and all of Sunday was spent on DecoderPro and refining the settings for my stable of DCC loks. I added acceleration and deceleration delays for smoother (and more realistic) starts and stops on all of them. I also limited the speed on the loks, so that they couldn't be confused with Formula 1 racecars. Heck, I even added a speed table to one of the loks that wasn't working as well with the 3-step (vmin/vmax) approach. They aren't perfect - and none of them are matched for speed - but they all run MUCH more realistically.
Next weekend is Labor Day Weekend. This will likely be the last weekend that I can dedicate a significant amount of time to the layout until after Thanksgiving. Marching band competitions will take up nearly every Saturday. And, I'll be attending at least a couple of UCF football games. I might sneak a Saturday or two in there, but I'm not counting on it. Anyway, next weekend, I'll have the better part of three days. So, I plan on building a board to hold the block detector and signal driver cards for the south end of Murnau Bf, and begin wiring blocks and signals on that end. Tortoises and a control panel will follow, given enough time.
August 13-14, 2016 – Variety Is The Spice Of Life (15 August 2016)
I had a couple distractions this weekend - the Bundesliga Super Cup (Bayern vs. Dortmund) being one of them. Regardless, I had a very productive weekend.
On Saturday, I cut some plywood that would be used to mount the three DS64s for the turnouts in Staging. I also cut a hole in the plywood for a switch - a QPDT (QUADRUPLE pole - double throw!) for the programming track and a "safety section" of track. I also wired up the QPDT, which were the only pieces of track remaining that weren't wired on this section of Staging.
I got started early on Sunday, knowing that I'd stop to watch the Super Cup. I painted the plywood that I had mounted on Saturday. While that was drying, I installed the catenary the the remaining section of track on the top deck that leads to the helix. Once that was done, I mounted the QPDT switch on the plywood. I decided to test the programming track and switch, even though I didn't have the PR3 wired up to it. It turned out to be a good idea. I had placed one of the red wires in the wrong location on a terminal block. The programming track worked fine, but the "safety section" was shorting out. This was an easy fix. Once this was done, these two sections worked as expected. Power and DCC running in one position, and no power in the other. Once I hook up the PR3, the second position will provide low power to the programming track, and no power to the "safety section".
No photos this week. I guess I could snap a picture of the bare plywood (except for the QPDT) where the DS64s will be - or the finished catenary. Other than that, it's just been wiring - and that's boring, photo-wise. Maybe in a couple of weeks. I won't be able to work on the layout next weekend. I'll have two more weekends, including a 3-day Labor Day weekend, and then marching band and UCF football season starts. So, things will begin to slow down on the layout until about Thanksgiving. BUT! That doesn't mean I won't make at least SOME progress!
August 7, 2016 – Back Under Staging (15 August 2016)
Just back from watching Bayern thrash Inter Milan the weekend before, I was looking forward to getting back to work on the layout. Unfortunately, I had a few things to do on Saturday. So, it was a one-workday weekend.
I managed to get most of the remaining tracks wired up to a buss wire. Since I had a few Tortoise switch machines installed, I was able to run a few test trains into Staging. I found a few issues - mostly filing and adjusting. It was great to see a train go from the middle of Staging, up the helix, into Murnau Bahnhof, and onto the branchline to Murnau Ort. By my estimate, that's about 65 feet of mainline!! Well, about 5 feet of it was branchline - but it still counts as part of the run.
July 23-24, 2016 – Like A Tortoise (Switch Maching): Slow And Steady (24 July 2016)
I spent part of the weekend catching up on things, as I was in Seattle last week. One good thing came out of my trip - I finally got to meet a fellow Modelleisenbahner, who I've corresponded with via the Internet for 18 years! Back in the day, we were both N scale, Deutsche Bahn newbies, trying to learn as much as we could about out hobby.
Some of my Viessmann catenary order had arrived a week ago. However, rather than work on that, I decided it was time to modify some Tortoise switch machines, so that I could install them under Staging. I managed to modify 7, so that was a good start. It was one shy of the total I would need on this end of Staging. I even got 4 of them installed, which is no easy feat by yourself. The biggest problem is getting the wire, which acts as the fulcrum, into the hole of the Peco turnout. It helps to have a "spotter" on top for this, but I did surprisingly well on my own.
I'll be unavailable again next weekend, as I'm going to see FC Bayern Munich in a match against Inter Milan! My first chance to see Bayern live - I'm very much looking forward to this! So, the layout will have to wait for a couple of weeks again. I'm hoping to install the rest of the Tortoise switch machines, finish the wiring on the installed portion of Staging, and, possibly, install catenary to the point where trains enter the elongated helix from the top level. That's a fairly ambitious plan. Let's see how I do.
July 9-10, 2016 – The Over/Under On Wiring (14 July 2016)
It was all about the wiring this weekend. Installing additional overhead catenary on the main level, and wiring up some of the tracks in Staging on the lower level. Most of Saturday was spent on the catenary. I had read that it's best to start from a turnout, and go from there. So, rather than starting on the area where the track comes out of the elongated helix, which was the original plan, I started on the first two turnouts encountered when entering Murnau Bf from the north. This covered 3 turnouts, a yard lead to 3 stub-ended holding tracks, and about half of the track between Murnau Bf. and the helix, before I ran out of wire and posts. So, another order was made on Sunday, which should be here the next time I can work on the layout.
The rest of Saturday and all of Sunday, I turned my attention to the underside of the layout - specifically, Staging. I had a BUNCH of feeder wires hanging down from all of the tracks in Staging that needed to be connected to terminal blocks. I also needed to run buss wires between these terminal blocks. But before I did that, I had a couple of wires that needed to be connected to District 1. They included wires to the track along the farm scene on the lower level (these feeders have been hanging there for years, and were used to power the entire layout, back in the day), plus the first turnout in Staging. I got a little over half of the feeders wired up to the terminal blocks.
I'll be unavailable next weekend, so my next chance to work on the layout will be July 23-24. That weekend, I'll try to finish up the feeders, and then start working on the Tortoise switch machines. Before I can install them, however, I'll need to make the appropriate modifications. That could take up one of the days, itself!
Since I won't be messing with the layout for a couple of weeks, I decided to create a simple scene to show off the new catenary on the main level.
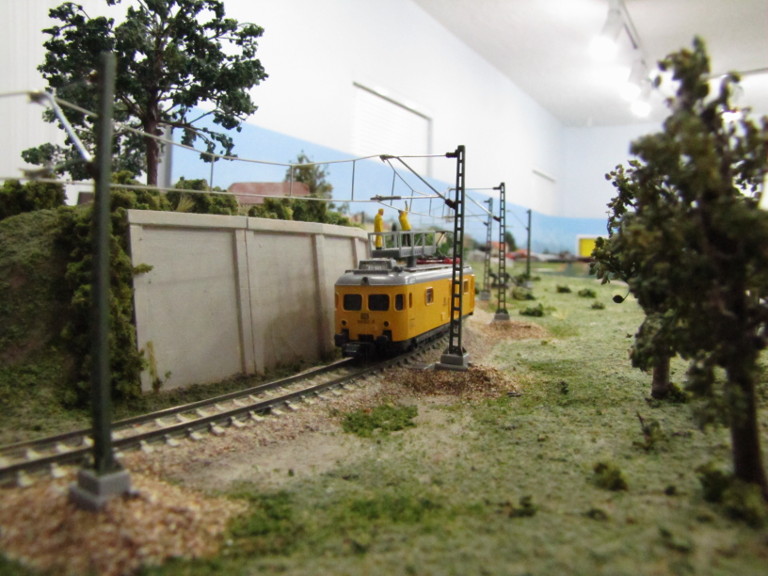 |
| A catenary maintenance crew is making adjustments on the newly installed wire on KBS 960, just north of Murnau Bahnhof. |
July 1-4, 2016 – Fourth of July Weekend - More Scenery, More Scenery, More Scenery (4 July 2016)
Yep, that pretty much explains it. I worked on scenery on both ends of Murnau. I installed the highway bridge/overpass and added scenery around it. I also added some more ballast, trees, bushes and grass around the Murnau Ort area. I finished the catenary on the lower level, including a wire that goes into the backdrop that hides Staging. These areas aren't fully completed, but I feel good enough about them to do some wiring in Staging next weekend. If I have time, I may start working on the panel for the BD-1s and SD-1s for the south end of Murnau, too.
Short entry, but here are some photos that I've been promising for a few weeks.
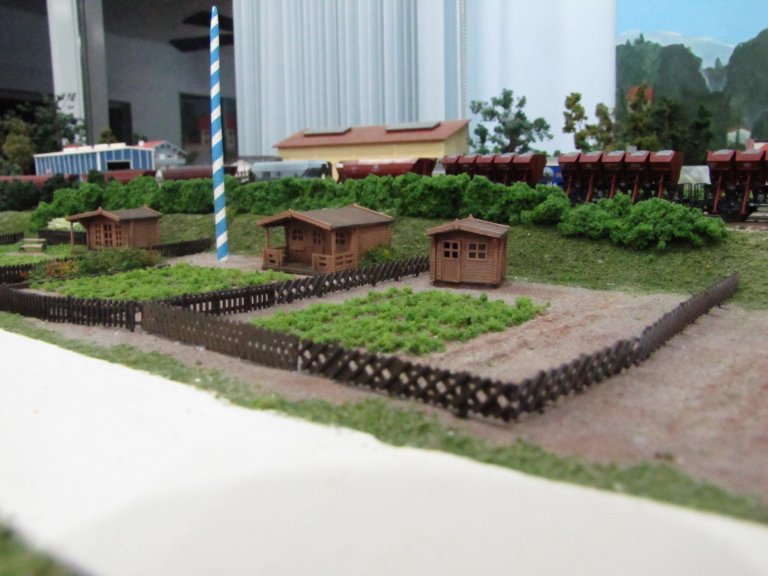
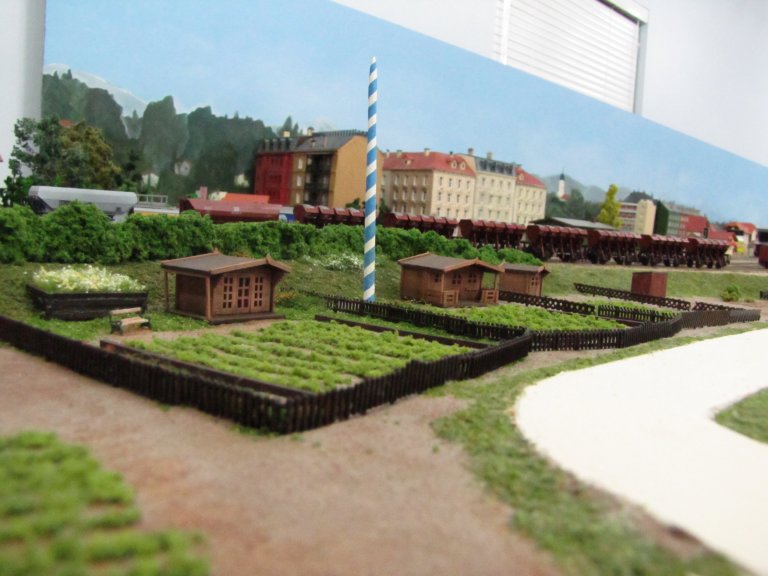
 |
| The gardens are still unfinished, but now they at least have some people in them. I have another set of gardeners to add. These people are mostly harvesting and prepping their gardens. The next bunch will be tending to their gardens - and possibly having a cookout. |
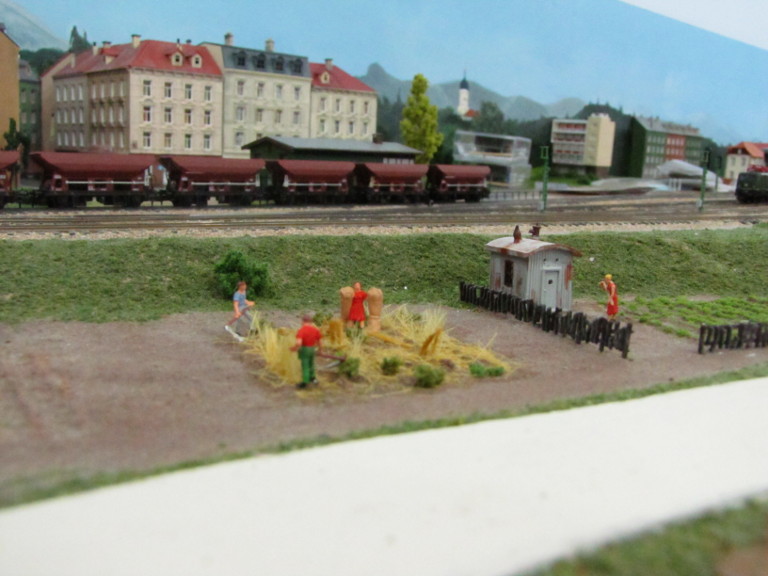 |
| Further down "Gardners' Row". |
 |
| A view of the Esso depot with more scenery. |
 |
| A view of the old Lokschuppen with more scenery. |
 |
| A view of the Lokschuppen from the top of the Hechendorf Rampe. |
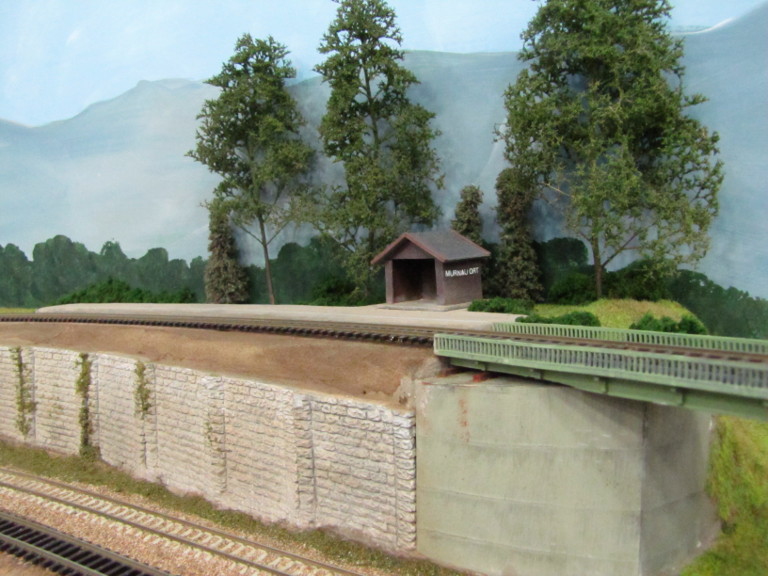 |
| Murnau Ort with scenery. The ballasting and scenery in front of the track will have to wait until I start on the peninsula, which takes this line to Jägerhaus - the next stop on KBS063. |
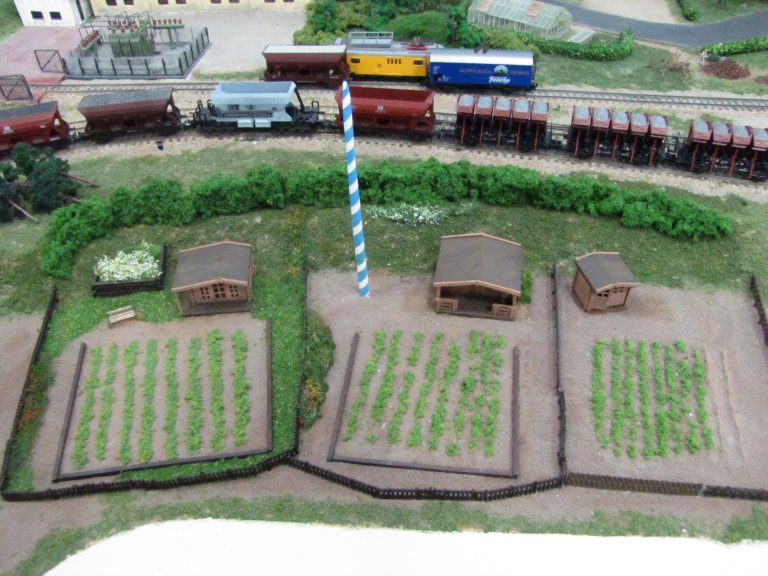
 |
| An overhead view of Murnau Ort. Note the vegetation growing between the sections of the retaining wall. |
 |
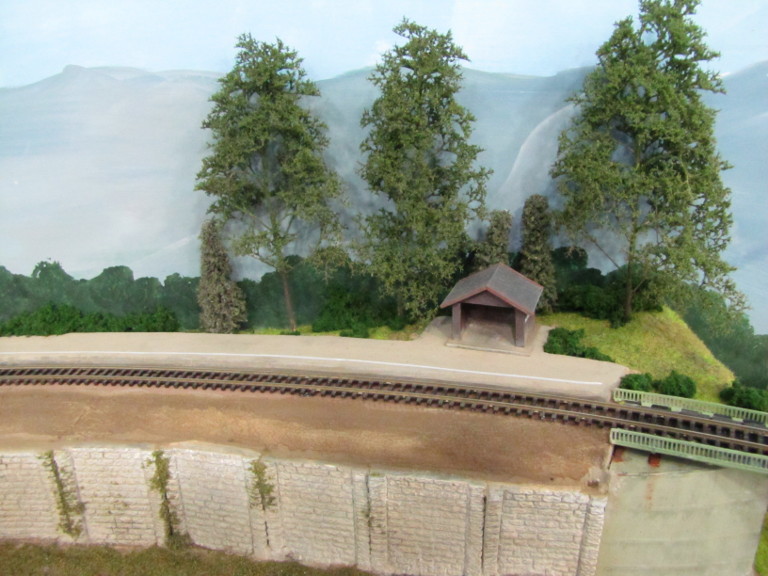
| No more gaping hole heading to Staging! Instead, we have a backdrop and bridge/overpass to cover it up. |
 |
| A close-up of the bridge. Check out the catenary!! Also, I love the little dirt road that also goes under the bridge. |
June 18, 19, 2016 – Playing, "Hide The Entrance To Staging" (4 July 2016)
As mentioned in my last entry, I was able to move the larger portion of Staging back to its rightful location, with the help of my wife. Once in place, I screwed it down and then proceeded to connect it to the rest of the layout. I encountered an issue with the first turnout in Staging - it was out of gauge, likely due to melting a tie or two while soldering feeders. So, I had to replace it with a good turnout. I'm hoping that I can fix the gauge issue on the bad turnout and returning to the layout at a future location.
Once Staging was connected to the rest of the layout, and fully tested to ensure it actually worked, it was time to disguise the entrance to Staging. I had a bridge in mind for this. A tunnel didn't make sense, since there are no tunnels on this line. So, a bridge would have to do. I installed a small section of backdrop with a cut-out for the track to pass through, and my wife painted it.
With the backdrop extension at Murnau Ort, I was also able to continue to scenic around the Haltepunkt. Another good weekend for progress just before our trip up to Iowa.
June 11, 12, 2016 – SUCCESS!! Signal Issue Resolved! Great Weekend! (13 June 2016)
This weekend, I was bound and determined to finish up the electronics on the north end of Murnau Bahnhof. But, I still had that pesky signal on Track 4! After going through the same routine, including questioning the internal switches on Tortoise switch machines and replacing the Ausfahrtsignal itself, I (again!) narrowed it down to the SD-1 signal driver board. But, how could this be? It was a brand new board - installed to replace one with a blown component. No matter - it was easy enough to swap out. So, I grabbed yet another SD-1 and hooked it up. TAAA-DAAA!!!!! It worked!! The Ausfahrtsignal worked just as expected! Woo hoo!!! I was so psyched, I even had my wife come in to watch it change - just to make sure I wasn't hallucinating! Nope - she saw it, too!
So, I'll need to contact Circuitron, regarding the bad SD-1.
The rest of the weekend was spent on scenery (laying some static grass, planting some people working in the gardens, etc.) and finishing up the wiring required to call the north end "done". This included installing opto-sensors for the blocks for Track 1 and Track 2. Next weekend, I can move a large section of Staging into its rightful location and secure it to the rest of the layout. At that point, the wiring on the south end of Murnau Bf will begin. I have a control panel to install for the turnouts, as well as the the signals. I guess I could also begin wiring that large section of Staging. Hmmm.... Maybe I'll install a couple of Tortoise switch machines and a track, so that I can run a train down there. Let's see how I feel about that next weekend.
Oh, my wife finished the backdrop behind Murnau Ort. So, I can finish the scenery in that area, too. Also, while cleaning her part of the hobby room, she came across my Noch Puffer Bottle for static grass - see mention of static grass application in the paragraph above. I'm still considering getting a powered version, but the bottle worked fairly well.
Again, no pictures. I will try to make a concerted effort to take a photo or two next weekend.
June 5, 2016 – A Surprise Troubleshooting Session - With My Mother-In-Law! (13 June 2016)
As a surprise 25th Wedding Anniversary present, I took my wife to Anna Maria Island for 3 days. It was an awesome and much needed vacation on the beach, doing absolutely nothing. We got back around noon on Sunday, so I decided to spend a few hours on the layout, since my wife was going to be busy. As luck would have it, my in-laws were in town, so that my daughter had someone staying with her while we were gone. That meant that my mother-in-law, who is very interested in trains and my layout, was willing and available to help me with troubleshooting my "problem signal".
After trying many of the other tests I had tried before, I narrowed it down to the SD-1 board, itself, which seemed odd to me. Then, I remembered - I had accidentally added a "-" power wire to the "+" common for the signals, which had created an acrid odor (Surprise!). I had thought that I had blown something on top of the layout (like a locomotive decoder) when I had done it, because the smell appeared to be coming from the top and not the underside of Murnau. So, I took the board out and examined it. Bingo! There was a blown component and a little black smudge next to it. Time to toss this SD-1 and replace it with a good one!
After installing the new SD-1, we tested it again. Similar (not exactly the same) issue! What was going on?!?! The green and yellow lights were always dim, but always on. Ugh..... After doing several other tests, I called it a day.
May 28 - 30, 2016 – A Productive Memorial Day Weekend In The Town Of Murnau (31 May 2016)
As the title of this installment indicates, Memorial Day weekend was a productive one on the layout. I started out by adding bushes and trees around the Lokschuppen. As I did this I noticed that the seam between the new section of backdrop and the rest of the back drop had already developed a crack. So, I headed to Home Depot to get some drywall seam tape. I had never used this on my fascia or my backdrop. I'm now seeing that I should've been using it all along! I got some ultra-thin tape and it is fantastic! I added the tape on Sunday and put some wood putty on top of it. After curing overnight, my wife added the base color to it. So, the backdrop is now ready for detailing, and the area around the Lokschuppen has a good amount of scenery.
I also got a chance to add some ballast to a couple more sections of track. While letting that dry, I "painted" some dirt by Arizona Rock onto the plaster around Murnau Ort. I whipped up another batch and took care of some of the areas just north of the oil depot as well.
With scenery filling my time working on the layout on Saturday, Sunday, and part of Monday, I finally got up the gumption to do some signal wiring. I started with the simplest task - I installed 4 Ausfahrtsignale (Exit Signals) and a Block signal on the south end of Murnau Bahnhof. Next, I added the last Stop signal to the north end of the Bahnhof. This was the simplest of the signals to wire up, so I did that and then tested it. Of course - I had the polarity wrong the first time. Switching the wires attached to the Tortoise quickly fixed that. Then, it was onto the two remaining Ausfarhtsignale on the north end - one for Track 1 and one for Track 2. I wired up the Green and Yellow lights on both signals before it was time to call it a weekend. The good news is, I had already wired up the Red lights from the SD-1s to the terminal strip. So, it should just be a matter of figuring out the logic and wiring between this strip and the Tortoise, accordingly. Not as simple as it sounds (remember my issue with the signal for Track 4, which still exists?), but doable. I also have to wire up the White lights to the top "Shunting" slide switch, but that should be easy. Then, it's just a matter of wiring up the "positive" common wire before applying power and testing everything. Once this is done, I'll have no choice, but to troubleshoot the signal for Track 4. I can't move to the south end of Murnau until it is resolved, because I need to move the board holding the north end of the Staging tracks into its rightful location. This will allow me access to the signals on the south end of the Bahnhof.
No workin' on the railroad this coming weekend - I have a special surprise for my wife to celebrate our 25th wedding anniversary. I'll try to take some photos of the scenery work I've been doing for the next entry. By the way, this last year, I've been very busy on the layout - and have added many more photos than I had previously. So, I've had to create an archive for 2015, alone! The link is at the top of the page.
May 21, 22, 2016 – Getting Plastered In The Background (15 May 2016)
So, my wife finally found some time to work on the next section of my backdrop. She had primed it with sky blue a few weeks ago. This weekend, she added the mountains. On Sunday, I mounted it to the layout. Even though it's not finished, it looked great - and, it blended with the other backdrops she had done for me, oh, so long ago! In order for her to finish it, I needed to get things finished around that area. This section goes behind Murnau Ort. Now that I had a backdrop, I was able to attach cardboard and extruded foam to it in order to finish the land forms.
I shoved strips of cardboard between the back drop and Murnau Ort for most of this work. I used extruded foam just behind the bridge abutment to provide a slope down to the road that crosses below the bridge - and over the mainline at grade. Once this was all in place, it was time for plaster cloth and some lightweight hyrdocal. I also used the hyrdocal to smooth out a joint between sections of the layout.
In addition to all of this, I added some burnt grass around the Lokschuppen, and planted a Sperrsignal (a dwarf stop signal used for shunting). I also added 5 small sections of ballast where I would be placing signals on the south side of Murnau Bf. I'll try to plant those signals next weekend.
As I was finishing up on Sunday evening, I noted that one of my feeder wires on the branchline between Murnau and Murnau Ort had broken loose. This reminded me that I still had a bad solder on a feeder wire to a frog on the south end of Murnau. Time to get the soldering iron out! I fixed both of these and then did a test run. I noticed that a section of track between the branchline and the old Murnau Lokalbahnhof was dead. I moved the feeder wires on that section, pushing up on the far wire - bingo! The lok started to run. So, that means I have another bad solder joint on that wire. Oh, wait! That was the section of track that I had just scenicked the week before! Great, just great. Well, that issue will have to wait until next weekend. The good news is that it's the back rail. So, soldering to the side of the rail won't be visible.
All-in-all, a pretty good weekend in Murnau!
May 14, 15, 2016 – An Unremarkable Weekend - Troubleshooting And Scenery (15 May 2016)
Having just gotten back from Seattle on a business trip, I probably didn't get as much done as I would've liked. I spent Saturday, between the Bayern match and the Strikers match, trying to work on my BR 627 - a diesel railcar. The motor in that unit has become incredibly finicky when used with DCC. I tried it on regular DC, and it worked fine. I had it completely apart, and it would work while in DCC mode when the motor was at some orientation. It was difficult to reproduce, and it wouldn't have mattered anyway - that orientation wouldn't work with the shell back on. I finally had to give that up and head to the Strikers match.
Sunday, I decided I needed to make SOME progress, so I went back to scenery. I added grass, a buffer stop, and some ballast around the Lokschuppen and the oil company. I made sure to take some "progress" photos before doing this however. I also took some photos after the grass was laid. And, as promised, I took a couple of videos! That was pretty much my weekend.
 |
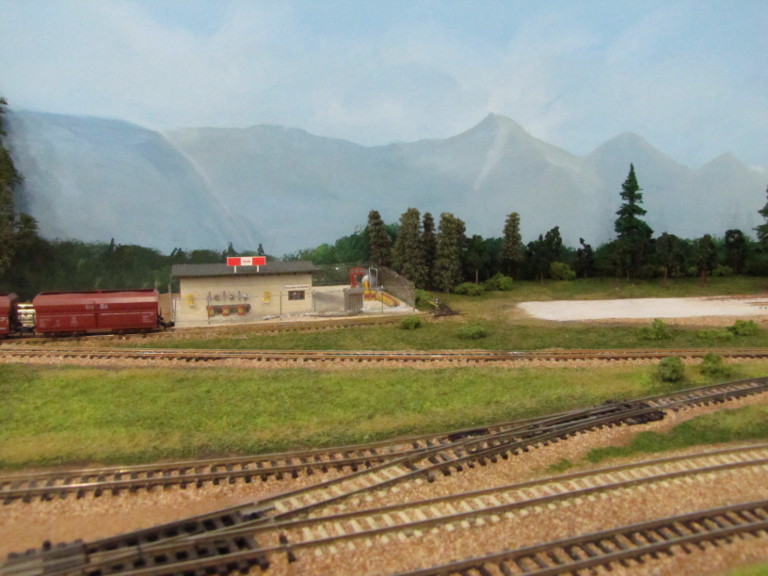
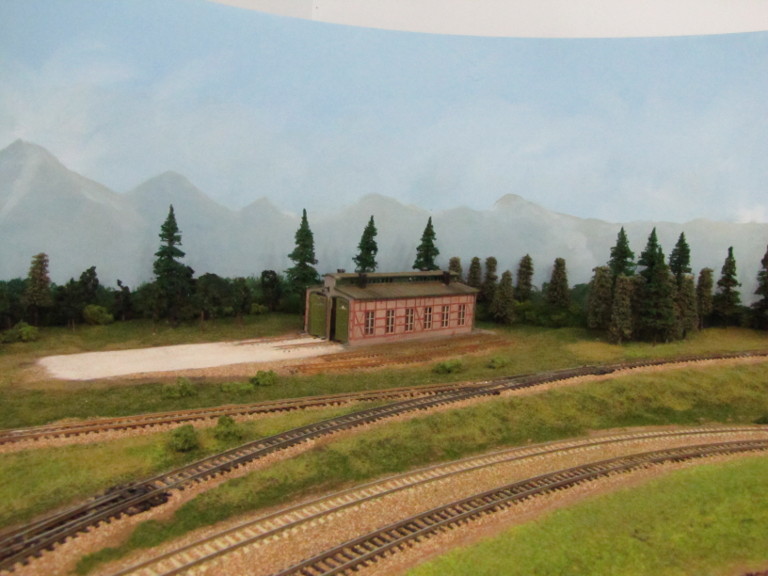
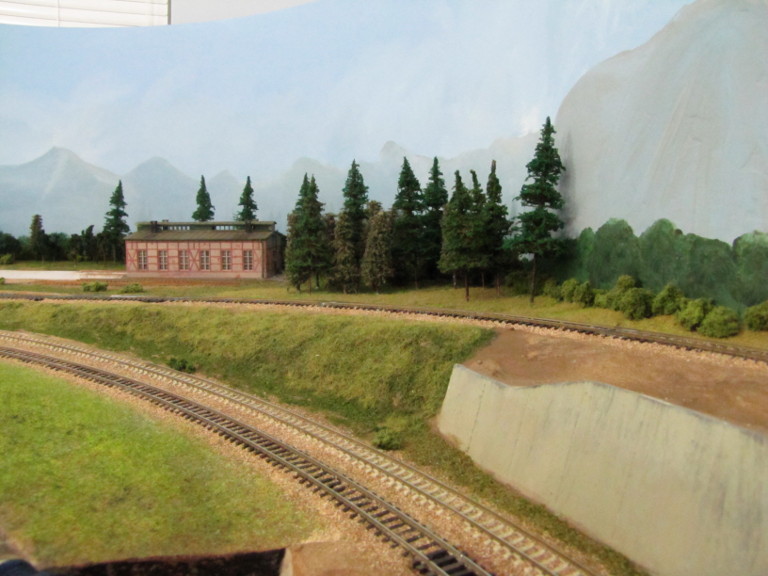
| The Lokschuppen. The white area to the right is a pad/gravel area. The rails in the very foreground are the mainline (KBS 960) heading south via the Hechendorf Rampe. The line in the middle heads to Oberammergau to the right, via the branchline (KBS 963). If taken to the left, that same line takes you into the old Lokalbahn station in Murnau. |
 |
| The Esso Oil Depot. Murnau is a small town, and this depot is probably the right size. There's enough room for 2 tank cars. This "spur" used to be the lead to the Lokschuppen, but the trackage was taken up before the timeframe that I model - by about 4-5 years. |
 |
| An overview of the area. |
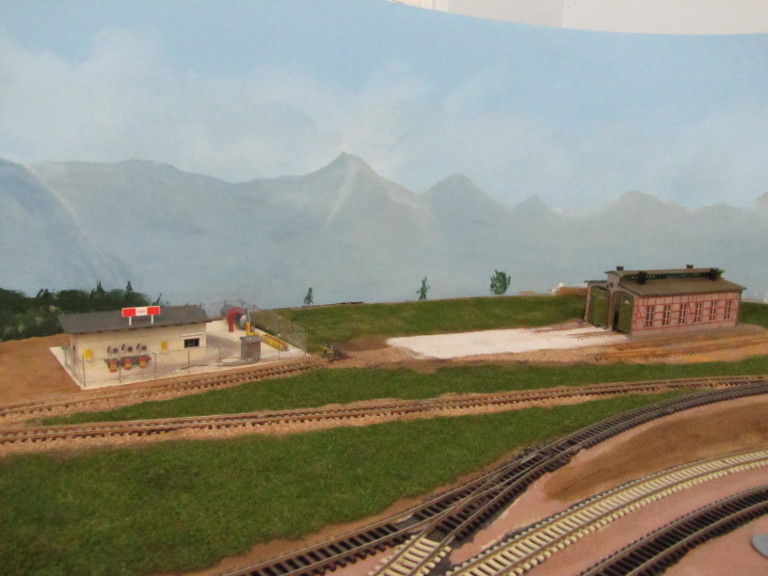 |
| Another overview. However, it now has grass, a buffer stop at the Esso Oil Depot, and some additional ballast. Bushes and trees will come next. |
 |
| A view of the Lokschuppen and Esso Oil Depot from Murnau Ort. |
 |
| This is the photo I forgot to take during my last session. The sign is from a business in Murnau - Getränke Fleischmann, which is a beverage distributor. Note the interior of the business. I scoured the Internet to find these three photos, which I think look awesome - shelf after shelf of BEER! |
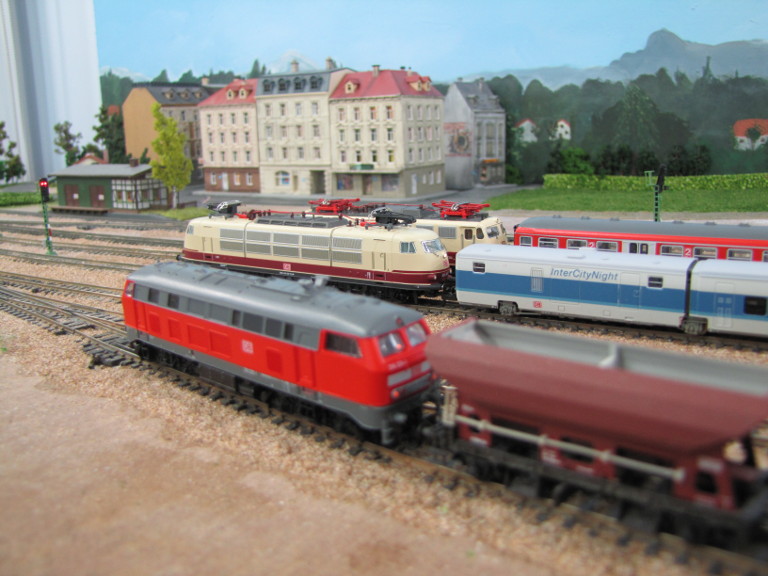 |
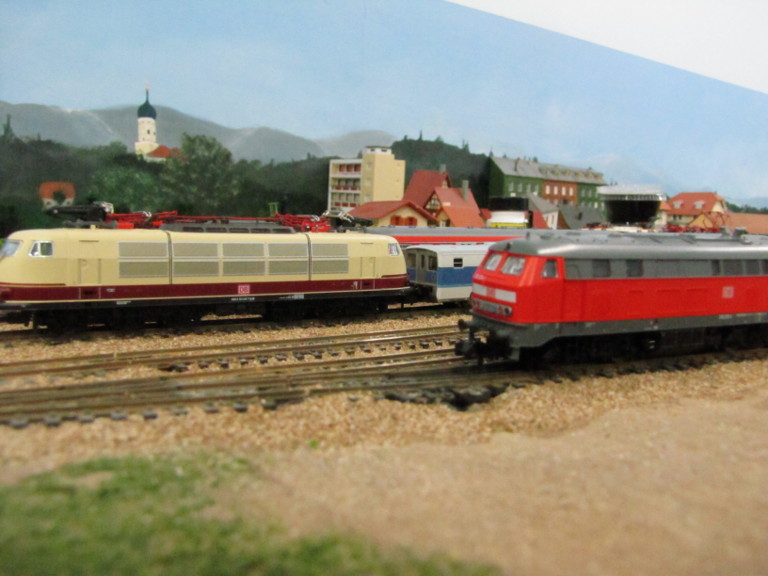
| Everyone is lined up to show off in the videos. A BR 112 leads a Regionalbahn train. A BR 103 leads an InterCityNight train. A BR 218 is shunting some ballast hoppers. |
 |
| Another view of the Loks. |
Now to the videos. FYI, they're very grainy, so I'm not happy with the quality. I used an older Canon, so I don't think it's high definition. I'll try something else, if I ever do more videos. But, I wanted to get something up here, and didn't want to waste time redoing everything.
| A BR 103, leading an InterCityNight train, takes a detour through Murnau, on it's return to München Ostbahnhof. |
| A BR 112 leads a typical Regionabahn train out of Murna Bf. The only issue is that this is a push-pull train, and would normally be Steuerwag-first when heading north toward München Hbf. |
| A new BR 425 take a test trip on KBS 960, making no stops in Murnau. This train is a couple of years outside the timeframe that I model, but I couldn't resist purchasing it. |
| A BR 218 diesel Lok is doing some shunting in the yard at Murnau Bf. |
May 7, 8, 2016 – Back to Programming Decoders Like A Pro - DecoderPro, That Is! (8 May 2016)
One again, end-of-the-year activities curtailed my work on the layout. My son came home on Friday, after a successful semester at UCF. My daughter's band banquet was Saturday night, and, of course, there was Mother's Day on Sunday. So, once again, I tried to sneak in a few hours, here and there, between the activities.
This weekend turned out to be a decoder programming weekend. I couldn't get motivated to do anything else, as anything I would've worked on would require several, uninterrupted hours - at least, that's what I would've preferred. So, I set up the temporary programming track, instead.
I had 4 Steuerwagens, which are used in push-pull RegionalBahn services. They are passenger cars with a control cab on one end. These four cars are from Arnold. Two of them came to me with decoders already installed. The other two had already been purchased prior to realizing that they were "DCC ready" - meaning, they had an NEM plug for a decoder. So, I purchased 2 additional decoders for these as well, a while back. My first step was to open up one of the decoder-equipped cars, so that I knew how I should proceed with the two cars without decoders. It was pure hell trying to get the shell off - everything fits so tightly, and there are many more detailed parts on these modern models, which made it even more painstaking. Once the shell was off, it was very easy to see that the decoders simply plugged into the NEM plug on the back of a light board near the control cab. Once these were all installed, it was time to program all four.
I started with the ones that were already installed. I changed the address to be the same as the locomotive I expected them to be run with. I also learned very quickly that the travel direction had to be reversed. If the train was running Steuerwagen first, the locomotive was in reverse, but you wanted the white lights to appear on the Steuerwagen. Likewise, if the train was running locomotive first, you wanted the red lights to appear on the Steuerwagen. I got 3 of the 4 to work perfectly. One of the pre-installed cars is still having a bit of an issue. I may have to disassemble that one again - Oh boy!
I ran a few trains with these cars in tow (and leading), and they looked and worked great!
Oh! And I found out that I had NOT destroyed any decoders, as previously thought several weeks back. Once I placed every locomotive that I thought was having trouble onto the programming track, they all worked! So, now, it was time to try the ET 425 that I thought I had trashed. The 425 is an EMU that has been taking over passenger service on KBS960 over the last decade or so. It's not really in my era of operation, but it's hard to pass on something you have ridden so often when you visit Oberbayern. So, I put it on the programming track, and - TA-DA! - it came to life! The decoder used in this unit has no feedback, unfortunately. After trying a couple of times to get it to take an address other than 3, I gave up, and just watched it as it cruised up and down my layout.
I also tried to, again, get the BR 101 from Denmark to work with no luck. So, I have three problem children: 1) a Steuerwagen with lighting issues, 2) an ET 425 that is being difficult, and not accepting a new address, and 3) an unresponsive BR 101, which may get shipped back to Denmark. We'll see. Overall, I feel pretty good about my DCC fleet, JMRI's DecoderPro, and my progress for the weekend.
I'll try to post pics of my catenary and oil depot next weekend. If I get ambitious, I may even try my hand at a video! Maybe a train parade. Hmmmm... (Don't hold your breath, but you never know!)
April 30, May 1, 2016 – Showing Off The Layout And Sneaking In Some Moments For Work Between Other Activities (8 May 2016)
OK, so no work during the week. Work and other activities kept me from doing much. One thing that I did manage to do was clean up the layout room a bit. It's still pretty messy (Hey! I'm working!), but it's much better than before.
Saturday, I got my chance to show off my progress to my in-laws, who are always interested to see anything new that I've added. Once this was done, I decided to do some more work around the Lokschuppen. I used some weathering powders (Bragdon) to give the area a darker color. I used a light color in front of the Lokschuppen to represent a cleared area.
I knew I didn't have a big chunk of time left, as I was going to a Ft. Lauderdale Strikers match with a friend. So, as I was looking around for something that would kill an hour or two, my eye caught the catenary and wire from my newly arrived order of Viessmann signals and catenary. Hmmmm... Maybe I could try my hand and setting up some catenary! The perfect place to test something out was on the lower level - along the scenicked curve, in front of the farm, before heading to staging. I could test setting up catenary on a curve, and transitioning from hidden track to visible track. I added a cork pad (to bring the catenary posts to the level of the track) that I glued next to the track. Once that dried I screwed in a catenary post. From there I actually went back towards the helix. I wanted to create a transition so that you could have the pantographs on the locomotives coming from helix slowly make contact with the overhead wire. So, I added three additional pads, stacked on top of each other - and then screwed in the post on top of that. The transition is smooth, but I'm not sure I'm totally satisfied with the look of the post so far above the track. I'm going to experiment a bit at some point in the future - either hide the pads with scenery or try something else. However, on a few test runs with various types of pantographs, they all were able to successfully transition to and from the helix to the section of track under wires. Cool! I ended up installing 6 posts in all - with accompanying wire. Photos will have to wait, as I had limited time this weekend.
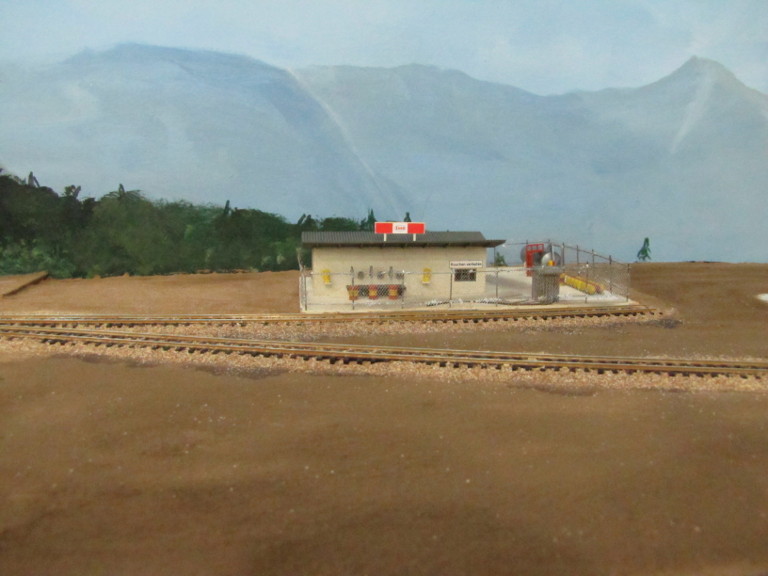
Sunday was spent adding a little ballast and a scratch-built, chain-link fence to the oil depot - something I hadn't done in at least 5-6 years. It came out pretty well, all things considered. Once this was done, I added a few more details to the depot. Now it was time to plant it. I whipped up a batch of Arizona Rock "dirt", and slathered the area where the oil depot would be located. I then set the depot in the appropriate location, added weights to the building and concrete pad to keep it in place, and did a little ballasting around the tracks near the depot, before calling it a weekend.
April 24, 2016 – DecoderPro On A New Laptop - And A December (2015) Order Finally Arrives! (25 April 2016)
On Friday, I received three shipments: a new home office desktop computer (to replace the 10 year old PC running XP!), a refurbished laptop (for the layout, to run JMRI's DecoderPro and PanelPro), and an order for Viessmann signals and catenary that I had placed in mid-December(!). So, Saturday was spent setting up the two computers. The laptop was easy, as it had a specific purpose. The home office PC was a different story. I had 10 years' worth of data and applications to transfer and reinstall. It's still not 100%, but I'm adding this entry and the previous one on the new desktop!
So, that left Sunday to get something layout-related accomplished for the weekend. I had recently purchased a DB BR 101 electric locomotive with a DCC decoder from a gentleman from Denmark. Unfortunately, I was unable to get it to work. He had mentioned that he and his son had used it with a European DCC system (Lok Maus?), and that he had read that I would have to reprogram it in order for it to work with my Digitrax system. So, the previous week, I had purchased the refurbished laptop with the idea that I'd try to reprogram this lok, and also change the addresses on a few of the other DCC-equipped loks and rolling stock that I had.
I hooked up the PR3 to the laptop and downloaded the Windows drivers, as suggested in the JMRI on-line documentation. Once this was done, I hooked up the PR3 to a constructed (and temporary) programming track. I'll need this until I finish the Staging below Murnau, where I'll have a "drive on" programming track. I can still use this temporary programming track to test out analog loks that I purchase.
I would first test a lok on my layout, to check its running (or non-running) qualities BEFORE I messed with the CV settings with DecoderPro. I then read the decoder settings, wrote the any new settings back to the decoder, and headed back to the layout for a short test. All ten of my previously owned DCC-equipped loks worked as expected. The new one still wouldn't work. I'm currently in discussions with the gentleman from Denmark, to figure out next steps. I don't want to tear into the lok, if he won't take it back if I can't seem to resolve the issue. We'll see...
Next weekend, my in-laws will be here, my daughter has her end-of-the-year Fuzion concert on Friday/Saturday night, and there is a Saturday night Ft. Lauderdale Strikers match. So, progress may be sporadic. As a side note, I actually did some cleaning and rearranging in the layout room done on Monday night. I might try to do a little bit of work this week. It's not likely, but I'm not going to rule it out.
April 16,17, 2016 – Movin' Dirt, And An Oil Depot (25 April 2016)
Saturday and Sunday were used to work around the Lokschuppen at the south end of Murnau Bahnhof. I'm not quite sure why I did this instead of finishing up the gardens, but that's OK - progress is progress! To fully utilize my time, I started with cutting blue extruded foam to fit where I had a gap along the backdrop and also where I had an elevation change. After cutting it to fit, I took it out on the patio and sanded it down to a contour I was happy with. Using white glue, I glued all of the piece in place and let it dry.
I needed another project to work on while I wanted for the glue to set up. Hey! I needed an oil depot in this area as well. In fact, I had the very model (in the box) as a stand-in for itself at the very location where it would be planted! So, I grabbed the box and headed to the workbench. First, I painted any parts that needed it. Of course, I now had to wait for these parts to dry. Perfect timing! The glue for the foam had set up.
It was time to add the plaster-cloth to the extruded foam. I have found that cutting the plaster-cloth to size and layering it on while still dry works very well. I can play a bit with the pieces until I feel like there is good coverage. Then, I simply apply water with a paintbrush. Initially, I work in the plaster with the brush, but will ultimately start smoothing it out with my fingers. If necessary, I whip up a batch of lightweight Hydrocal to add some thickness. In this case, I didn't do that. The foam underneath made for a solid base. While waiting for plaster to dry, I headed back to the workbench.
I started assembling the building, the tank and the assortment of barrels. I started looking at the base, and it made no sense to me. It was molded in green and appeared to have grass texture. Grass?! Huh? That just wouldn't do. An oil depot should have a concrete pad, not a "grass yard". So, I cut some styrene to create the pad. Oh! The plaster was dry - time to head back to the layout.
I painted the areas of white plaster, Mudstone (Ceramcoat) for a base color. While I waited for that to dry, I started to add a layer of "dirt" from Arizona Rock. in and around the Lokshuppen. This mixture of white glue, water, and the Arizona Rock dirt allowed me to plant the Lokschuppen and associated abandoned tracks without the need for any other adhesives. Planting buildings in this fashion means there are no gaps between the layout base and the foundation of the building - which is a big deal in N scale. Photography easily spots these gaps, and even the smallest gap can look huge compared the the N scale scenery and buildings! By the time I had finished this rather large area, the Mudstone was dry enough to add the dirt to those areas as well. OK, back to the workbench.
I attached the main building, tank/tankpad, and barrels to the styrene pad that I had cut out. I decided to add a pump house and some concrete panels that lead from the pump house to the main tank. I think drilled two small holes in the pump house and added hoses for unload fuel from railcars. I still need to add a chain link fence and a couple of other finishing touches, but I think it look really nice! And, foregoing the use of the original base was definitely the right choice. I'll try to take some photos of this industry before I do any more work on it.
My final task was to add some ballast to the abandoned tracks around the Lokschuppen. I'll need to weather the area around the Lokschuppen, so that it looks more like gravel than dirt. I'll also need to add some grass, weeds, trees, and maybe some junk laying around.
April 9,10, 2016 – Garden Houses And An Unexpected Addition! (10 April 2016)
Saturday and Sunday were scenery days after all. The garden area took up all of my time, so the signals were not looked at this weekend.
Saturday, I built up all three of the garden houses. Once done, I set them down in various locations along the front of the layout. Once I had figured out where I wanted them, I realized that the scenes would still not look right. Fences! I needed fences! I knew I had several varieties of fences, but was having a hard time finding them. Turns out, they were on a shelf right in front of me! I'm getting to the point where I'm becoming fairly organized. However, when you haven't touched something for over two years, you tend to forget where, exactly, you "organized" things.
I painted all of the fences a very dark brown - almost black. Once they were dry, I clipped them off the sprues and started the arduous task of "digging" holes for all of those fence posts. As I was doing this, an idea came to me out of the blue - I needed a Maypole in one of these gardens! I talked it over with my wife, and we came up with a plan to build one from scratch. I took a long, thin peg, chucked it into one of my drills, and applied sandpaper to it as it rotated. This would get me the tapered look that I needed for my Maypole. I drilled a tiny hole in the bottom and added a piece of piano wire. This served two purposes - 1) I could hold the pole as I painted it, and 2) I would used the wire when I planted the pole. I painted the whole pole white and let it dry while I went back to planting fences.
My wife thought she could free-hand the Bavarian blue stripe around the pole. I was skeptical, but I let her give it a shot. Epic fail! It didn't look too bad from afar. However, N scale photography would've picked up every imperfection. So, I painted the pole white again, and called it a day on that idea.
On Sunday, my wife went with my idea for round two. She took pin-striping and wrapped it around the pole. I had some for making highway markings. However, after a first try, we both realized that the striping was too narrow. So, I had her add a second stripe to increase the thickness. Except that it was yellow, it looked perfect! I then had my wife add another light coat of white to seal the pin-striping. Once dry, she painted the whole Maypole a light blue. She let that dry and then carefully removed the pin-striping. PERFECT!
I have some coats of arms for area towns - Murnau, Oberammergau, Unterammergau, etc. - that I will be hanging from cross-beams . I also plan on making a couple of rings of garland to add to the Maypole. It already looks cool, in my opinion, but I can't wait to see the finished product.
I finished up Sunday by planting the garden houses and adding flower beds, a bench, and some grass. One of the gardens is complete. The other 4, plus a couple of abandoned gardens, still need some final touches. However the area is starting to come together nicely!
Oh, and I did remember to take some photos!
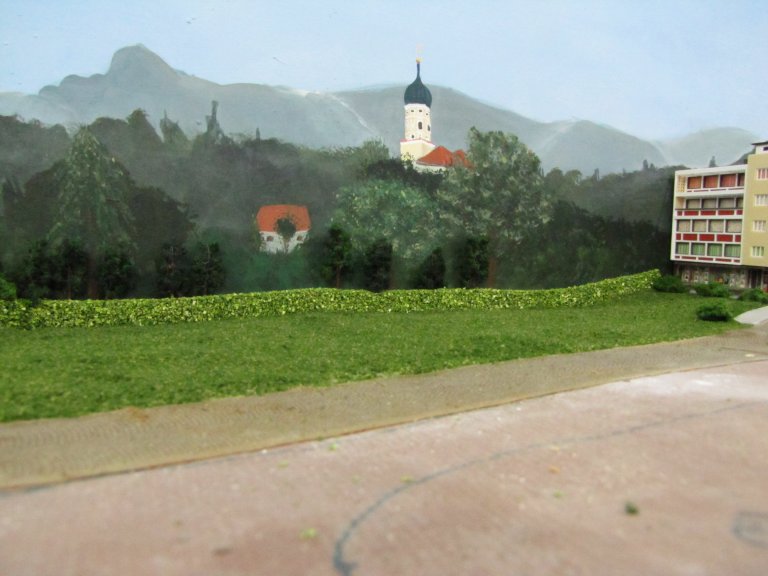 |
| This is a picture of the open area between the two city areas. I added the grass, the hedge, the background trees, and some bushed by the apartment. I also added grass to the sidewalk area between the apartment and come half-relief city buildings to the right of the apartment, but I didn't take a picture of that section just yet. Maybe once I have the area in front of it closer to completion. By the way, have I mentioned how much I LOVE the church in the background that my wife painted more than a decade ago? |
 |
| The three buildings to the right are the ones that I recently planted. The corner building is the one I just finished building last weekend. It has a beer distributor in the front. I forgot to take a picture of the front windows. I'll have to do that, because I think I did a heck of a job finding photos to match the business. This is an actual business in Murnau - albeit, not in this location. |
 |
| The three "nice" garden houses. The two in the forefront are not completed, but are getting there! Hey, look! A Maypole!! It's not finished, but I wanted it in the photo. It looks slightly thick in the photo, given its height. However, it looks perfect when looking at it "live". You can also see the two flower beds in the middle garden - one up against the side of the garden house, and one along the fence on the far side. |
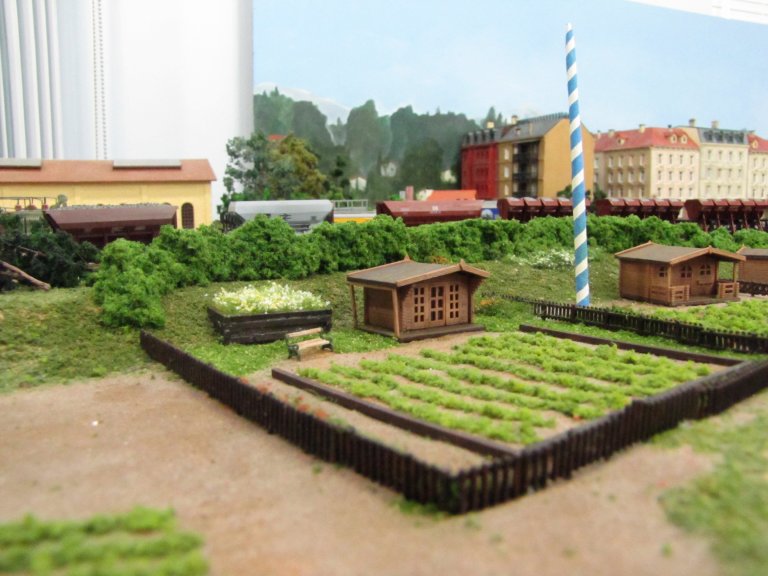 |
| The completed garden. Note the terraced flower bed. There is also a flower bed along most of the side fence to the left and also along the back part of the far side fence. You can also see a flower bed on the hill (behind the Maypole) for the garden to the right. I also added the large hedge to the back. When walking along the street in Murnau (the real one!) by these gardens, you could hardly tell they were anywhere near a train station, except for the catenary and the occasional hum of electric locomotives as they departed - or the squeak of their brakes as they came into the station. They were just peaceful little slices of utter tranquility, where people would come to unwind after a long day at work. |
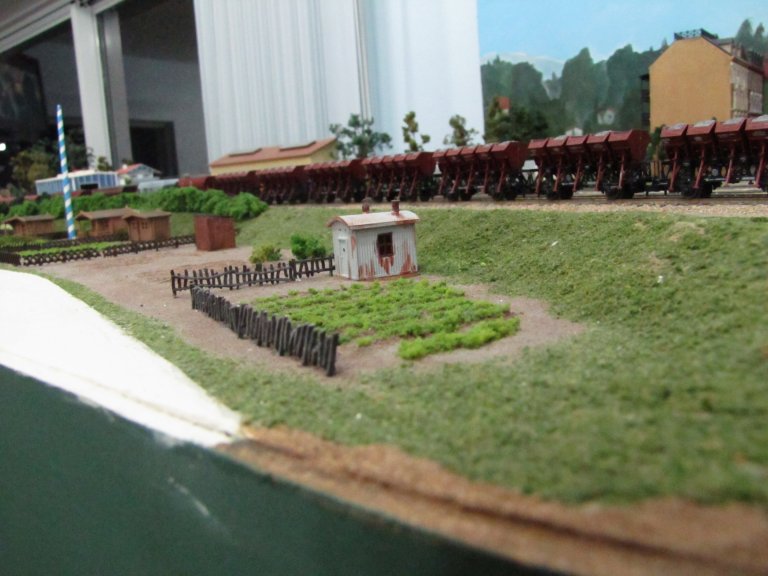 |
| A garden that isn't kept up as nicely as the first ones. Likely used to provide vegetables for the family, rather than a retreat for an avid gardener. I'm not sure I saw one of these, but I decided to take some artistic liberties. Plus, I liked the rickety fencing. You'll also note the abandoned/barren garden just to the left of this one. I plan on having some overgrowth in that one. |
 |
| A bit of an overview of everything I've done the last few weeks. You can see the gardens and also the city block that I recently completed. The road to the right has also been revitalized. You can also see the vegetables of yet anther garden in lower left of the foreground. |
 |
| An aerial shot of the three nicer gardens. I still need to add some people - and Preiser just happens to have a set of figures called, "Working in the Garden"! |
March 27, April 3, 2016 – A Friedhof, And Working On An Old Item On My Checklist (3 April 2016)
So, I took a weekend off to head up to Des Moines to catch some March Madness with a friend. It was good to take a break from the layout, but I was ready to hit it hard once I got back. Unfortunately, the last two weekends have been a bit busy - at least on the Saturdays.
I had ordered some headstones on eBay, which happened to show up on Saturday, March 26th. So, on Sunday, I took the opportunity to add the headstones to my fenced in area at the church. I had decided a while ago to make this a cemetery (Friedhof, in German), so it was nice to get that taken care of. As I finished this off, I started to think about the city block that I told myself would be the "next thing" to finish - probably over 2 years ago! My plan was to work from back to front, and this was the next thing to the south that needed to be worked on. I decided now would be a good time.
I started to rifle through my models to find a corner building, as I had decided that I didn't want to use the partially demolished building in this location. Once I found it, I placed the base down against the other building to see how it would fit. It fit perfectly! But wait - I suddenly realized that the two buildings that were already there hadn't been "planted". So, I lined them up and glued them down. Next, I started working on the corner building model. This was a bit of a kitbash, as I had used an assortment of pieces for my half-relief buildings further to the south in Murnau (behind the Bahnhof). I got all of the individual walls built, including the doors, windows, and glass, and called it a weekend - in terms of the building.
My eyes wandered towards the big, empty space between the two sets of city buildings. On the prototype, there is a big, open grassy area just north of the Murnau Bf. (and across a road), and it was my plan to model that at this location - it was easy, and true to the prototype. So, I decided to finish the weekend by planting a large hedge along the backdrop, and laying down some grass in this large area, and also along a couple of sidewalks between an apartment building and the half-relief city buildings.
The following weekend again found me with only Sunday to work out in the hobby room. I finished up the corner building, which included a little research on-line. I had decided that I wanted to make the business in this building a place to buy drinks (Getränke). So, I found an actually business in Murnau - Getränke Fleischmann - and used its sign for the one on the building. I also found pictures to use in the windows, so that it looked like it was filled with various beers.
Before I planted this and another building, I painted the interior of this blocks of building an asphalt color. Often, the area inside a block of buildings is used as a parking lot. I figured this would be appropriate, since the businesses would also receive deliveries here as well. With the buildings in place, I can finally call this city block complete! I also added some bushes and trees the park I had created the previous week.
Next up was the garden areas at the front of the layout. I have three garden houses that I will be building. I painted the parts for the models, and took the parts for the smallest one off the sprues. I also repainted the road in front of the gardens, as it had been badly chipped during construction a couple of years ago. That's how I ended the weekend on the layout. I think I'll have a full weekend, next weekend, to work on the layout. I should be able to finish the garden houses. After that, either work on some signals, or maybe work on scenery around the old Lokschuppen on the south side of Murnau Bf.
Photos of the new scenery should be available in my next entry... if I remember to take some pics!
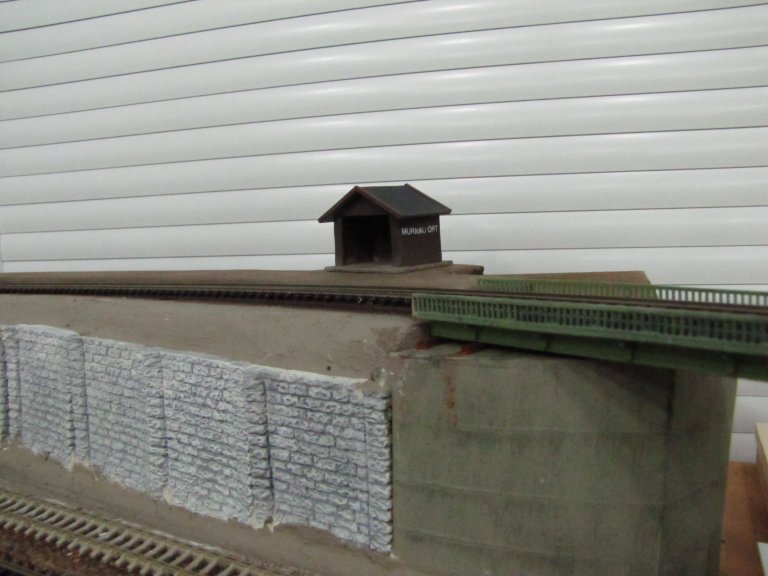
March 5-6, 12-13, 2016 – Murnau Ort Goes From Kit-Built To Nearly Scratch-Built (13 March 2016)
The weekend of March 5th was spent painting the new hydrocal land forms around Murnau Ort and creating a platform for Murnau Ort. I started by painting the land forms my base color of choice - Mudstone, by Ceramcote. After that, I turned my attention to the platform. Plywood (1/4") would be the base, which is how I created the platform for the Murnau Guterschuppen. Since this was on a curve - and with tight clearances between the track and planned backdrop - I had to really work at getting everything to fit. I started by taking a piece of paper, placing it on top of the area, and rubbed a pencil back and forth across it. This showed me the location of the tracks and also the back edge of the layout. I taped this sheet of paper to the plywood and made my cuts accordingly. After several test fits, followed by sanding, I finally had the platform properly shaped. I whipped up a batch of Durham's water putty to the consistency of slightly runny pancake batter, and began dabbing it onto the plywood. After letting it dry, I sanded the putty to smooth it out. I added several layers of various colors of paint to finally get it to dark gray color with a bit of depth. I still wasn't completely happy with it, but I was out of time for the weekend.
The weekend of March 12 was spent finishing up the platform and building the little waiting shed for Murnau Ort. We had just received a fairly large order of paint, which included one of my favorite weathering colors - Drizzle Grey, by Ceramcote. So, I used a a wash of Drizzle Grey, Black, and Mudstone to get a better look for the platform. I finished it off with a couple of layers of Bragdon weathering powders (light grey and a dark earth color). At that point, I was satisfied with the overall color of the platform.
The waiting shed had always been planned to be an out-of-the-box structure. I had purchased a Faller model, which included two of these waiting sheds. In my mind, these were exactly like the ones at Murnau Ort and Jägerhaus. I took a look at photos of Murnau Ort on my website, and realized they weren't even close! The roofs ran the opposite direction, the model was half-timbered and Murnau Ort is just a wooden shack, and the colors were off. The only thing that was close to correct was the general size. After thinking about it, I decided to use some of the pieces from the model to create the Murnau Ort wating shed. I guess you'd call it a kit-bash. However the only reason I used the model parts is because that were close to the right dimensions, and it was easier than cutting out new styrene.
I added balsa wood to both sides of the wall sections. I made one of the side sections the back, which gave me the proper roof line. I took the roof line from the other side section, and used it for the front. Since the roof was not barrel tile, but tar paper (at least it LOOKS like tar paper), I had to cut some styrene out for the roof. I added 1500 grit sandpaper to the roof to represent the tar paper. It already comes in charcoal gray, so it's a good match after weathering. I added some right-angled styrene as roof trim and to help hold down the "tar paper".
I had searched my vast stash for some white dry-transfer letters, as I was sure I had some. It turns out, I only had black - I had used it for my Oberammergau Bf scratch-building project years ago. Luckily, I found the white version of the same set on eBay. And, they just happened to show up this weekend! Perfect timing!
I finished Saturday evening off with a little ballasting in Murnau Bf. I made a purchase of 9 used Viessmann signals on eBay for $14.99 (plus free shipping)! You cannot buy a single Viessman signal brand new for less that $18!! (And, the exit signals are around $28!) So, I took a chance. At least 2 are unusable. One has a resistor reversed, and a couple others have some detail parts missing. Once I test them out (and fix the one resistor), I'll stick 'em on the layout if they work. If all four of the exit signals (Ausfahrtsignal) work, that's a savings of about $100! So, I was ballasting a section where I was going to add the final Ausfahrtsignal on the north end of Murnau Bf.
I'm hoping to get some other work done on Sunday. Maybe some foliage around Murnau Ort. I'm also hoping my wife can start on the section of backdrop directly behind Murnau Ort. I cut a section of tempered hardboard for her. Let's see if she feels inspired!
Here are the photos of Murnau Ort that I promised. By waiting, I was able to take pictures of the platform and waiting shed as well!
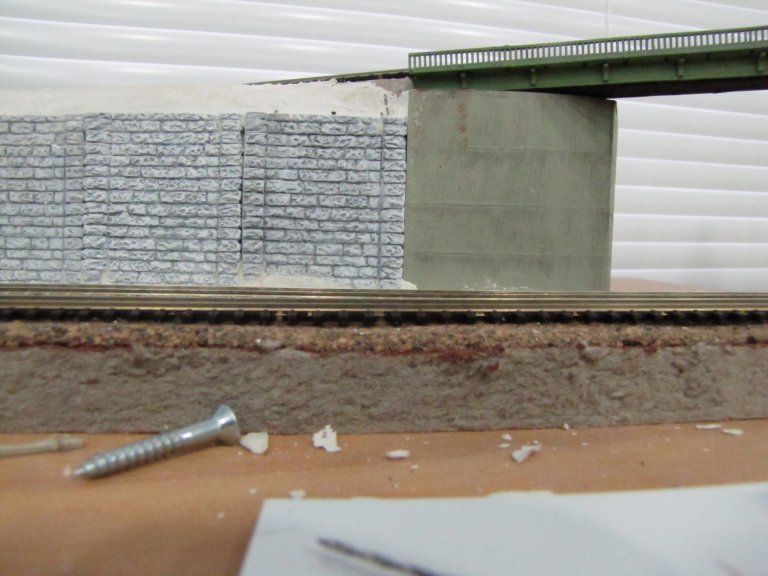 |
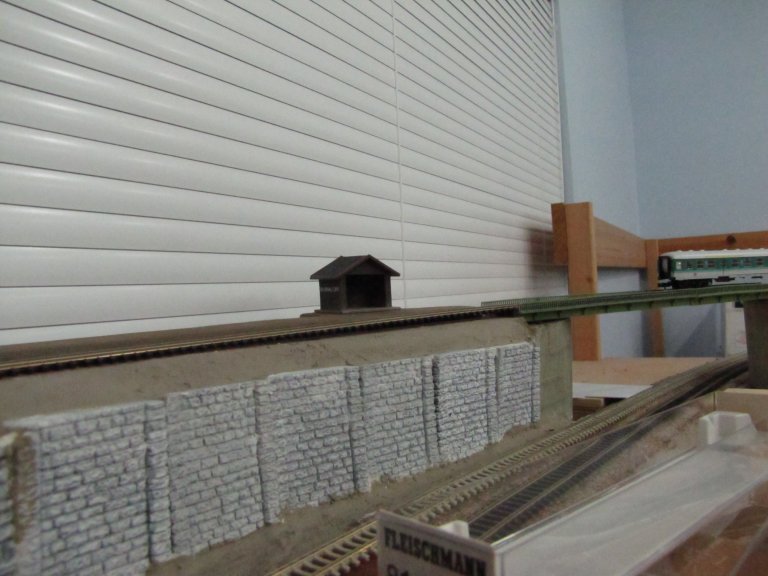
| A close-up of the bridge abutment on the Murnau Ort side. Also, the first 3 sections of the stone retaining wall. |
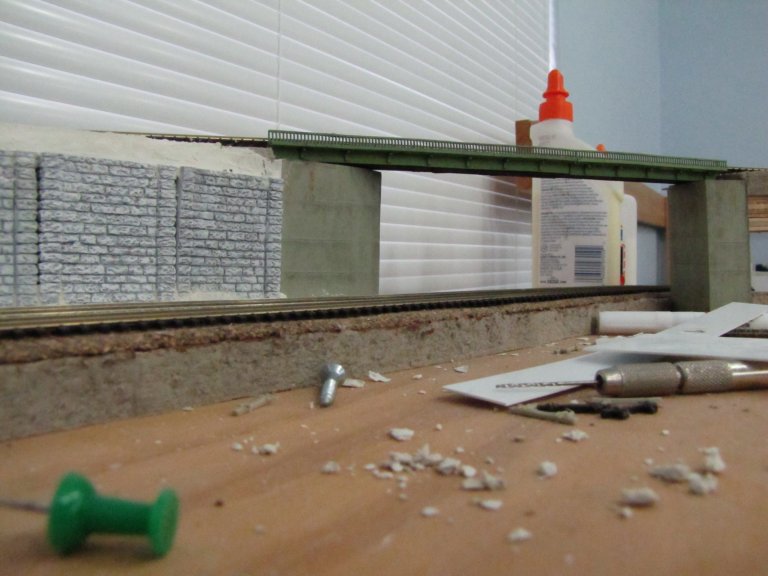 |
| A broad view of the bridge, with both abutments. |
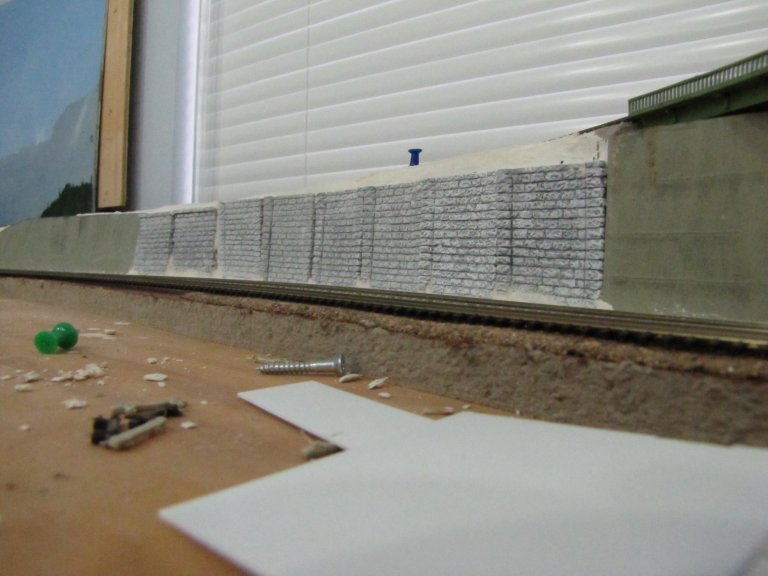 |
| A view of the stone section of the retaining wall, with the bridge abutment to the right and the concrete section of the retaining wall on the left. |
 |
| A view of the concrete retaining wall. You can also see hill to the left of the wall. |
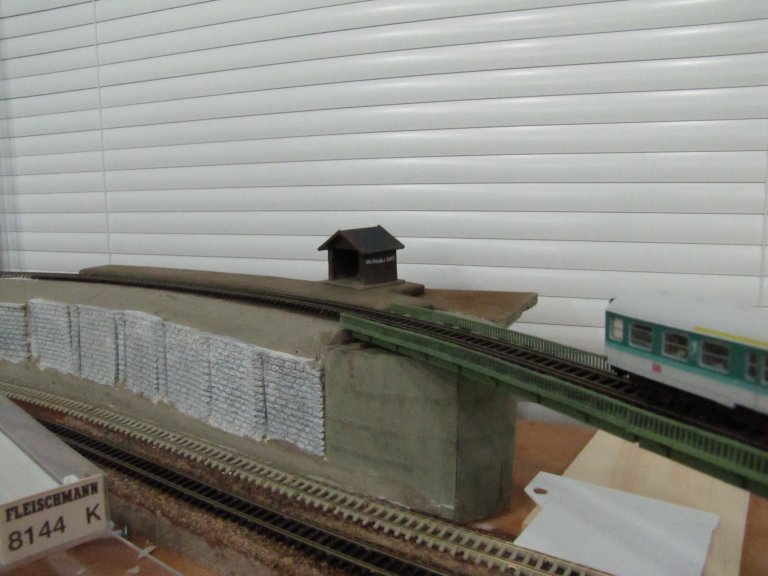 |
| The new addition: The Murnau Ort platform and waiting shed. |
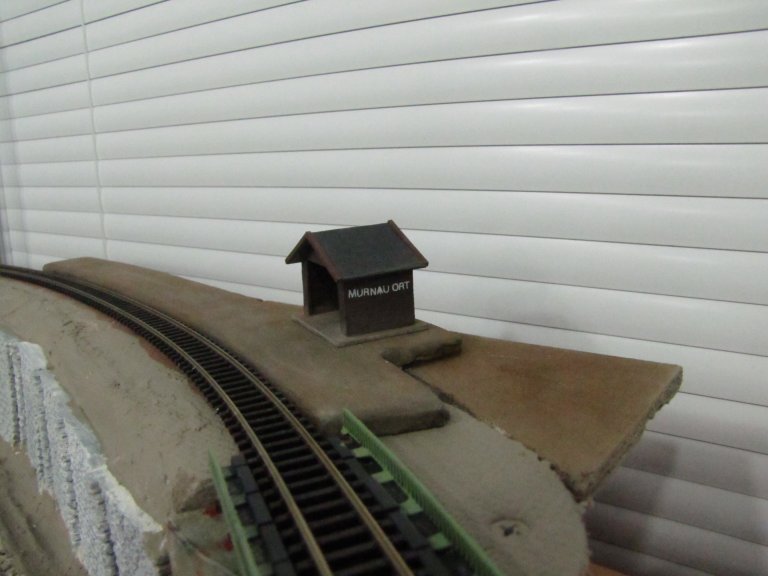 |
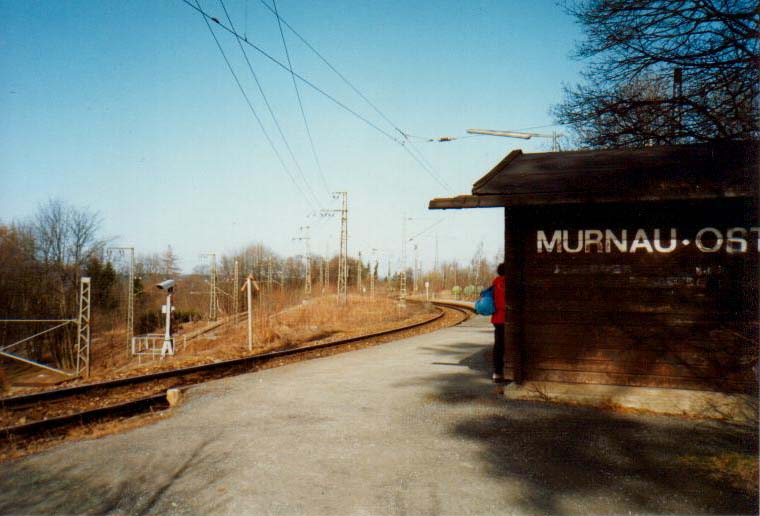
| A closer view - from the bridge. Here's the photo of the real Murnau Ort from my site. Note that the year that photo was taken, the name, "Murnau Ost" was actually painted on this side of the waiting shed. The other side was properly painted with, "Murnau Ort". I'm not sure how long that lasted, but every other photo I've seen of this shed has the name, "Murnau Ort" properly painted on this side of the building. |
 |
| A shot with a good view of the bridge abutment, and its weathering. |
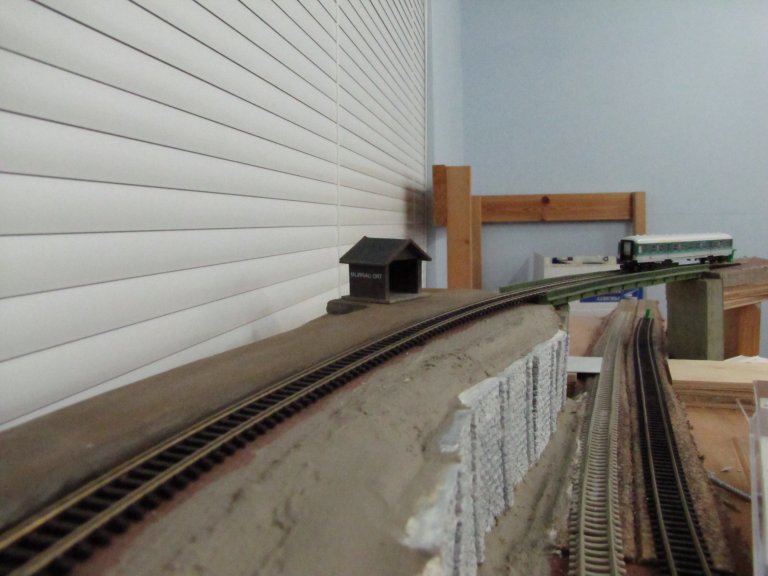 |
| A view of the platform and waiting shed as if coming from Murnau Bf. The double-track is the mainline descending the Hechendorf Rampe. |
 |
| One final view looking up at Murnau Ort from the mainline. |
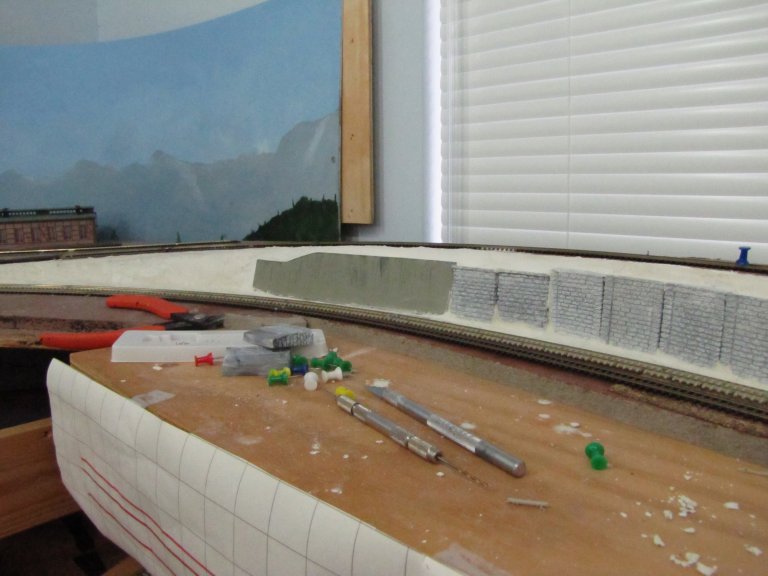
January 30-31, February 6, 13, 21, 27-28, 2016 – Electronics Burnout - Must... Do... Some... Modeling (29 February 2016)
OK, so I was growing tired of being under the layout, wiring up signals. The lingering issue that I mentioned in my last few entries was not helping matters. Because of this, I was beginning to slow my pace down. Fewer hours and days were being spent on the layout. I was dreading going back out there to wire up that final signal, or troubleshoot that stupid problem. But, what could I do? I wanted to continue my progress.
Rather than enlisting my wife or daughter in helping me troubleshoot the signal, I decided I'd get the area around Murnau Ort ready for signals. In order to do that, I'd need to do a little terra-forming and some bridge abutment scratch building.
For the first couple of weekends, I worked on creating two scratch-built bridge abutments that held up the bridge where the branchline (KBS 963) crosses above the mainline (KBS 960) and a road. This area requires oddly shaped abutments. Strangely enough, the real thing has what I consider non-standard abutments, so it all made sense! Nothing I had seen came close to the look I needed for this location. So, I figured I'd try to roll my own. I have to say that they turned out very well! Photos will have to wait until next weekend, however.
The next couple of weekends I spent on the hillside between the two lines, just before they cross. At this spot, KBS 963 is on an upward grade of 1.5% - 2.0%, and KBS 960 is on a 2.5% downward grade. From the abutment, northward (back toward Murnau Bf.), there is a retaining wall. The initial sections are made of rough-cut stone, followed by concrete. I used some stone retaining wall plaster castings that I had purchased for the first section. I used styrene for the concrete section. Everything was painted and weathered.
I made one minor mistake: I installed the stone sections prior to a layer of hydrocal. I had added some cardboard webbing and also some blue foam to form the "hill" between the two lines. Before, I knew it, I was merrily gluing the stone sections directly to the cardboard webbing! Luckily, the pieces fit fairly tightly together. The webbing was also nothing more that thick strips of cardboard, so there was only a small section on top of the retaining wall sections that would require the hydrocal. Also, any vertical openings between sections will be filled with grass or small bushes, so disaster was averted. Whew! (Yes, it had been quite a while since I had done this type of scenery!)
This last weekend, I laid the strips of plaster cloth in the appropriate places over the cardboard and blue foam landforms, and brushed them with water. I smoothed out the plaster with my fingers until there were no obvious holes. Then, it was time to whip up a batch of hydrocal. I first poured some on the area that wouldn't have any retaining wall - where the two lines first begin to diverge in height. Once I got to where the concrete section was to be installed, I slathered on a much heavier layer of hydrocal onto the layout. As soon as I had done this, I quickly took the section of concrete retaining wall, and, in a bulldozer motion, I shoved the hydrocal back up against the hill. This put the wall in the right position, and kept it in place, for the most part. At that point, I took the remainder of the hydrocal batch and filled behind the wall to the top and smoothed it out. I made sure the area around the stone sections of the wall were appropriately filled in as well. I'll have photos of this next week as well - before I add any layers of foliage.
Overall, I think it looks pretty good, so far. Next weekend, I'd like to add the platform for Murnau Ort, as well as add the foliage on the hill. If my signal order still hasn't arrived, I may install the backdrop, so that my wife and/or daughter can start painting it. We'll see...
At this point, I'm just happy that I was able to find something to keep me interested in the layout. Maybe in another week or two, I'll be ready to finish up the signals. That's what is so great about this hobby. There are so many things to do, that you can switch your focus if you find your interest waning. Electronics, carpentry, painting, model building, etc., etc. - usually, SOMETHING will pique my interest!!
January 23-24, 2016 – Another Block Added, And Still No Luck In Troubleshooting (24 January 2016)
I was able to add the opto-sensors to the block for Track 3 in the Murnau Bahnhof. I wired them up to the appropriate BD-1, adjusted the sensitivity of the sensors on the board, and the Einfahrtsignal, which I had already wired up to an SD-1 connected to the BD-1, magically began to show to proper aspect as trains when in and out of the Track 3 block! And, it worked on the first try!!
I also had to rewire a couple of things - I had forgotten to add isolating diodes (1N4001) on a couple of lines coming off the Tortoise switch machines.
Once I was done with that, I started looking at the wiring for Track 4. So far, the signal for Track 4 is my only problem child. Here's the situation:
If the following block is clear, only one of the 4 Ausfahrtsignals should be green. However, I currently only have Track 4 and Track 5 signals wired.
Aligned for Track 1: Track 4 Signal - Double Red, Track 5 Signal: Double Red. Yep! That all looks good!
Aligned for Track 2: Track 4 Signal - Double Red, Track 5 Signal: Double Red. Yep! That all looks good!
Aligned for Track 5: Track 4 Signal - Double Red, Track 5 Signal: Green. Yep! That all looks good!
Aligned for Track 4: Track 4 Signal - Green/Double Red, Track 5 Signal: Double Red. Hey! Wait!! Track 4 should show ONLY Green!!
I swear that the signals for Track 4 and Track 5 are wire the same - except that they are exact opposites of each other! I checked and double-checked. Everything appears to be as it should. And, yet, here I am with a signal that bleeds Double Red when it is the track aligned for the main line! I may take another look at it next weekend. I should probably do it at the beginning of the week, instead of the end - when I'm wrapping everything up. The problem is, I need a second set of eyes in order to troubleshoot. My wife is very accommodating, but I hate having to always ask her to help out. "What do you see now?" "How 'bout now?" "Are you SURE it's still showing double red and green?"
Besides the troubleshooting, I still have one more Ausfahrtsignal (Track 2) that I can wire up, before I have to wait for my next order of signals. They should be shipped here in the new 2-3 weeks.
Here is the diagram that I promised a couple of weeks ago. I finally got around to creating it on the PC.
 |
| This is the diagram that has helped me the most, recently. It shows the wiring logic for ensuring that only one Ausfahrtsignal of the four (Tracks 1, 2, 4, 5) shows the actual occupancy of the block north of Murnau Bahnhof. The other 3 signals should show double-red, as they are not aligned for the mainline. The little rectangles with the lines on one side are the isolating diodes that I've added to prevent "power bleed". |
| Switch #3 determines whether we're aligned for Tracks 1/2 or Tracks 4/5. You'll note one more Tortoise on the Track 1/2 side. That is because Track 3 is also along this path. If Track 3 is aligned, all four of the signals will show double-red. |
January 9-10, 16-17, 2016 – Signals, Troubleshooting, And Blowing Loco Decoders!! (17 January 2016)
Shockingly, I had two good weekends to work on the layout, in spite of distractions, such as the Florida Cup (with Schalke 04 and Bayer Leverkusen!) in Orlando and Lockhart Stadium.
The first weekend was spent installing a third Ausfahrt Signal (for Track #2). I was hoping to install a fourth (for Track #1), but I suddenly realized I didn't HAVE a fourth. It will be coming with my shipment later in January. I also finished wiring up a few things and did some troubleshooting. The Ausfahrt signals were showing "double-red", PLUS the true aspect whenever the tracks were properly aligned for that signal. So, you'd see a "green" (or a "green-yellow"), but also see the "double-red". This was better than during the holidays, when I was seeing this for BOTH signals - regardless of track alignment. I also found out I had an opto-sensor that wasn't working properly. I suspected the two wires were touching, but didn't have time to work on it this weekend, as I only had Saturday.
The second weekend was much more productive, since I had most of both days to work on the layout. The bad news is that I think a blew a locomotive decoder due to mis-wiring in my haste to make progress. I would turn on the power to the layout, hear the beeps from the Digitrax system, and then smell the acrid smoke of a decoder losing its "magic". Unfortunately, I did this twice!! New Rule: No locomotives left on the tracks between wiring sessions! WAIT until you're sure that your layout is short-free! To be fair, I thought the PM42 was suppose to alleviate this issue! I heard the beeps from the main unit (which is also supposed to shutdown when there is a short!), and a "click" from the PM42, but I guess they weren't quick enough to prevent decoders from being fried. Ugh.... So, some weekend in the near future, I'll be installing new decoders instead of working on the signals on the layout!
OK, so, on to the good news. I was able to wire up the Einfahrt signal at the north entrance to Murnau Bahnhof. The associated block still needs to be installed. But, hey - the signal is lit up! I also wired up the white lights on two of the Ausfahrt Signals to a switch. The white lights indicate that shunting can proceed within the area of the station, regardless of aspect.
I also added two Sperrsignals, which are stop signals used for shunting areas. These are directly related to the position of the Tortoise switches - much like the LEDs on the control panel. They look great, and will be an added indication for engineers, so that they don't enter a switch that is improperly aligned.
I still had the issue with the "faulty" opto-sensor at the entrance to Murnau Bahnhof. After doing a little reading about these sensors in the instructions provided by Circuitron, I realized what I needed to do to ensure the wires weren't touching. Circuitron suggests that two angled holes are drilled from the same starting point - making an upside down "V". Of course!! I was simply wrapping on leg/wire with electrical tape. (It has worked for the other 7 I had installed.) So, I took out the sensor and drilled a second, angled hole. After re-wiring the opto-sensor, I tested it out. PERFECT!!! No issues at all! So, I immediately went to the four holes that I had already drilled for my next block, and drilled a second channel from the top hole. I should be set for those next weekend!
No diagrams this time. However, here are some photos of the progress:
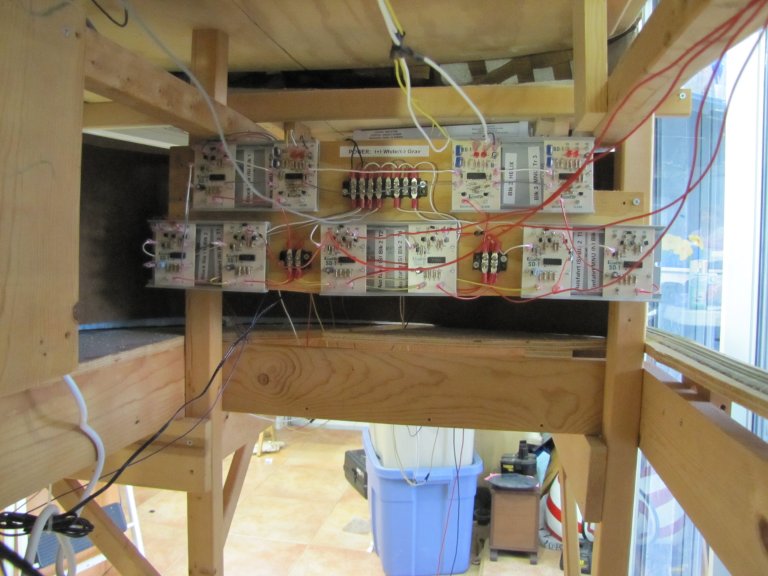 |
| A full view of the rack of BD-1s and SD-1s. The top row has an SD-1 signal driver on the left, followed by three BD-1 block detection units. The bottom row is six SD-1s. This is a view before the wiring got REALLY hectic! |
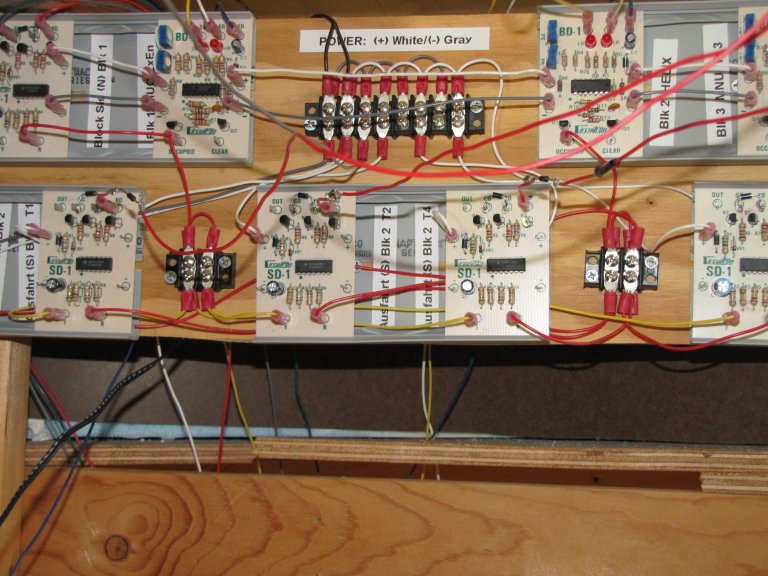 |
| A close-up view of the boards. Again, I try to label as much as I can. At my age, each weekend is a struggle to remember what I did the previous weekend! |
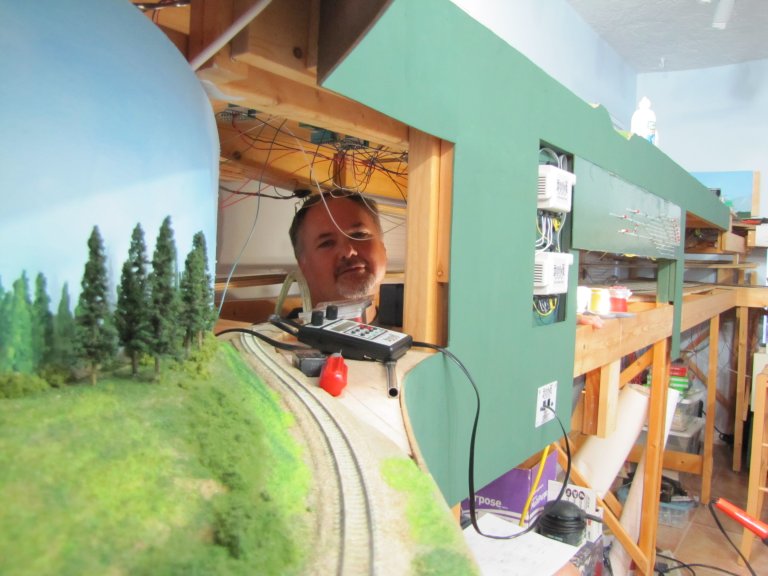 |
| This is my perch under the layout. My wife thought it would be funny to show people what I do on my weekends. And, yes, it's a bit cramped! Imagine having to do this with the lower level in place! My head is where Staging starts. I moved both sections of Staging further down (to the right) to make room to maneuver. Once I'm done at this end, I'll have to do the same exercise on the south end of Murnau Bahnhof. After that, I'll (hopefully!) be able to install the Staging sections permanently - or, at least, semi-permanently. |
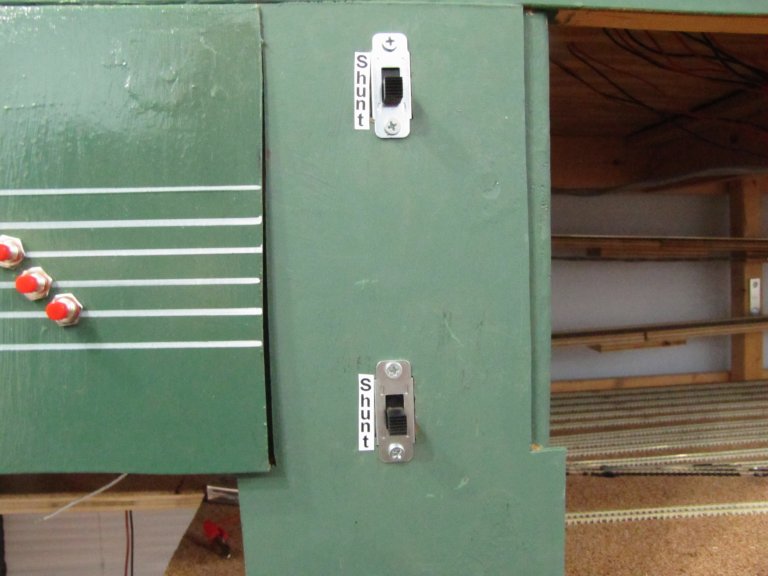 |
| These "Shunt" switches turn on the white lights on the four (two each) Ausfahrt Signals. There are two on either side of the mainline, so I paired them. |
 |
| Just below the Andechs wagen, you'll see one of two Sperrsignals I installed this weekend. The diagonal yellow indication means the track in the foreground is safe for travel through a switch that is located just to the left of this picture. The other aspect is two horizontal red lights. |
 |
| Two of the Ausfahrt Signals. The locomotive has the green light to head into the next block, which is the mainline heading north to Munich. Normally, the light for the next track over would be green as well. However, the switches for that track are not properly aligned for the mainline heading north. So, it gets the double red signal. That second signal is the one that is still giving me trouble. If I align the switches for that track, it would show green AND the double red. I'll try to fix that next weekend. |
 |
| The same two Ausfahrt signals. However, the locomotive has left the station, cleared the next block, but is in the following block after that - thus, the green/yellow aspect, which means proceed at reduced speed (or, be prepared to stop before the next block). |
 |
| Two Block Signals out in the countryside. The Block Signals only have a red aspect and a green aspect. |